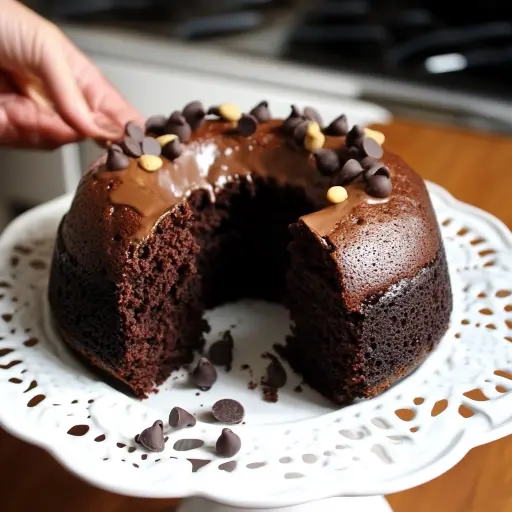
Description: This recipe proves that you don’t need a fancy oven or complicated ingredients to create a moist, deeply chocolatey cake. Using just one egg as the base, this single-serving or small-batch cake comes together quickly on the stovetop, offering a convenient and satisfying treat perfect for a solo indulgence or a last-minute dessert craving. The rich cocoa flavor, coupled with the sprinkle of melty chocolate chips, makes it a timeless classic, ready in under an hour.
Ingredients:
- 1 large egg (at room temperature for better emulsification)
- 1/3 cup granulated sugar (for sweetness and moistness)
- 1/4 cup vegetable oil (such as canola or sunflower, for moisture and a tender crumb)
- 1/3 cup all-purpose flour (provides structure)
- 2 tablespoons unsweetened cocoa powder (Dutch-processed recommended for richer flavor and darker color)
- 1/2 teaspoon baking powder (for leavening and a light, airy texture)
- 1/2 teaspoon pure vanilla extract (enhances the chocolate flavor)
- Chocolate chips (semi-sweet or dark, for topping – optional but highly recommended)
- Pinch of salt (enhances the flavors)
- Butter or cooking spray, for greasing the mold
Preparation:
Step 1: Prepare the Mold: Thoroughly grease a 5-inch round cake mold or heat-safe bowl (oven-safe if you choose the oven method) with butter or cooking spray. This will prevent the cake from sticking and ensure easy removal. A springform pan can be helpful, but isn’t required.
Step 2: Whisk the Egg and Sugar: In a medium-sized mixing bowl, crack in the egg. Using an electric mixer (handheld or stand mixer) or a whisk, beat the egg until light and frothy. Gradually add the granulated sugar, a tablespoon at a time, while continuing to beat.
Step 3: Achieve Stiff Peaks: Continue beating the egg and sugar mixture until it becomes pale yellow in color and noticeably thicker. You’re aiming for stiff peaks – when you lift the beaters (or whisk), the mixture should form a peak that holds its shape for a few seconds before slowly drooping. This step is crucial for creating a light and airy cake.
Step 4: Incorporate the Oil: Pour in the vegetable oil and beat for another minute, or until fully incorporated. Be careful not to overmix at this stage, as it can deflate the air you’ve whipped into the egg mixture.
Step 5: Sift Dry Ingredients: In a separate bowl, sift together the all-purpose flour, cocoa powder, baking powder, and a pinch of salt. Sifting ensures that there are no lumps and that the dry ingredients are evenly distributed throughout the batter.
Step 6: Combine Wet and Dry: Gradually add the sifted dry ingredients to the wet ingredients, mixing gently with a spatula or spoon. Fold the ingredients together until just combined. Avoid overmixing, as this can develop the gluten in the flour, resulting in a tough cake. A few streaks of flour are okay at this stage.
Step 7: Add Vanilla: Stir in the vanilla extract until evenly distributed.
Step 8: Pour into Mold: Pour the batter into the prepared 5-inch mold, spreading it evenly.
Step 9: Sprinkle with Chocolate Chips: Generously sprinkle chocolate chips on top of the batter.
Step 10: Preheat the Pan (Stovetop Method): Place a heavy-bottomed pan (cast iron is ideal) on the stovetop over medium heat. Cover the pan with a tight-fitting lid. Preheat the pan for 5 minutes. This creates a mini-oven effect inside the pan.
Step 11: Bake (Stovetop Method): Carefully place the mold containing the cake batter inside the preheated pan. Cover the pan tightly with the lid. Reduce the heat to low. Cook for 20-30 minutes, or until a toothpick inserted into the center of the cake comes out clean. The cooking time may vary depending on your stovetop and pan. Check the cake after 20 minutes, and if the top is getting too dark, you can place a piece of aluminum foil loosely over the mold to prevent burning.
Step 12: Bake (Oven Method): Alternatively, if using an oven, preheat it to 160°C (320°F). Place the mold on a baking sheet and bake for 20-30 minutes, or until a toothpick inserted into the center comes out clean.
Step 13: Cool and Serve: Once the cake is cooked, remove it from the pan (or oven) and let it cool in the mold for 10-15 minutes. This allows the cake to firm up slightly, making it easier to remove. Then, gently invert the cake onto a serving plate. Slice and serve warm or at room temperature.
Why You Will Love This Recipe:
- Simplicity: This recipe uses readily available ingredients and requires minimal effort. You don’t need any special equipment or baking skills.
- Convenience: The stovetop method eliminates the need for an oven, making it perfect for those without an oven or who want to save on energy.
- Quick: From start to finish, this cake can be ready in under an hour, satisfying your sweet cravings in no time.
- Single-Serving/Small Batch: The recipe is designed for a small serving, making it ideal for solo indulgences or small gatherings.
- Customizable: You can easily adapt the recipe to your preferences by adding different extracts, nuts, or spices. You could try almond extract instead of vanilla, or add a pinch of cinnamon or nutmeg.
- Moist and Delicious: Despite being a “no-oven” cake, it boasts a surprisingly moist and tender crumb, thanks to the oil and the gentle cooking method. The rich chocolate flavor is sure to please any chocolate lover.
Serving Suggestions:
- Dust with Powdered Sugar: A simple dusting of powdered sugar adds a touch of elegance.
- Serve with a Scoop of Ice Cream: Pair the warm cake with a scoop of vanilla, chocolate, or coffee ice cream for a decadent dessert.
- Drizzle with Chocolate Sauce: Add an extra layer of chocolatey goodness by drizzling warm chocolate sauce over the cake.
- Top with Whipped Cream and Berries: Create a more elaborate dessert by topping the cake with whipped cream and fresh berries (strawberries, raspberries, or blueberries).
- Enjoy with a Cup of Coffee or Tea: The cake is a perfect accompaniment to your favorite hot beverage.
Tips:
- Room Temperature Egg: Using an egg at room temperature helps it emulsify better, resulting in a smoother batter.
- Don’t Overmix: Overmixing the batter can lead to a tough cake. Mix until just combined.
- Low Heat is Key (Stovetop Method): Cooking the cake on low heat is essential to prevent it from burning on the bottom.
- Check for Doneness: Use a toothpick to check for doneness. Insert the toothpick into the center of the cake. If it comes out clean, the cake is ready.
- Adjust Sweetness to Taste: If you prefer a less sweet cake, you can reduce the amount of sugar slightly.
- Add a Glaze: For extra flavor, you can make a simple chocolate glaze by melting chocolate chips with a little bit of milk or cream.
- Use High-Quality Cocoa Powder: Using a good quality cocoa powder, like Dutch-processed, will result in a richer and more intense chocolate flavor.
- Experiment with Flavors: Try adding a pinch of cinnamon, espresso powder, or chopped nuts to the batter for a different flavor profile.
Prep Time: 10 minutes
Cook Time: 20-30 minutes
Total Time: 30-40 minutes
Nutritional Information:
- Note: Nutritional information is an estimate and may vary based on specific ingredients and portion sizes.
- Calories: Approximately 350-400 per serving
- Protein: Approximately 5-7 grams
- Sodium: Approximately 100-150 mg
Conclusion:
This one-egg chocolate cake is a testament to the fact that delicious desserts don’t have to be complicated or time-consuming. Whether you choose to bake it on the stovetop or in the oven, this recipe offers a quick, easy, and satisfying way to indulge in a classic chocolate cake experience. Its simplicity, combined with its customizable nature, makes it a perfect recipe for both beginner bakers and seasoned pros looking for a convenient treat. Enjoy this little piece of chocolate heaven!
Questions and Answers:
Q1: Can I use a different type of flour?
A: While all-purpose flour is the recommended choice for this recipe due to its readily available nature and consistent results, you can experiment with other flours. Cake flour would result in an even softer and more tender crumb, but you might need to slightly reduce the amount used. Gluten-free all-purpose blends can also be used, but be sure to choose a blend that is designed for baking and contains xanthan gum for binding. Keep in mind that using different flours may affect the texture and rise of the cake.
Q2: What if I don’t have a 5-inch mold?
A: A 5-inch mold is ideal for this recipe, but you can use a slightly larger mold or even a heat-safe bowl of similar size. The cooking time may need to be adjusted slightly depending on the size and shape of your mold. Avoid using a mold that is significantly larger, as the cake may spread too thin and become dry. You can also divide the batter into two smaller ramekins for individual servings.
Q3: Can I make this recipe vegan?
A: Yes, with some substitutions, you can make this recipe vegan. Replace the egg with a flax egg (1 tablespoon of ground flaxseed mixed with 3 tablespoons of water, let sit for 5 minutes). Ensure your chocolate chips are dairy-free. The rest of the ingredients are already plant-based. Be aware that the texture may differ slightly from the original recipe.
Q4: How do I prevent the cake from sticking to the pan, especially when using the stovetop method?
A: Thoroughly greasing the mold is crucial for preventing the cake from sticking. Use butter or cooking spray to generously coat the entire inside of the mold, paying attention to the bottom and sides. You can also dust the greased mold with a light coating of cocoa powder or flour to further prevent sticking. If you’re concerned about sticking, you can line the bottom of the mold with parchment paper.
Q5: My cake is getting too dark on top while cooking on the stovetop. What should I do?
A: If the cake is getting too dark on top before it is fully cooked, you can loosely cover the mold with a piece of aluminum foil. This will help to deflect some of the heat and prevent the top from burning while the inside continues to cook. Be sure to keep the heat on low to prevent scorching the bottom of the cake.