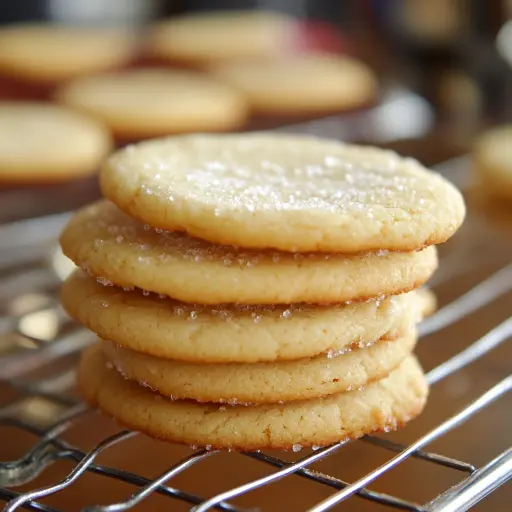
Description: Indulge in the simplicity of these melt-in-your-mouth butter cookies! With just three essential ingredients, these cookies are a testament to how deliciousness can be achieved with minimal effort. Perfect for beginner bakers or anyone craving a quick and satisfying treat. They are buttery, crumbly, and subtly sweet, making them a perfect accompaniment to your coffee or tea, or simply enjoyed on their own. The optional addition of vanilla extract elevates the flavor profile, adding a hint of warmth and depth. Get ready to experience the pure joy of homemade cookies without the fuss!
Ingredients:
- 1 cup (225g) unsalted butter, softened to room temperature. The quality of the butter is crucial! Choose a high-fat European-style butter if possible for an even richer flavor and more tender texture. Make sure your butter is truly soft; it should yield easily to gentle pressure but not be melted. This ensures proper creaming with the sugar.
- 1/2 cup (100g) granulated sugar. Granulated sugar provides the necessary sweetness and also helps to create a delicate, slightly crispy edge on the cookies. It’s important to measure accurately for consistent results.
- 2 cups (250g) all-purpose flour. Use standard all-purpose flour, spooned and leveled into the measuring cup for accuracy. Avoid packing the flour, as this will result in drier, denser cookies.
- (Optional) 1 teaspoon vanilla extract. While technically breaking the “3-ingredient” rule, a dash of vanilla extract dramatically enhances the flavor of these cookies. Consider it a highly recommended addition!
Preparation:
- Step 1: Preheat and Prepare: Begin by preheating your oven to 350°F (175°C). This is essential for consistent baking and prevents the cookies from spreading too thin before they set. Line a baking sheet with parchment paper. Parchment paper is your best friend here; it prevents sticking, makes cleanup a breeze, and ensures the cookies bake evenly without browning excessively on the bottom. Avoid using wax paper as it is not heat resistant and can melt in the oven. If you don’t have parchment, a lightly greased baking sheet is an alternative, but watch the cookies closely to prevent burning.
- Step 2: Cream Butter and Sugar: In a large mixing bowl, using an electric mixer (handheld or stand mixer), beat the softened butter and granulated sugar together until the mixture is light and fluffy. This process, known as “creaming,” is crucial for creating a tender and airy texture. Creaming incorporates air into the batter, which helps the cookies rise properly and become less dense. Beat on medium speed for about 3-5 minutes, scraping down the sides of the bowl occasionally to ensure everything is evenly incorporated. The mixture should become noticeably paler and fluffier as it creams. If you don’t have an electric mixer, you can cream the butter and sugar by hand, but it will require significant elbow grease and patience!
- Step 3: Incorporate Flour: Gradually add the all-purpose flour to the creamed butter and sugar mixture. Add the flour in stages, about a half cup at a time, and mix on low speed until just combined. Be careful not to overmix the dough once the flour is added. Overmixing develops the gluten in the flour, which will result in tough, chewy cookies rather than the desired tender, crumbly texture. Stop mixing as soon as the flour is incorporated. The dough will be slightly sticky, but that’s perfectly normal. If you’re adding vanilla extract, incorporate it at this stage.
- Step 4: Shape the Cookies: Roll the dough into 1-inch balls using your hands. A small cookie scoop can help ensure uniformity, which is important for even baking. Place the dough balls onto the prepared baking sheet, leaving about 1-2 inches of space between each cookie to allow for spreading during baking.
- Step 5: Press and Bake: Use a fork to gently press down each ball, creating a crisscross pattern on the top of each cookie. This not only flattens the cookies but also adds a decorative touch. Dip the fork in a little bit of sugar between pressing each cookie to prevent it from sticking. Bake in the preheated oven for 12-15 minutes, or until the edges are lightly golden. Keep a close eye on them, as they can brown quickly. The centers of the cookies should still be soft and slightly pale.
- Step 6: Cool and Enjoy: Let the cookies cool on the baking sheet for about 5 minutes before transferring them to a wire rack to cool completely. This allows them to firm up slightly and prevents them from breaking when you move them. Resist the urge to eat them straight from the oven – they will be much more enjoyable once they have cooled slightly.
Why You Will Love This Recipe:
These 3-ingredient butter cookies are a revelation in simplicity and flavor. You’ll love them because:
- They are incredibly easy to make. Perfect for beginner bakers or those short on time.
- The ingredient list is short and sweet. Chances are you already have these ingredients in your pantry.
- They are incredibly delicious. The buttery, crumbly texture and subtle sweetness are simply irresistible.
- They are versatile. You can easily customize them with extracts, spices, or decorations.
- They are a crowd-pleaser. Everyone loves a classic butter cookie!
- Minimal cleanup: With few ingredients involved, the cleanup is as easy as the prep!
Serving Suggestions:
- Enjoy them with a cup of hot coffee, tea, or cocoa.
- Serve them as a simple dessert after a meal.
- Pack them in lunchboxes for a sweet treat.
- Decorate them with frosting, sprinkles, or chocolate for special occasions.
- Pair them with a scoop of vanilla ice cream for a decadent dessert.
- Crumble them over yogurt or fruit for added flavor and texture.
- Give them as a homemade gift.
Tips:
- Use high-quality butter for the best flavor.
- Make sure the butter is properly softened before creaming.
- Avoid overmixing the dough.
- Don’t overbake the cookies; they should be soft in the center.
- Store the cookies in an airtight container to maintain their freshness.
- Experiment with different extracts, such as almond, lemon, or peppermint.
- Add a pinch of salt to the dough to enhance the flavor.
- For extra flavor, brush the cookies with melted butter after baking and sprinkle with sugar.
- Freeze the dough balls for easy baking later.
Prep Time: 10 minutes Cook Time: 12-15 minutes Total Time: 22-25 minutes
Nutritional Information: (approximate, per cookie)
- Calories: 75-85
- Protein: Less than 1g
- Sodium: 20-30mg (depending on butter)
Conclusion:
These 3-ingredient butter cookies are a testament to the fact that simple ingredients can create extraordinary results. They are perfect for satisfying your sweet tooth without the fuss, and their buttery, crumbly texture is sure to delight. Whether you’re a beginner baker or a seasoned pro, this recipe is a must-try. So gather your ingredients, preheat your oven, and get ready to experience the pure joy of homemade butter cookies!
Questions and Answers about this Recipe:
Q1: Can I use salted butter instead of unsalted butter?
A: While you can use salted butter, it’s generally recommended to use unsalted butter in baking recipes. This allows you to control the amount of salt in the recipe and ensures a more balanced flavor. If you do use salted butter, omit any additional salt called for in the recipe. Also, be aware that the salt content in salted butter can vary between brands, so the final flavor of the cookies may be slightly different.
Q2: What if my dough is too dry and crumbly?
A: If your dough is too dry and crumbly, it could be due to a few reasons. The most common culprit is using too much flour. Make sure you are measuring your flour accurately by spooning it into the measuring cup and leveling it off with a knife. Another reason could be that your butter was not softened enough. The butter needs to be properly softened to incorporate properly with the sugar. If the dough is still too dry, try adding a tablespoon or two of milk or cream, mixing until the dough comes together.
Q3: Can I freeze the butter cookie dough?
A: Yes, you can absolutely freeze the butter cookie dough! This is a great way to have cookies on hand whenever you want them. To freeze the dough, roll it into individual balls, place them on a baking sheet lined with parchment paper, and freeze until solid. Once frozen, transfer the dough balls to a freezer bag or airtight container. The dough can be frozen for up to 3 months. When you’re ready to bake, simply remove the desired number of dough balls from the freezer and bake as directed, adding a few extra minutes to the baking time if needed.
Q4: Can I add chocolate chips to these cookies?
A: Absolutely! Feel free to add about 1/2 cup of chocolate chips (milk, semi-sweet, or dark, whatever you prefer) to the dough along with the flour. You can also add other mix-ins like chopped nuts, dried cranberries, or sprinkles.
Q5: My cookies spread out too much during baking. What did I do wrong?
A: There are a few reasons why your cookies might have spread out too much. One reason could be that your butter was too warm or even melted. The butter should be softened but still hold its shape. Another reason could be that you didn’t chill the dough before baking. Chilling the dough helps to prevent it from spreading too much in the oven. Finally, make sure your oven temperature is accurate, since too low of a temperature may lead to excessive spreading.