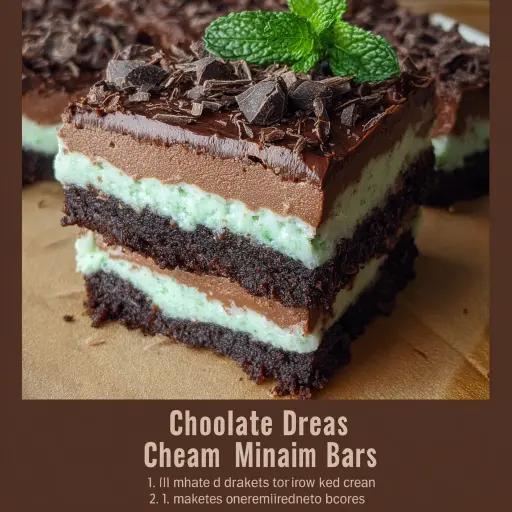
Description: Indulge in the refreshing layers of these Chocolate Mint Dream Bars, a delightful dessert that combines the rich flavors of chocolate with the cool, invigorating taste of mint. These bars are perfect for any occasion, offering a harmonious blend of textures and tastes that will leave everyone craving more. Whether it’s a holiday gathering, a summer barbecue, or just a special treat for your family, these bars are sure to be a hit.
Ingredients:
For the Crust:
- 30 chocolate sandwich cookies (like Oreos), finely crushed to a sand-like consistency – approximately 1 ½ cups of crushed cookies
- 5 tablespoons (2.5 oz or 70g) unsalted butter, melted until smooth and slightly golden
For the Cream Cheese Layer:
- 8 oz (226g) cream cheese, softened to room temperature for easy blending
- 1 cup (120g) powdered sugar, sifted to avoid lumps
- 1 cup (237ml) heavy whipping cream, chilled and whipped to stiff peaks
For the Mint Pudding Layer:
- 1 box (3.4 oz or 96g) instant vanilla pudding mix, ensure it is instant for quick thickening
- 1 ½ cups (355ml) cold milk, any kind (whole, 2%, almond, soy, etc.) will work
- ½ teaspoon peppermint extract, pure extract for the best flavor
- Green food coloring (optional), gel or liquid, for a vibrant minty look
For the Topping:
- 1 ½ cups (approximately 4 oz or 113g) thawed whipped topping (like Cool Whip), thawed in the refrigerator to maintain its fluffy texture
- ½ cup (approximately 2 oz or 56g) chopped Andes Mints or mint chocolate chips, evenly sized pieces for easy sprinkling
Preparation:
Step 1: Prepare the Crust (10 minutes)
Begin by thoroughly crushing the chocolate sandwich cookies. You can use a food processor for a fine, even crush, or place the cookies in a resealable bag and crush them with a rolling pin. Ensure there are no large chunks remaining to create a smooth, firm crust. In a medium-sized mixing bowl, combine the crushed cookies with the melted butter. Mix well until the crumbs are evenly moistened and the mixture resembles wet sand.
Step 2: Press the Crust and Chill (15 minutes + chilling time)
Transfer the cookie crumb mixture into a 9×9-inch baking dish. Use the bottom of a measuring cup or your fingers to firmly press the mixture into an even layer across the bottom of the dish. Ensure the crust is compact to prevent it from crumbling when the bars are cut. Cover the dish with plastic wrap and chill in the refrigerator for at least 15 minutes. This step is crucial as it allows the butter to solidify, creating a stable base for the subsequent layers. For a firmer crust, you can chill it for up to 30 minutes.
Step 3: Make the Cream Cheese Layer (10 minutes)
In a large mixing bowl, beat the softened cream cheese with an electric mixer until it is smooth and free of lumps. Gradually add the sifted powdered sugar, continuing to beat until the mixture is light and fluffy. Sifting the powdered sugar helps prevent any lumps from forming, ensuring a smooth texture. In a separate bowl, whip the chilled heavy whipping cream to stiff peaks. Gently fold the whipped cream into the cream cheese mixture until just combined. Be careful not to overmix, as this can deflate the whipped cream and result in a less airy layer.
Step 4: Layer the Cream Cheese (5 minutes)
Remove the chilled crust from the refrigerator. Spread the cream cheese mixture evenly over the top of the crust, ensuring it reaches all edges of the dish. Use an offset spatula or the back of a spoon to create a smooth, even surface. This layer provides a creamy, tangy contrast to the chocolate crust and the minty pudding.
Step 5: Prepare the Mint Pudding Layer (5 minutes)
In a separate medium-sized bowl, whisk together the instant vanilla pudding mix and cold milk until the mixture begins to thicken. This should take about 2 minutes. Add the peppermint extract and a few drops of green food coloring (if using). Stir well to combine, ensuring the color is evenly distributed. Adjust the amount of food coloring to achieve your desired shade of green. The peppermint extract adds a refreshing mint flavor that complements the chocolate and cream cheese.
Step 6: Layer the Mint Pudding (5 minutes)
Carefully spread the mint pudding mixture over the cream cheese layer. Use the back of a spoon or an offset spatula to gently spread it evenly across the surface. Try not to disturb the cream cheese layer underneath. The pudding layer should be smooth and uniform, providing a vibrant contrast to the creamy white layer.
Step 7: Add the Topping (5 minutes)
Gently spread the thawed whipped topping over the mint pudding layer. Again, use an offset spatula or the back of a spoon to create a smooth, even surface. Sprinkle the chopped Andes Mints or mint chocolate chips evenly over the whipped topping. The mint chocolate chips add an extra burst of mint flavor and a touch of chocolate crunch.
Step 8: Chill and Serve (4+ hours)
Cover the baking dish with plastic wrap and refrigerate the bars for at least 4 hours, or preferably overnight. This allows the layers to set completely and the flavors to meld together. Before serving, cut the bars into squares using a sharp knife. For clean cuts, you can dip the knife into warm water and wipe it clean between cuts.
Why You Will Love This Recipe
These Chocolate Mint Dream Bars are a true crowd-pleaser, offering a delightful combination of flavors and textures that everyone will adore. The rich, chocolatey crust provides a satisfying base, while the creamy cream cheese layer adds a tangy sweetness. The refreshing mint pudding layer offers a cool, invigorating contrast, and the whipped topping and mint chocolate chips provide the perfect finishing touch. These bars are easy to make, require no baking, and can be prepared ahead of time, making them ideal for parties, holidays, or any special occasion. They are also incredibly versatile; you can customize the recipe to suit your preferences by using different types of cookies, extracts, or toppings. Whether you’re a chocolate lover, a mint enthusiast, or simply looking for a delicious and impressive dessert, these Chocolate Mint Dream Bars are sure to become a new favorite.
COOKING Rating
Easy
Serving Suggestions:
- Serve chilled directly from the refrigerator.
- Garnish with extra mint leaves or a dusting of cocoa powder for an elegant presentation.
- Pair with a scoop of vanilla ice cream or a dollop of whipped cream for an extra indulgent treat.
- Serve with a cup of hot cocoa or coffee to balance the coolness of the bars.
- Cut into smaller squares for a bite-sized treat at parties or gatherings.
Tips:
- Ensure the cream cheese is fully softened to prevent lumps in the cream cheese layer.
- Sift the powdered sugar to avoid any clumps and ensure a smooth cream cheese mixture.
- When whipping the heavy cream, use a chilled bowl and whisk for best results.
- Do not overmix the cream cheese layer after adding the whipped cream to maintain its airy texture.
- Adjust the amount of peppermint extract to suit your taste preferences.
- Use gel food coloring for a more vibrant color with less liquid.
- Chill the bars for at least 4 hours to allow the layers to set completely.
- For easier cutting, dip the knife in warm water and wipe it clean between cuts.
- Store leftover bars in an airtight container in the refrigerator for up to 3 days.
Prep Time:
30 minutes
Cook Time:
0 minutes (no baking required)
Total Time:
4 hours 30 minutes (includes chilling time)
Nutritional Information:
(Note: Nutritional information is an estimate and can vary based on specific ingredients and serving sizes.)
Calories:
Approximately 320 kcal per bar
Protein:
Approximately 4 grams per bar
Sodium:
Approximately 150 milligrams per bar
Conclusion
The Chocolate Mint Dream Bars are a delightful dessert that combines the best of both worlds: the rich, comforting flavor of chocolate and the cool, refreshing taste of mint. With their layers of chocolate crust, creamy cream cheese, mint pudding, and whipped topping, these bars offer a symphony of flavors and textures that will tantalize your taste buds. Whether you’re hosting a party, celebrating a special occasion, or simply craving a sweet treat, these bars are sure to impress. Easy to make and requiring no baking, they are a convenient and delicious option for any dessert lover. So, gather your ingredients, follow the steps, and indulge in the dreamy goodness of these Chocolate Mint Dream Bars!
Questions and Answers about this Recipe
- Question 1: Can I use a different type of cookie for the crust?
- Answer: Absolutely! While chocolate sandwich cookies like Oreos provide a classic chocolate flavor, you can experiment with other types of cookies. Consider using chocolate graham crackers, shortbread cookies, or even gluten-free cookies if you have dietary restrictions. Just ensure the cookies are finely crushed and can bind together with the melted butter to form a stable crust.
- Question 2: Can I make these bars ahead of time?
- Answer: Yes, these bars are perfect for making ahead of time! In fact, chilling them for at least 4 hours, or preferably overnight, allows the layers to set completely and the flavors to meld together. This makes them a convenient dessert option for parties, holidays, or any occasion where you want to prepare in advance. Just be sure to store them in an airtight container in the refrigerator until you’re ready to serve.
- Question 3: What can I use if I don’t have peppermint extract?
- Answer: If you don’t have peppermint extract on hand, you can try using other mint-flavored extracts or ingredients. Mint oil is a more concentrated option, so use it sparingly. Alternatively, you can steep fresh mint leaves in warm milk for about 30 minutes, then strain the milk and use it in the pudding layer for a natural mint flavor. If you’re using mint-flavored candies, such as crushed peppermints, add them to the pudding layer and adjust the sweetness as needed.
- Question 4: Can I freeze these bars?
- Answer: While you can freeze these bars, the texture of the cream cheese and whipped topping may change slightly upon thawing. To freeze them, cut the bars into individual squares and wrap them tightly in plastic wrap, then place them in a freezer-safe container. Thaw them in the refrigerator for several hours before serving. Keep in mind that the texture may not be as smooth as freshly made bars, but they will still be delicious.
- Question 5: What if I don’t have a 9×9 inch baking dish?
- Answer: If you don’t have a 9×9 inch baking dish, you can use a similar-sized dish, such as an 8×8 inch or 9×13 inch dish. Keep in mind that using a smaller dish will result in thicker bars, while using a larger dish will result in thinner bars. You may need to adjust the chilling time accordingly. Alternatively, you can use individual dessert cups or ramekins to create individual servings of the Chocolate Mint Dream Bars.