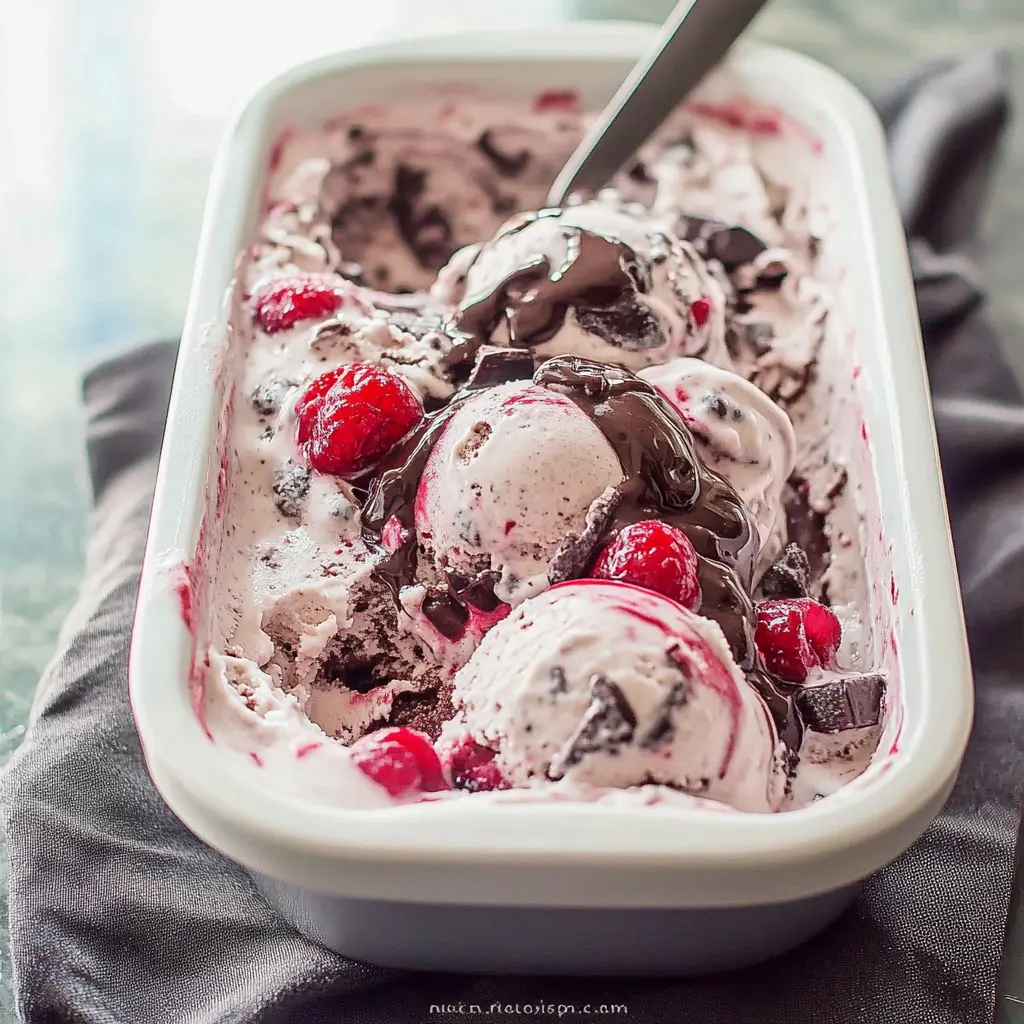
Description: This No-Churn Chocolate Cherry Cheesecake Ice Cream is a decadent and delightful frozen dessert that combines the creamy richness of cheesecake with the classic flavors of chocolate and cherry. It’s incredibly easy to make, requiring no ice cream maker, and delivers a smooth, luscious texture that will rival your favorite store-bought brands. The combination of Oreo cookie crust, creamy cheesecake base, and sweet-tart cherry pie filling creates a symphony of flavors and textures that’s perfect for any occasion.
Why You Will Love This Recipe:
- Effortless Preparation: No ice cream maker? No problem! This recipe is designed for simplicity, using readily available ingredients and a straightforward mixing process. You’ll be enjoying homemade ice cream in no time.
- Incredible Flavor: The combination of creamy cheesecake, crunchy Oreo cookies, and sweet-tart cherry pie filling is a flavor explosion in every bite. It’s a delightful twist on classic ice cream flavors that will tantalize your taste buds.
- Customizable: Feel free to experiment with different cookie flavors, pie fillings, and mix-ins to create your own unique ice cream masterpiece. The possibilities are endless!
- Perfect for Any Occasion: Whether it’s a summer barbecue, a cozy night in, or a special celebration, this ice cream is the perfect treat to share with friends and family. It’s guaranteed to be a crowd-pleaser.
- No-Churn Magic: The secret to this recipe is the combination of sweetened condensed milk and whipped topping, which creates a creamy, smooth texture without the need for churning. It’s a game-changer for homemade ice cream.
Ingredients:
- 12 Oreo Cookies
- 4 tablespoons Butter, softened
- 8 ounces Cream Cheese, softened
- 8 ounces Whipped Topping, thawed
- 14 ounces Sweetened Condensed Milk
- ½ cup Vanilla Yogurt
- 1 teaspoon Vanilla Extract
- 1 cup Cherry Pie Filling
Preparation:
Step 1: Prepare the Oreo Cookie Base. Place the Oreo cookies and softened butter in a food processor. Pulse until the cookies are finely crushed and the mixture begins to clump together, forming a crumbly base. This will act as a delicious crust throughout the ice cream. If you don’t have a food processor, you can place the Oreos in a ziplock bag and crush them with a rolling pin, then mix in the softened butter.
Step 2: Blend the Cheesecake Base. In a large bowl, combine the softened cream cheese, thawed whipped topping, sweetened condensed milk, vanilla yogurt, and vanilla extract. Use a hand mixer (or a stand mixer) to blend these ingredients thoroughly until the mixture is smooth, creamy, and free of any lumps. This forms the rich and decadent cheesecake base of the ice cream. Ensure the cream cheese is properly softened for the best texture.
Step 3: Assemble the Ice Cream. Pour the prepared Oreo cookie mixture into the center of the cheesecake base. Then, carefully spoon the cherry pie filling on top of the cookie mixture. It’s important not to stir at this stage to maintain the distinct layers of flavor and texture.
Step 4: Gently Fold. Using a rubber spatula, gently fold the Oreo cookie mixture and cherry pie filling into the cheesecake base. Perform only two or three strokes to incorporate the ingredients. Overmixing will cause the cookies to lose their texture and the pie filling to blend too much into the base, so be careful not to overdo it.
Step 5: Freeze. Pour the ice cream mixture into a bread loaf pan or your preferred freezer-safe container. Cover the container tightly with plastic wrap or a lid to prevent freezer burn. Freeze for at least 4 hours, or preferably overnight, to allow the ice cream to fully set.
COOKING Rating: Easy
Serving Suggestions:
- Serve the No-Churn Chocolate Cherry Cheesecake Ice Cream in bowls or cones for a classic ice cream experience.
- Top with extra cherry pie filling, whipped cream, and a sprinkle of crushed Oreo cookies for an extra touch of indulgence.
- Create an ice cream sundae bar with a variety of toppings, such as chocolate sauce, caramel sauce, sprinkles, and nuts.
- Serve alongside a slice of warm chocolate cake or brownie for a decadent dessert pairing.
- Make ice cream sandwiches by scooping the ice cream between two Oreo cookies or graham crackers.
Tips:
- Ensure that the cream cheese is fully softened before blending to avoid lumps in the ice cream base.
- Do not overmix the ingredients to maintain the distinct layers of flavor and texture.
- Freeze the ice cream for at least 4 hours to allow it to fully set.
- If the ice cream is too hard to scoop, let it sit at room temperature for a few minutes to soften slightly.
- For a richer chocolate flavor, add 1/4 cup of unsweetened cocoa powder to the cheesecake base.
- Experiment with different pie fillings, such as blueberry, strawberry, or apple, for a variety of flavor combinations.
- Add chopped nuts, chocolate chips, or other mix-ins for added texture and flavor.
Prep Time: 15 minutes Cook Time: 0 minutes Total Time: 4 hours 15 minutes (includes freezing time)
Nutritional Information:
- Calories: Approximately 350 per serving (estimated)
- Protein: Approximately 5 grams per serving (estimated)
- Sodium: Approximately 150 milligrams per serving (estimated)
Conclusion:
This No-Churn Chocolate Cherry Cheesecake Ice Cream is a delightful and easy-to-make dessert that’s perfect for any occasion. The combination of creamy cheesecake, crunchy Oreo cookies, and sweet-tart cherry pie filling creates a symphony of flavors and textures that will tantalize your taste buds. Whether you’re a seasoned ice cream maker or a beginner in the kitchen, this recipe is guaranteed to be a success. So gather your ingredients, follow the simple steps, and prepare to indulge in a homemade ice cream experience that’s truly unforgettable.
Questions and Answers about this recipe:
Q1: Can I use low-fat cream cheese and whipped topping to make this recipe healthier?
A: While you can use low-fat versions of these ingredients, keep in mind that it may affect the texture and flavor of the ice cream. Low-fat cream cheese might not blend as smoothly, and low-fat whipped topping may not hold its shape as well. The resulting ice cream may be slightly less creamy and rich, but it can still be a delicious and lighter option.
Q2: Can I use a different type of cookie instead of Oreos?
A: Absolutely! Feel free to experiment with different types of cookies, such as chocolate chip cookies, graham crackers, or even peanut butter cookies. The key is to choose a cookie that complements the other flavors in the ice cream. Just make sure to adjust the amount of butter accordingly, depending on the dryness of the cookie.
Q3: Can I make this ice cream ahead of time and store it in the freezer for longer than 4 hours?
A: Yes, you can definitely make this ice cream ahead of time. Once it’s fully frozen (after about 4 hours), you can store it in the freezer for up to 2-3 weeks. Just make sure to keep it tightly covered to prevent freezer burn. When you’re ready to serve, let it sit at room temperature for a few minutes to soften slightly for easier scooping.
Q4: What if I don’t have a food processor? Can I still make the Oreo cookie base?
A: Yes, you can still make the Oreo cookie base without a food processor. Simply place the Oreos in a ziplock bag and crush them with a rolling pin until they are finely crushed. Then, mix in the softened butter with a fork until the mixture becomes crumbly and sticks together. It might take a little more effort, but it will still work perfectly well.
Q5: Can I add other mix-ins to this ice cream, such as chocolate chips or nuts?
A: Absolutely! Feel free to get creative and add other mix-ins to customize your ice cream. Chocolate chips, chopped nuts, mini marshmallows, or even a swirl of caramel sauce would all be delicious additions. Just remember to add them after you’ve gently folded in the Oreo cookie mixture and cherry pie filling to prevent them from sinking to the bottom of the container.