Description of this recipe
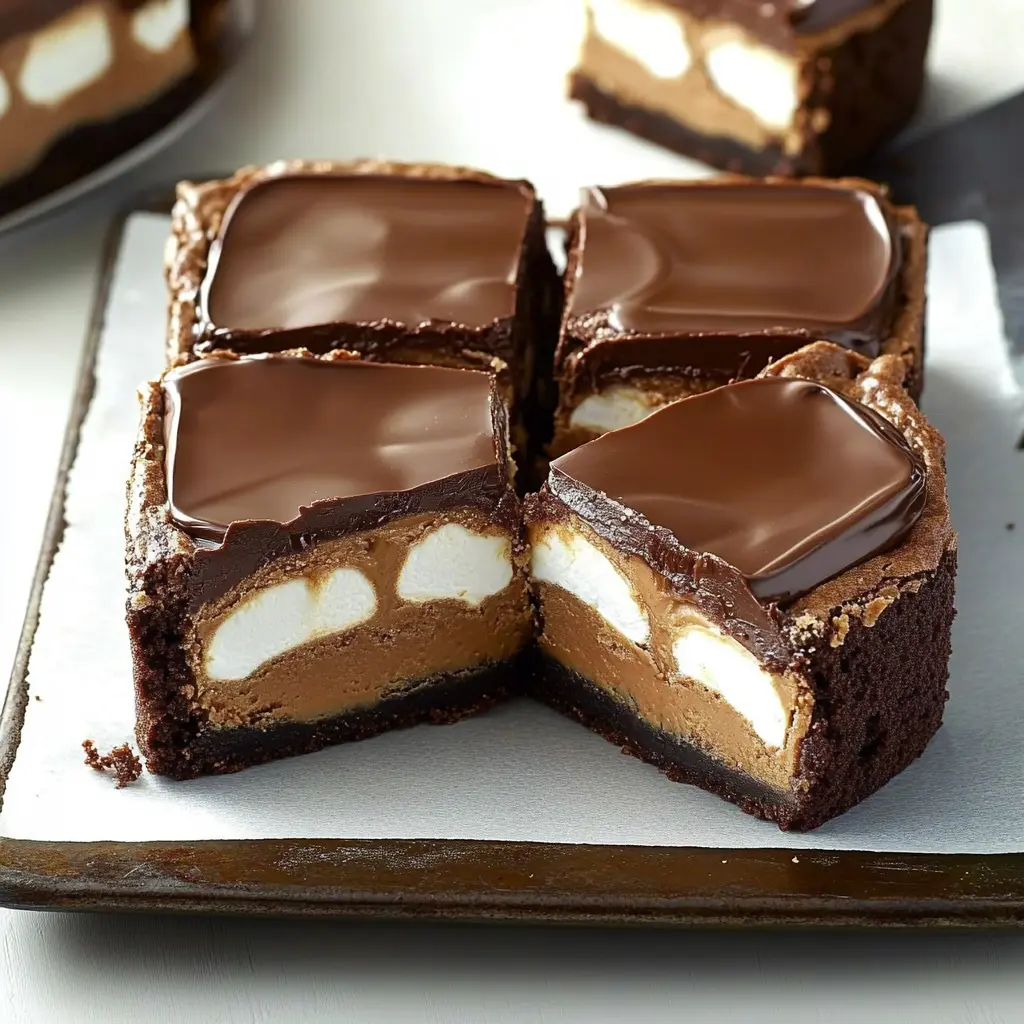
These Layered Chocolate Marshmallow Peanut Butter Brownies are a decadent treat that combines the rich flavors of chocolate and peanut butter with the gooey sweetness of marshmallows. This recipe creates a delightful multi-layered brownie experience, perfect for satisfying your sweet tooth and impressing friends and family. With a fudgy brownie base, a creamy peanut butter middle, and a luscious marshmallow-chocolate topping, these brownies are a true indulgence.
Why you will love this recipe
You’ll adore these brownies because they’re incredibly delicious and offer a delightful textural contrast in every bite. The combination of the soft, fudgy brownie, the smooth, rich peanut butter, and the sweet, gooey marshmallow frosting creates a symphony of flavors that will leave you craving more. They are also relatively easy to make, despite the impressive layered effect. This recipe is perfect for special occasions, holidays, or any time you want to treat yourself to something extraordinary. The process of creating these brownies is also enjoyable, providing a sense of accomplishment and satisfaction. These brownies are guaranteed to be a crowd-pleaser, making them a go-to recipe for parties and gatherings. Finally, the unique combination of flavors sets these brownies apart from typical desserts, offering a memorable and delightful experience.
Ingredients:
For the Brownie Layer:
- 1 cup (2 sticks) butter, divided
- 1/2 cup baking cocoa, divided
- 4 large eggs, room temperature
- 2 cups sugar
- 1 teaspoon vanilla extract
- 1 1/2 cups all-purpose flour
- 1/2 teaspoon salt
For the Peanut Butter Layer:
- 1 jar (16.3 ounces) chunky peanut butter
- 1/3 cup 2% milk
For the Marshmallow-Chocolate Frosting:
- 1/4 cup baking cocoa
- 1/2 cup (1 stick) butter
- 10 large marshmallows
- 2 cups confectioners’ sugar
Preparation:
Step 1: Prepare the Oven and Pan
Preheat your oven to 350°F (175°C). This temperature ensures the brownies bake evenly and achieve the perfect fudgy texture. While the oven is heating, grease a 15x10x1-inch baking pan. The greasing prevents the brownies from sticking and ensures they come out cleanly. You can use butter, cooking spray, or line the pan with parchment paper for easier removal. Ensure the entire pan is coated to prevent any sticking.
Step 2: Melt Butter and Cocoa for Brownie Layer
In a small saucepan, melt 1 cup (2 sticks) of butter over low heat. Once melted, stir in 1/2 cup of baking cocoa until the mixture is smooth and well combined. This creates the base for the rich chocolate flavor of the brownies. Remove the saucepan from the heat and set aside. Ensure the mixture is smooth to avoid any lumps in the brownie batter. The warmth from the melted butter helps the cocoa dissolve evenly, enhancing the chocolate flavor.
Step 3: Mix Eggs, Sugar, and Vanilla
In a large bowl, beat 4 large eggs, 2 cups of sugar, and 1 teaspoon of vanilla extract until the mixture is well blended. Use an electric mixer or whisk vigorously by hand until the mixture becomes light and slightly frothy. Room temperature eggs incorporate more easily and create a smoother batter. The sugar helps create a tender crumb and adds sweetness. Vanilla extract enhances the overall flavor profile of the brownies.
Step 4: Combine Dry and Wet Ingredients
In a separate bowl, combine 1 1/2 cups of all-purpose flour and 1/2 teaspoon of salt. Gradually add the dry ingredients to the egg mixture, beating until just combined. Avoid overmixing, as this can lead to tough brownies. Then, pour in the melted butter and cocoa mixture and beat until everything is well combined, forming a smooth and luscious brownie batter. The salt enhances the sweetness and balances the flavors.
Step 5: Bake the Brownie Layer
Spread the brownie batter evenly into the prepared baking pan. Use a spatula to ensure the batter reaches all corners of the pan for uniform thickness. Bake in the preheated oven for 18–22 minutes, or until a toothpick inserted in the center comes out clean. Be careful not to overbake, as this can result in dry brownies. The baking time may vary depending on your oven, so keep a close eye on the brownies. Once baked, remove from the oven and let it cool for 3–4 minutes before adding the peanut butter layer.
Step 6: Prepare and Spread Peanut Butter Layer
In the microwave, soften 1 jar (16.3 ounces) of chunky peanut butter for about 30 seconds. This makes it easier to spread. Stir the peanut butter until it’s smooth and spreadable. Evenly spread the softened peanut butter over the warm brownies. Ensure the peanut butter layer is uniform for consistent flavor in every bite. Chill the brownies for 45 minutes until the peanut butter layer is set. This prevents the marshmallow frosting from melting into the peanut butter.
Step 7: Make the Marshmallow-Chocolate Frosting
In a heavy saucepan, combine 1/3 cup of 2% milk, the remaining 1/4 cup of baking cocoa, the remaining 1/2 cup (1 stick) of butter, and 10 large marshmallows. Cook over medium-low heat, stirring constantly, until the mixture is smooth and the marshmallows are completely melted. This creates the creamy, sweet base for the frosting.
Step 8: Add Confectioners’ Sugar and Frost
Remove the saucepan from the heat and gradually stir in 2 cups of confectioners’ sugar until the frosting is smooth and glossy. Ensure there are no lumps in the frosting for a perfect finish. Immediately spread the marshmallow-chocolate frosting over the chilled peanut butter layer. Work quickly to prevent the frosting from setting before it’s spread evenly.
Step 9: Chill and Slice
Refrigerate the brownies for at least 30 minutes before slicing into squares. This allows the frosting to set completely, making it easier to cut and serve. Use a sharp knife to cut the brownies into neat squares. For cleaner cuts, you can dip the knife in warm water and wipe it clean between slices.
COOKING Rating:
Intermediate
Serving Suggestions:
These brownies are fantastic on their own, but you can elevate them further with these serving suggestions:
- A la Mode: Serve a warm brownie with a scoop of vanilla ice cream for a classic dessert pairing.
- Chocolate Sauce: Drizzle with chocolate sauce or ganache for an extra layer of chocolate richness.
- Whipped Cream: Top with a dollop of freshly whipped cream for a light and airy contrast.
- Berries: Serve alongside fresh berries like raspberries or strawberries for a touch of tartness and color.
- Coffee: Enjoy with a cup of hot coffee or espresso to complement the sweetness.
Tips:
- Room Temperature Eggs: Using room temperature eggs helps create a smoother batter and better emulsion.
- Don’t Overbake: Overbaking can result in dry brownies. Check for doneness with a toothpick, but remove them from the oven as soon as it comes out clean.
- Chill Time: Chilling the peanut butter layer and the finished brownies is crucial for easy slicing and a firm texture.
- Soft Peanut Butter: Softening the peanut butter in the microwave makes it easier to spread evenly over the brownies.
- Even Frosting: For a smooth frosting, stir in the confectioners’ sugar gradually and ensure there are no lumps.
Prep Time:
25 minutes
Cook Time:
22 minutes
Total Time:
1 hour 12 minutes (including chilling time)
Nutritional Information:
Note: Nutritional information is an estimate and can vary based on specific ingredients and portion sizes.
Per Serving (1 brownie):
- Calories: Approximately 450-500
- Protein: 8-10g
- Sodium: 150-200mg
Conclusion
These Layered Chocolate Marshmallow Peanut Butter Brownies are a delightful combination of flavors and textures that are sure to impress. With a fudgy brownie base, creamy peanut butter middle, and sweet marshmallow-chocolate topping, they offer a rich and satisfying dessert experience. Perfect for any occasion, these brownies are easy to make and guaranteed to be a hit. Enjoy baking and savoring this irresistible treat!
Questions and Answers About This Recipe:
Q1: Can I use natural peanut butter instead of processed peanut butter?
A: While you can use natural peanut butter, keep in mind that it tends to be runnier and may not set as firmly as processed peanut butter. If using natural peanut butter, you might want to add a tablespoon or two of confectioners’ sugar to help stabilize it. Additionally, stir the natural peanut butter very well before using it, as the oil tends to separate.
Q2: Can I make these brownies gluten-free?
A: Yes, you can make these brownies gluten-free by substituting the all-purpose flour with a gluten-free flour blend. Ensure the blend you use is designed for baking and contains xanthan gum or another binding agent to provide structure. Bob’s Red Mill Gluten-Free 1-to-1 Baking Flour is a good option. The rest of the ingredients are naturally gluten-free.
Q3: How do I prevent the peanut butter layer from mixing with the brownie layer?
A: To prevent the peanut butter layer from mixing with the brownie layer, make sure the brownie layer has cooled slightly before spreading the peanut butter. Soften the peanut butter in the microwave to make it easier to spread without pressing too hard on the brownie layer. Chilling the brownies after spreading the peanut butter will also help set the layer and keep it separate.
Q4: Can I use dark chocolate cocoa powder for a richer chocolate flavor?
A: Absolutely! Using dark chocolate cocoa powder will enhance the chocolate flavor and add a deeper, more intense richness to the brownies. Just substitute the regular baking cocoa with dark chocolate cocoa powder in the brownie batter and marshmallow-chocolate frosting.
Q5: How long can I store these brownies, and how should I store them?
A: These brownies can be stored in an airtight container at room temperature for up to 3 days or in the refrigerator for up to a week. Storing them in the refrigerator will help them stay firm and prevent the marshmallow frosting from becoming too soft. If storing them in the refrigerator, let them sit at room temperature for about 15-20 minutes before serving for the best texture. You can also freeze the brownies for up to 2-3 months. Wrap them tightly in plastic wrap and then in foil to prevent freezer burn. Thaw them in the refrigerator overnight before serving.