Description of this recipe
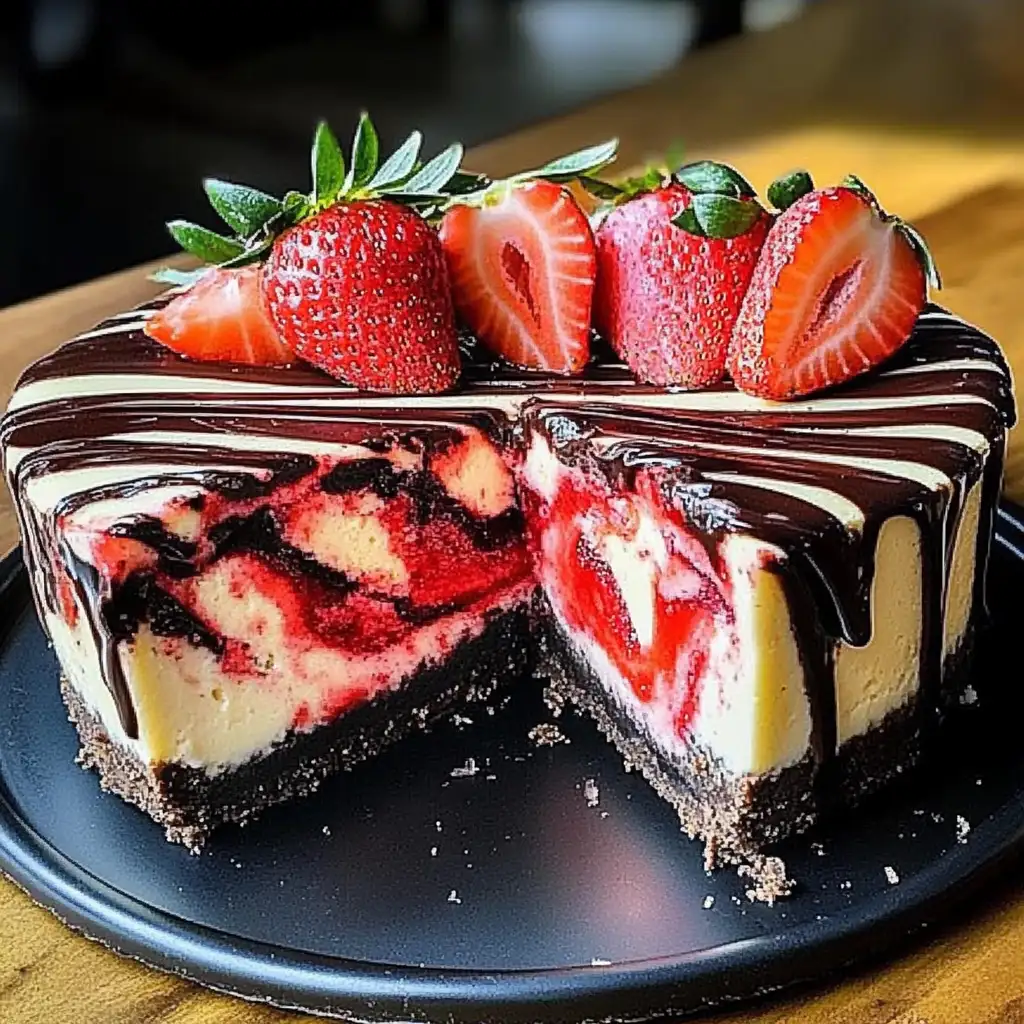
Indulge in the luxurious combination of creamy cheesecake, rich chocolate ganache, and the refreshing sweetness of strawberries with this stunning Chocolate Covered Strawberry Swirl Cheesecake. This dessert is a showstopper, perfect for special occasions, holidays, or any time you want to impress your family and friends. It starts with a crisp Oreo cookie crust, topped with a velvety smooth cheesecake filling swirled with homemade strawberry sauce, and finished with a decadent chocolate ganache and fresh strawberries. Every bite offers a delightful contrast of textures and flavors that will leave you craving more.
Why you will love this recipe
This recipe is a guaranteed crowd-pleaser for several reasons:
- Flavor Explosion: The combination of chocolate, strawberry, and cheesecake is a match made in dessert heaven. The tartness of the strawberries cuts through the richness of the cheesecake and chocolate, creating a balanced and harmonious flavor profile.
- Stunning Presentation: The strawberry swirl effect adds a beautiful visual appeal to the cheesecake. The glossy chocolate ganache and fresh strawberry garnish elevate the dessert to a restaurant-quality presentation that will wow your guests.
- Impressive Yet Achievable: While it may look complicated, this recipe is surprisingly straightforward. With clear instructions and readily available ingredients, even novice bakers can create this masterpiece.
- Perfect for Any Occasion: Whether it’s a birthday party, holiday gathering, or a simple weekend treat, this cheesecake is sure to be the highlight of any celebration.
- Customizable: You can easily adapt this recipe to suit your preferences. Use different types of cookies for the crust, experiment with other fruit swirls like raspberry or blueberry, or add chocolate chunks to the cheesecake filling for an extra dose of chocolate.
Ingredients:
For the Oreo Crust:
- 2 cups (200g) Oreo cookie crumbs (about 20-22 cookies)
- 4 tbsp (57g) unsalted butter, melted
For the Cheesecake Filling:
- 3 (8oz/226g) packages full-fat cream cheese, softened to room temperature
- 1 cup (200g) granulated sugar
- 1/4 cup (30g) all-purpose flour
- 1 tsp pure vanilla extract
- 1/2 tsp salt
- 3 large eggs, room temperature
- 1 cup (226g) sour cream, full-fat, room temperature
For the Strawberry Swirl:
- 1 cup fresh or frozen strawberries, chopped
- 1/4 cup granulated sugar
- 1 tbsp lemon juice
For the Chocolate Ganache:
- 1/2 cup heavy cream
- 1/2 cup semi-sweet chocolate chips or chopped chocolate
For Garnish:
- Fresh strawberries, halved
Preparation:
Step 1: Prepare the Oreo Crust
Begin by preheating your oven to 350°F (175°C). It’s crucial to wrap the outside of a 9-inch springform pan with a large piece of heavy-duty aluminum foil. This will prevent water from seeping into the cheesecake during the water bath. In a medium-sized mixing bowl, combine the Oreo cookie crumbs with the melted butter. Stir until the crumbs are evenly moistened and the mixture resembles wet sand. Press this mixture firmly and evenly into the bottom of the prepared springform pan. Use the back of a measuring cup or your fingers to create a smooth, compact crust. Bake the crust in the preheated oven for 10 minutes. This helps to set the crust and prevent it from becoming soggy. Once baked, remove the crust from the oven and let it cool completely on a wire rack.
Step 2: Make the Strawberry Swirl
While the crust is cooling, prepare the strawberry swirl. In a small saucepan, combine the chopped strawberries, granulated sugar, and lemon juice. Place the saucepan over medium heat and cook, stirring occasionally, until the strawberries begin to break down and the mixture thickens slightly. This process usually takes about 5-7 minutes. For a smoother consistency, use a fork or an immersion blender to mash the strawberries. If you prefer to remove the seeds, strain the mixture through a fine-mesh sieve. Allow the strawberry swirl to cool completely before using it in the cheesecake.
Step 3: Make the Cheesecake Filling
In a large mixing bowl, using a hand mixer or the bowl of a stand mixer fitted with the paddle attachment, beat the softened cream cheese on medium speed until it is smooth and creamy. This usually takes about 2-3 minutes. Make sure to scrape down the sides of the bowl periodically to ensure all the cream cheese is evenly mixed. Add the granulated sugar, flour, vanilla extract, and salt to the bowl. Beat on low speed until just combined. It’s important not to overmix at this stage, as overmixing can incorporate too much air into the batter, which can cause the cheesecake to crack during baking. Add the eggs one at a time, mixing on low speed until each egg is just incorporated. Finally, add the sour cream and mix on low speed until the batter is smooth and homogenous. Again, be careful not to overbeat the batter.
Step 4: Assemble the Cheesecake
Pour about two-thirds of the cheesecake batter over the cooled Oreo crust, spreading it evenly. Drop spoonfuls of the cooled strawberry sauce randomly over the cheesecake batter. Using a knife or a skewer, gently swirl the strawberry sauce into the batter to create a marbled effect. Be careful not to over-swirl, as this can muddy the colors and create a less defined swirl. Pour the remaining cheesecake batter over the swirl and repeat the swirling process with more strawberry sauce.
Step 5: Bake the Cheesecake
Place the springform pan inside a large roasting pan. Carefully pour hot water into the roasting pan until it reaches about 1 inch up the sides of the springform pan. This water bath, also known as a bain-marie, helps to bake the cheesecake evenly and prevent it from cracking. Bake at 350°F (175°C) for 1 hour to 1 hour and 15 minutes, or until the edges of the cheesecake are set and the center jiggles slightly. To test for doneness, gently shake the pan. The edges should be firm, but the center should still have a slight wobble. Turn off the oven, crack the door open slightly, and let the cheesecake cool inside the oven for 1 hour. This slow cooling process helps to prevent the cheesecake from cracking due to sudden temperature changes. Remove the cheesecake from the oven and water bath, and let it cool completely on a wire rack. Once cooled, cover the cheesecake and refrigerate it for at least 6 hours, or preferably overnight, to allow it to set completely.
Step 6: Make the Chocolate Ganache
Once the cheesecake is fully chilled, prepare the chocolate ganache. In a small saucepan, heat the heavy cream over medium heat until it just begins to simmer. Be careful not to boil the cream. Pour the hot cream over the chocolate chips or chopped chocolate in a heatproof bowl. Let the mixture sit for 5 minutes to allow the heat from the cream to melt the chocolate. After 5 minutes, whisk the mixture until it is smooth and glossy. If the ganache is too thick, add a tablespoon of hot cream at a time until you reach the desired consistency.
Step 7: Decorate and Serve
Carefully remove the chilled cheesecake from the springform pan. Place it on a serving platter. Drizzle the cooled chocolate ganache over the top of the cheesecake, allowing it to drip down the sides. Garnish the top of the cheesecake with fresh strawberry halves. Slice the cheesecake with a sharp knife and serve chilled. For best results, wipe the knife clean between each slice to create neat, even slices.
COOKING Rating:
- Difficulty: Medium
- Prep Time: 45 minutes
- Cook Time: 1 hour 15 minutes
- Cooling Time: 2 hours
- Chill Time: 6 hours (or overnight)
- Total Time: 9 hours (minimum)
Serving Suggestions:
- Serve the cheesecake chilled as a decadent dessert.
- Pair it with a scoop of vanilla ice cream or a dollop of whipped cream for an extra treat.
- Serve with a glass of dessert wine or a cup of coffee.
- Add a drizzle of strawberry sauce or a sprinkle of cocoa powder for added flavor and visual appeal.
Tips:
- Make sure your cream cheese is softened to room temperature before mixing. This will help to prevent lumps in the cheesecake filling.
- Do not overmix the cheesecake batter. Overmixing can incorporate too much air, which can cause the cheesecake to crack during baking.
- Use a water bath to bake the cheesecake. This will help to bake the cheesecake evenly and prevent it from cracking.
- Cool the cheesecake slowly. This will help to prevent it from cracking due to sudden temperature changes.
- Chill the cheesecake for at least 6 hours, or preferably overnight, to allow it to set completely.
- For a cleaner cut, dip your knife in hot water and wipe it clean between each slice.
Prep Time:
- 45 minutes
Cook Time:
- 1 hour 15 minutes
Total Time:
- 9 hours (minimum, including cooling and chilling)
Nutritional Information:
(Note: Nutritional information is an estimate and may vary based on specific ingredients and serving sizes.)
- Calories: Approximately 450-550 per serving
- Protein: Approximately 8-10 grams per serving
- Sodium: Approximately 200-250mg per serving
Conclusion
This Chocolate Covered Strawberry Swirl Cheesecake is a decadent and visually stunning dessert that is sure to impress. While it requires some time and effort, the result is well worth it. With its creamy cheesecake filling, sweet strawberry swirl, and rich chocolate ganache, this cheesecake is a true indulgence that is perfect for any special occasion. So, gather your ingredients, follow the instructions carefully, and get ready to create a dessert masterpiece that will have everyone begging for more.
Questions and Answers about this Recipe
Q1: Can I use frozen strawberries for the strawberry swirl?
A: Yes, you can definitely use frozen strawberries. Just make sure to thaw them completely and drain any excess liquid before using them. Frozen strawberries may release more liquid than fresh strawberries, so you might need to cook the swirl for a slightly longer time to achieve the desired consistency.
Q2: Can I make this cheesecake ahead of time?
A: Absolutely! In fact, it’s recommended to make this cheesecake at least a day in advance. This allows the cheesecake to chill and set completely, resulting in a firmer and more flavorful dessert. The cheesecake can be stored in the refrigerator for up to 3-4 days.
Q3: Can I use a different type of cookie for the crust?
A: Yes, you can substitute the Oreo cookie crumbs with other types of cookie crumbs, such as graham crackers, chocolate wafers, or even shortbread cookies. Just make sure to adjust the amount of butter accordingly to achieve a moist, sand-like consistency.
Q4: How do I prevent the cheesecake from cracking?
A: Cracking can be a common issue with cheesecakes, but there are several steps you can take to prevent it. First, make sure your cream cheese and eggs are at room temperature. Avoid overmixing the batter, and use a water bath during baking to ensure even heat distribution. Finally, cool the cheesecake slowly by turning off the oven, cracking the door open, and letting it cool inside for an hour before transferring it to a wire rack.
Q5: Can I freeze this cheesecake?
A: Yes, you can freeze this cheesecake. Wrap it tightly in plastic wrap, followed by a layer of aluminum foil, to prevent freezer burn. It can be stored in the freezer for up to 2-3 months. When ready to serve, thaw the cheesecake in the refrigerator overnight. The texture of the cheesecake may change slightly after freezing, but it will still be delicious. It’s best to add the chocolate ganache after thawing.

