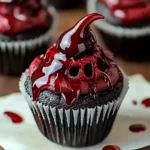
Description of this recipe
This Halloween cake recipe is designed to be both visually striking and delicious, perfect for adding a festive touch to your Halloween celebrations. Combining the moist texture of a classic cake with a spooky, colorful design, this recipe is sure to impress both kids and adults. The cake incorporates layers of flavor, from the subtle warmth of pumpkin pie spice to the rich sweetness of a cream cheese frosting.
Why you will love this recipe
You’ll adore this Halloween cake because it’s more than just a dessert; it’s a creative project that brings joy to the baking process. The recipe is adaptable to your skill level, allowing for simple designs or more elaborate decorations. The combination of the soft, flavorful cake and the tangy, sweet frosting creates a perfect balance that will satisfy any sweet tooth. It’s an excellent way to get into the Halloween spirit and create lasting memories with family and friends.
Ingredients:
For the Cake Batter
- 2 ½ cups all-purpose flour (300 g)
- 2 teaspoons baking powder
- ½ teaspoon baking soda
- ½ teaspoon salt
- 1 cup granulated sugar (200 g)
- ½ cup brown sugar (100 g)
- 1 cup unsalted butter (226 g), softened
- 3 large eggs
- 1 cup buttermilk (240 ml)
- 2 teaspoons vanilla extract
- 1 teaspoon pumpkin pie spice (optional)
- Orange or black food coloring (gel preferred)
For the Frosting
- 8 ounces cream cheese (225 g), softened
- ½ cup unsalted butter (113 g), softened
- 3 cups powdered sugar (360 g)
- 2 teaspoons vanilla extract
- Black, orange, and purple food coloring
For Decoration
- Halloween sprinkles
- Candy eyes
- Mini chocolate chips
- Edible glitter or shimmer powder
- Gummy worms or candy corn
Preparation:
Step 1: Prepare the Cake Batter:
Begin by preheating your oven to 350°F (175°C). This ensures that the cake bakes evenly. Grease two 9-inch round cake pans or one 9×13-inch rectangular pan. Greasing the pans prevents the cake from sticking, ensuring easy removal after baking. For extra insurance, line the bottoms of the pans with parchment paper cut to fit. Parchment paper acts as a non-stick barrier, making it simple to lift the cake layers out without breaking them.
Step 2: Mix Dry Ingredients:
In a medium-sized mixing bowl, combine the dry ingredients. This includes 2 ½ cups of all-purpose flour, 2 teaspoons of baking powder, ½ teaspoon of baking soda, and ½ teaspoon of salt. Whisk these ingredients together thoroughly. Whisking ensures that the baking powder and baking soda are evenly distributed throughout the flour, which is crucial for a cake that rises properly and has a light, airy texture. The salt enhances the other flavors in the cake, balancing the sweetness.
Step 3: Cream Butter and Sugar:
In a large mixing bowl, preferably using an electric mixer, cream together 1 cup of unsalted butter (softened) with 1 cup of granulated sugar and ½ cup of brown sugar. Beat these ingredients on medium speed until the mixture is light and fluffy. This process incorporates air into the butter and sugar, which is essential for creating a tender cake crumb. Creaming the butter and sugar adequately, typically for about 3-5 minutes, results in a smoother batter.
Step 4: Combine Wet and Dry Ingredients:
Add 3 large eggs, one at a time, to the creamed butter and sugar mixture, beating well after each addition. Eggs provide structure and richness to the cake. After the eggs are fully incorporated, mix in 2 teaspoons of vanilla extract. Vanilla extract enhances the overall flavor profile of the cake. Now, gradually add the dry ingredients to the wet ingredients, alternating with 1 cup of buttermilk. Begin and end with the dry ingredients. This method prevents the gluten in the flour from developing too much, which can result in a tough cake. Mix until just combined. Be careful not to overmix the batter, as this can also lead to a dense cake. If you’re using pumpkin pie spice, add 1 teaspoon at this stage.
Step 5: Divide, Color, and Bake:
Divide the cake batter into separate bowls depending on how many colors you want for your cake layers. Using gel food coloring, tint each bowl of batter with your desired Halloween colors, such as orange, black, or purple. Gel food coloring is preferred over liquid because it provides more intense color without adding excess liquid to the batter. Gently fold the coloring into the batter until evenly distributed. Pour the colored batter into the prepared pans. Bake in the preheated oven for 25–30 minutes, or until a toothpick inserted into the center comes out clean. This indicates that the cake is fully baked. If the toothpick has wet batter on it, continue baking for a few more minutes and check again.
Step 6: Cool the Cakes:
Once the cakes are baked, remove them from the oven and let them cool in the pans for about 10 minutes. This allows the cakes to set slightly before attempting to remove them. After 10 minutes, invert the cakes onto wire racks to cool completely. Ensure the cakes are completely cool before frosting, as warm cake can melt the frosting and make it difficult to work with.
Step 7: Make the Frosting:
While the cakes are cooling, prepare the cream cheese frosting. In a large mixing bowl, beat 8 ounces of softened cream cheese and ½ cup of softened unsalted butter until smooth and creamy. It’s crucial that the cream cheese and butter are softened to room temperature to avoid lumps in the frosting. Gradually add 3 cups of powdered sugar, mixing on low speed until fully incorporated. Then, add 2 teaspoons of vanilla extract and beat on high speed until the frosting is light and fluffy.
Step 8: Tint the Frosting:
Divide the frosting into separate bowls, depending on how many colors you want for decorating. Using food coloring, tint each bowl of frosting with Halloween colors like black, orange, and purple. Mix well until the color is uniform throughout the frosting. Place each color of frosting into piping bags fitted with your desired tips for decorating.
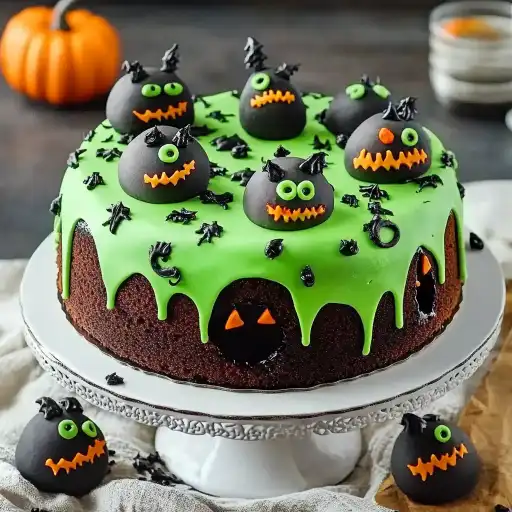
Step 9: Assemble and Decorate:
Once the cakes are completely cool, it’s time to assemble and decorate. Place one cake layer on a serving plate or cake stand. Spread a generous layer of frosting over the top. If you’re using two cake layers, carefully place the second layer on top of the frosting. Apply a thin layer of frosting (a crumb coat) over the entire cake to trap any loose crumbs. Chill the cake in the refrigerator for about 20 minutes to allow the crumb coat to set. After chilling, apply a final, thicker layer of frosting over the entire cake. Decorate the cake with Halloween sprinkles, candy eyes, mini chocolate chips, edible glitter, gummy worms, candy corn, and any other festive decorations you desire. Get creative and have fun with it!
COOKING Rating:
Intermediate
Serving Suggestions:
Serve this Halloween cake as a centerpiece for your Halloween party or as a special dessert for a family gathering. Pair it with a scoop of vanilla ice cream or a dollop of whipped cream for an extra indulgent treat. It also goes well with a warm cup of coffee or hot chocolate on a chilly autumn evening.
Tips:
- To prevent the cake from sticking, grease the pans thoroughly and line the bottoms with parchment paper.
- Make sure the butter and cream cheese are softened to room temperature for a smooth frosting.
- Use gel food coloring for more vibrant colors without adding extra liquid to the batter or frosting.
- Don’t overmix the cake batter; mix until just combined to avoid a tough cake.
- Chill the cake after applying the crumb coat to make frosting easier.
- Get creative with your decorations to make the cake unique and festive.
Prep Time:
30 minutes
Cook Time:
25-30 minutes
Total Time:
1 hour (plus cooling and decorating time)
Nutritional Information:
(Note: Nutritional information is approximate and can vary based on specific ingredients and serving sizes)
Calories:
Approximately 450-550 per serving
Protein:
Approximately 5-7 grams per serving
Sodium:
Approximately 200-300 mg per serving
Conclusion
This Spooky and Delicious Halloween Cake is a fantastic way to bring some festive fun to your Halloween celebrations. With its moist cake, creamy frosting, and creative decorations, it’s sure to be a hit with everyone. Whether you’re hosting a Halloween party or just want to make a special treat for your family, this recipe is adaptable and enjoyable to create. So, gather your ingredients, put on your favorite Halloween tunes, and get baking!
5 Questions and Answers About This Recipe
Q1: Can I make this cake ahead of time?
A: Yes, you can bake the cake layers 1-2 days in advance. Wrap them tightly in plastic wrap and store them at room temperature or in the refrigerator. Frosting can also be made 1-2 days ahead and stored in an airtight container in the refrigerator. Bring the frosting to room temperature and whip it again before using.
Q2: Can I use a different type of flour?
A: While all-purpose flour is recommended for this recipe, you can use cake flour for an even more tender cake. Substitute it in equal amounts. Avoid using bread flour, as it will make the cake too dense.
Q3: What if I don’t have buttermilk?
A: If you don’t have buttermilk, you can make a substitute by adding 1 tablespoon of white vinegar or lemon juice to a liquid measuring cup, then filling it with milk to the 1-cup line. Let it sit for 5 minutes before using.
Q4: Can I make this cake gluten-free?
A: Yes, you can substitute all-purpose flour with a gluten-free all-purpose flour blend. Be sure to check that the blend contains xanthan gum or add it separately for better texture.
Q5: What are some other decoration ideas?
A: Get creative with your decorations! You can use fondant to create spooky shapes like ghosts, bats, or pumpkins. You can also use different piping techniques to create intricate designs with the frosting. Consider adding a drizzle of chocolate ganache or caramel for extra flavor and visual appeal.