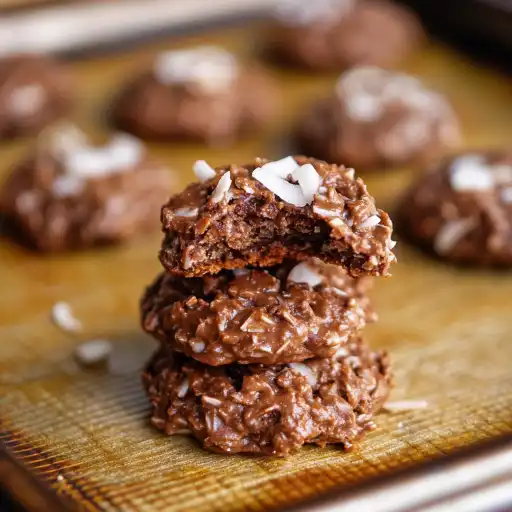
Description of this Recipe: These no-bake chocolate coconut cookies are a delightful treat that requires no oven, making them perfect for hot summer days or when you simply want a quick and easy dessert. Combining the rich flavors of chocolate and peanut butter with the chewy texture of coconut, these cookies are a crowd-pleaser that comes together in minutes. They are also easily customizable to suit various dietary needs and preferences.
Why You Will Love This Recipe:
- No Baking Required: The most appealing aspect of these cookies is that they don’t require baking. This makes them incredibly convenient and safe for kids to help with.
- Quick and Easy: With minimal ingredients and straightforward steps, these cookies can be ready in under 30 minutes, including cooling time.
- Delicious Flavor Combination: The blend of chocolate, peanut butter, and coconut creates a symphony of flavors that is both satisfying and comforting.
- Customizable: This recipe is versatile, allowing you to adjust ingredients based on your dietary restrictions or preferences. Use vegan butter and non-dairy milk for a vegan version, or swap peanut butter for almond butter if you have a peanut allergy.
- Perfect for Any Occasion: Whether you need a quick dessert for a family gathering, a treat to bring to a potluck, or just a sweet snack for yourself, these cookies fit the bill perfectly.
- Kid-Friendly: The simple process and delicious taste make these cookies a hit with children. It’s a fun activity to involve them in the kitchen.
- Great for Gifting: These cookies are also excellent for gifting. Package them in a decorative tin or cellophane bag, and they make a thoughtful and delicious present.
- Make Ahead: These cookies can be made ahead of time and stored in the refrigerator or freezer, making them ideal for meal prepping or planning for events.
- Simple Ingredients: The ingredients required are commonly found in most pantries, making it easy to whip up a batch whenever the craving strikes.
Ingredients:
- 2 cups coconut sugar (or other granulated sugar)
- ½ cup coconut oil (can substitute butter or vegan butter)
- ½ cup milk of choice (dairy, almond, soy, or coconut milk work well)
- 3 tablespoons unsweetened cocoa powder
- ½ cup peanut butter
- 1 teaspoon vanilla extract
- ¼ teaspoon salt
- 4 cups shredded unsweetened coconut
Preparation:
Step 1: Prepare Your Workspace
Before you begin, line a baking sheet with either a silicone liner, wax paper, or parchment paper. This will prevent the cookies from sticking and make cleanup a breeze. Set the baking sheet aside and gather all your ingredients to ensure a smooth process.
Step 2: Combine Sugar, Coconut Oil, and Milk
In a medium saucepan, combine the coconut sugar, coconut oil, and milk. Place the saucepan over medium heat and begin to stir frequently. This is crucial to prevent the sugar from burning and sticking to the bottom of the pan.
Step 3: Simmer the Mixture
Continue stirring the mixture until it comes to a gentle simmer. Once simmering, keep stirring until the sugar is completely dissolved. This should take about 2 minutes. Ensure that there are no sugar granules left at the bottom of the pan.
Step 4: Add Cocoa Powder
Remove the saucepan from the heat. Add the unsweetened cocoa powder to the mixture and stir vigorously until it is well mixed and no clumps remain. The mixture should be smooth and chocolatey.
Step 5: Incorporate Peanut Butter, Vanilla, and Salt
Add the peanut butter, vanilla extract, and salt to the chocolate mixture. Stir until everything is thoroughly combined. The peanut butter should melt into the warm chocolate, creating a creamy and rich base for the cookies.
Step 6: Mix in the Coconut
Add the shredded unsweetened coconut to the saucepan. Mix everything together until the coconut is evenly distributed throughout the chocolate-peanut butter mixture. This step is important to ensure that each cookie has the perfect coconutty texture. The dough will be thick and sticky at this point.
Step 7: Form the Cookies
Drop spoonfuls of the dough onto the prepared baking sheet. Use a tablespoon to scoop the dough, placing each spoonful a little distance apart on the baking sheet.
Step 8: Shape the Cookies (Optional)
If you desire a more uniform shape, use the back of a spoon to gently press each cookie down slightly. This will give them a more flattened, traditional cookie shape.
Step 9: Cool the Cookies
Allow the cookies to cool completely on the baking sheet. If the weather is warm, or if you want to speed up the process, you can place the baking sheet in the refrigerator to cool. This usually takes about 15-20 minutes. The cookies will firm up as they cool.
Step 10: Enjoy!
Once the cookies are firm, they are ready to eat. Store any leftover cookies in an airtight container at room temperature or in the refrigerator to maintain their freshness.
COOKING Rating: Easy
Serving Suggestions:
- Serve these cookies as a sweet treat with a glass of milk or a cup of coffee.
- Pack them in lunchboxes for a delightful midday snack.
- Bring them to potlucks, picnics, or parties.
- Serve them as part of a dessert platter alongside other sweets and fruits.
- Pair them with a scoop of vanilla ice cream for an extra indulgent dessert.
- Crumble them over yogurt or oatmeal for a flavorful topping.
- Use them as a base for mini ice cream sandwiches.
- Serve them with a warm cup of hot chocolate on a cold day.
- Offer them as a sweet ending to a casual dinner.
- Package them nicely and give them as a homemade gift.
Tips:
- Use Quality Ingredients: Using high-quality ingredients will enhance the flavor of the cookies. Opt for good quality coconut sugar, cocoa powder, and peanut butter for the best results.
- Adjust Sweetness: If you prefer a less sweet cookie, you can reduce the amount of sugar slightly.
- Nut Butter Alternatives: If you have a peanut allergy, you can easily substitute the peanut butter with almond butter, cashew butter, or sunflower seed butter.
- Vegan Option: To make these cookies vegan, use vegan butter and non-dairy milk. Ensure that the sugar you use is also vegan (some granulated sugar is processed using bone char).
- Add-Ins: Feel free to add other ingredients to customize the cookies. Chopped nuts, chocolate chips, or dried fruit would all be delicious additions.
- Mix-Ins: Consider adding chopped walnuts, pecans, or even dried cranberries for added flavor and texture.
- Storage: Store the cookies in an airtight container at room temperature for up to a week, or in the refrigerator for up to two weeks. You can also freeze them for longer storage.
- Freezing: These cookies freeze well. Place them in a freezer-safe container or bag, and they can be stored in the freezer for up to three months. Thaw them at room temperature before serving.
- Prevent Sticking: Make sure to use a silicone liner, wax paper, or parchment paper on the baking sheet to prevent the cookies from sticking.
- Cooling Time: Allow the cookies to cool completely before serving. This will allow them to firm up and prevent them from being too sticky.
- Consistency: If the dough seems too dry, add a tablespoon of milk at a time until it reaches the desired consistency. If it seems too wet, add a little more shredded coconut.
- Cocoa Powder: For a richer chocolate flavor, use dark cocoa powder.
- Texture: If you prefer a smoother texture, use creamy peanut butter instead of chunky.
Prep Time: 10 minutes
Cook Time: 5 minutes
Total Time: 15-20 minutes (plus cooling time)
Nutritional Information: (Estimated, per cookie)
Calories: 150-180 Protein: 2-3 grams Sodium: 20-30 mg
Conclusion:
These no-bake chocolate coconut cookies are a delightful and easy treat that anyone can make. With their rich flavors and simple preparation, they are perfect for satisfying your sweet tooth without the hassle of baking. Customize the recipe to suit your preferences, and enjoy these delicious cookies any time of the year. Whether you’re a seasoned baker or a beginner in the kitchen, this recipe is sure to become a favorite.
5 Questions and Answers About This Recipe:
Q1: Can I use a different type of sugar instead of coconut sugar?
A: Yes, you can substitute coconut sugar with other granulated sugars like white sugar, brown sugar, or even a sugar substitute like erythritol or stevia, depending on your dietary preferences. Keep in mind that the flavor and texture of the cookies might slightly change based on the type of sugar used.
Q2: What can I use if I don’t have peanut butter?
A: If you have a peanut allergy or simply prefer a different flavor, you can use almond butter, cashew butter, sunflower seed butter, or even tahini as a substitute. Each of these will impart a slightly different flavor to the cookies, so choose based on your personal preference.
Q3: How do I store these cookies to keep them fresh?
A: To keep these cookies fresh, store them in an airtight container at room temperature for up to a week. For longer storage, you can refrigerate them for up to two weeks or freeze them for up to three months. Allow frozen cookies to thaw at room temperature before serving.
Q4: Can I add chocolate chips to these cookies?
A: Absolutely! Adding chocolate chips is a great way to enhance the chocolate flavor of these cookies. You can use any type of chocolate chips you like, such as milk chocolate, dark chocolate, or white chocolate chips. Mix them in with the coconut for an extra layer of sweetness and texture.
Q5: Why are my cookies too sticky?
A: If your cookies are too sticky, it could be due to a few factors. Ensure that you have used the correct amount of each ingredient, especially the coconut. Adding a bit more shredded coconut can help to absorb excess moisture. Also, make sure to allow the cookies to cool completely, as they will firm up as they cool. Refrigerating them can also help to reduce stickiness.