Description of this recipe
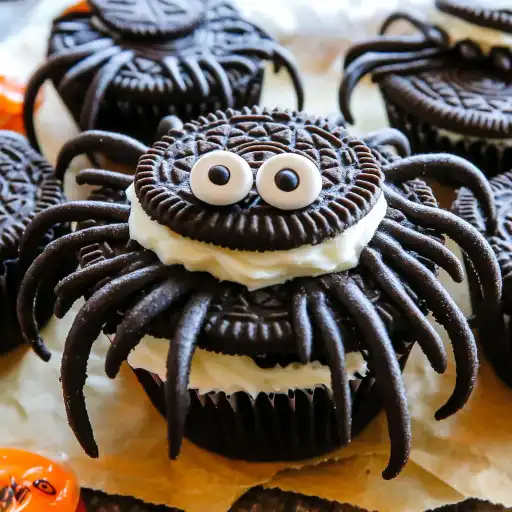
Oreo Cookie Spiders are a delightfully spooky and incredibly easy-to-make treat that’s perfect for Halloween parties, school events, or a fun afternoon activity with kids. These adorable arachnids require no baking and minimal effort, making them a go-to recipe when you need a quick, festive, and crowd-pleasing dessert. With just a handful of readily available ingredients – Oreo cookies, black licorice, candy eyes, white icing, and candy corn – you can transform ordinary cookies into charming, edible spiders that are sure to bring smiles and gasps of delight.
Why you will love this recipe
You’ll adore this recipe for several compelling reasons. First and foremost, it’s unbelievably simple, even for novice bakers or kids. The process involves no complex techniques or specialized equipment, making it a stress-free and enjoyable experience. Secondly, Oreo Cookie Spiders are incredibly customizable. You can experiment with different types of licorice, candy eyes, and even cookie fillings to create unique variations. Imagine golden Oreo spiders with red licorice legs or double-stuffed spiders with multi-colored candy eyes – the possibilities are endless! Moreover, these treats are a guaranteed hit at any Halloween gathering. Their playful appearance and delicious flavor make them irresistible to both children and adults. Finally, making Oreo Cookie Spiders is a wonderful way to engage children in the kitchen, fostering creativity and a love for baking in a fun and accessible way.
Ingredients:
- 16 Oreo cookies
- Rope black licorice
- 32 candy eyes
- 4 ounces white icing
- 32 pieces of candy corn
Preparation:
Step 1: Preparing the Cookies
Begin by lining a baking sheet with parchment paper. This will prevent the Oreo cookies from sticking and make cleanup a breeze. Gently twist or pull apart the Oreo cookies, separating the two halves. Arrange the cookie halves (both the cream-filled and the plain sides) on the parchment-lined baking sheet.
Step 2: Cutting the Licorice Legs
Take the rope of black licorice and cut it into 2-inch pieces. You will need 8 pieces of licorice per cookie to create the spider’s legs, totaling 128 pieces for the entire batch. Ensure that the licorice pieces are of uniform length to give the spiders a consistent and balanced appearance. Having all legs the same size makes the spiders look more aesthetically pleasing, and balanced.
Step 3: Attaching the Legs
Take the cookie halves with the cream filling. Place four pieces of the cut licorice on each side of the cookie, pressing them gently into the cream filling. These will serve as the spider’s legs. Ensure the legs are evenly spaced and extend outwards to create a realistic spider-like appearance. A symmetrical arrangement of legs enhances the spider’s visual appeal.
Step 4: Securing the Cookie Top
Take the remaining Oreo cookie halves (the ones without the cream filling). Apply a small, dime-sized amount of white icing to the inside of each cookie top. This icing will act as glue, securing the cookie top to the cream-filled half and holding the licorice legs in place.
Step 5: Completing the Spider Body
Carefully place the icing-coated cookie tops back onto the cream-filled cookie halves, sandwiching the licorice legs in between. Press gently to ensure the cookie tops adhere securely. Allow the icing to set for a few minutes to ensure a firm hold. A secure bond between the cookie halves prevents the spiders from falling apart.
Step 6: Adding the Eyes
Use a toothpick to dab a tiny, pea-sized amount of white icing onto the back of each candy eye. This will act as an adhesive, allowing the eyes to stick to the cookie.
Step 7: Placing the Eyes
Carefully position two candy eyes on top of each cookie, near the front. These will be the spider’s eyes. Arrange the eyes symmetrically to give the spiders a cute and whimsical appearance. The placement of the eyes significantly impacts the spider’s overall expression.
Step 8: Creating the Fangs
Take the candy corn pieces and cut them just above where the white part ends, leaving a small portion of the orange tip visible. This creates a black and orange effect, adding to the Halloween theme.
Step 9: Inserting the Fangs
Insert the candy corn tips into the front portion of the cookie filling, between the two sets of legs. This will create the spider’s fangs. Position the fangs at a slight angle to enhance the spider’s menacing, yet adorable, appearance. The fangs add a touch of realism to the cookie spiders.
Step 10: Final Touches and Setting
Once all the spiders are assembled, allow the icing to set completely. This will ensure that all the components – legs, eyes, and fangs – remain securely in place.
Step 11: Serving and Storing
Once the icing is set, the Oreo Cookie Spiders are ready to be served! Arrange them on a platter or tray for a festive presentation. If you’re not serving them immediately, store them in an airtight container at room temperature to maintain their freshness and prevent the cookies from becoming stale. Avoid refrigerating them, as this can cause the cookies to soften and the icing to become sticky.
COOKING Rating:
Easy
Serving Suggestions:
Oreo Cookie Spiders are a versatile treat that can be served in various ways:
- Halloween Parties: Arrange them on a platter as part of a Halloween dessert spread.
- School Events: Individually wrap them for easy distribution at school parties or bake sales.
- Gifts: Package them in decorative bags or boxes as a spooky and sweet gift for friends and family.
- Snacks: Enjoy them as a fun and festive snack any time of day.
Tips:
- For a gluten-free option, use gluten-free Oreo cookies.
- If you don’t have black licorice, you can use chocolate-covered pretzels or other similarly shaped candies for the legs.
- Experiment with different colors of icing and candy to create unique spider designs.
- Get creative with the candy eyes – use different sizes or colors for a more whimsical look.
- To prevent the licorice legs from slipping, you can melt a small amount of chocolate and use it as glue.
Prep Time:
20 minutes
Cook Time:
0 minutes
Total Time:
20 minutes
Nutritional Information:
(Note: This is an estimate and can vary based on specific ingredients used.)
Calories: Approximately 150-200 per spider
Protein: 1-2 grams
Sodium: 70-100 mg
Conclusion
Oreo Cookie Spiders are a delightful and easy-to-make treat that’s perfect for adding a touch of Halloween fun to any occasion. With their simple ingredients, straightforward preparation, and customizable design, these adorable arachnids are sure to be a hit with kids and adults alike. Whether you’re hosting a Halloween party, looking for a fun activity to do with your children, or simply craving a spooky and sweet snack, Oreo Cookie Spiders are a fantastic choice. So gather your ingredients, unleash your creativity, and get ready to create a batch of these charming edible spiders that will bring smiles and gasps of delight to everyone who sees (and tastes) them. Enjoy the process and the delicious results!
5 Questions and Answers About This Recipe:
- Can I use a different type of cookie instead of Oreos? Absolutely! While Oreos are the classic choice for this recipe, you can certainly experiment with other types of cookies. Chocolate sandwich cookies, peanut butter cookies, or even shortbread cookies can work well, depending on your personal preference and the overall flavor profile you’re aiming for. Keep in mind that the size and shape of the cookie may affect the final appearance of the spiders, so adjust the licorice leg length and candy eye placement accordingly.
- What if I don’t have black licorice? What can I use as a substitute for the spider legs? If you don’t have black licorice on hand, don’t worry! There are several creative substitutes you can use to create the spider legs. Chocolate-covered pretzels offer a crunchy and salty alternative, while thin pretzel sticks provide a more delicate and spindly look. You can also use black fondant or gum paste, rolled into thin ropes, for a more edible and customizable option. Get creative and see what other similarly shaped candies or edible materials you can find in your pantry.
- How can I make these Oreo Cookie Spiders more allergy-friendly? To make these spiders more allergy-friendly, consider the following substitutions. For a gluten-free option, use gluten-free Oreo cookies or another gluten-free sandwich cookie. If you have a nut allergy, ensure that all ingredients, including the cookies, icing, and candies, are nut-free. You can also use dairy-free chocolate sandwich cookies and dairy-free icing for a vegan option. Always double-check the ingredient labels to ensure they meet your specific allergy requirements.
- Can I make these Oreo Cookie Spiders ahead of time? How should I store them? Yes, you can definitely make these Oreo Cookie Spiders ahead of time. In fact, preparing them a day or two in advance can be a great way to reduce stress on the day of your party or event. To store them properly, place them in an airtight container at room temperature. Avoid refrigerating them, as this can cause the cookies to soften and the icing to become sticky. If you’re stacking the spiders, place a sheet of parchment paper between the layers to prevent them from sticking together.
- My icing is too runny. How can I thicken it up to make it easier to work with? If your icing is too runny, there are a few simple tricks you can use to thicken it up. Add a small amount of powdered sugar, one tablespoon at a time, and mix well until you reach the desired consistency. You can also try chilling the icing in the refrigerator for about 15-20 minutes, which will help it firm up. If you’re using store-bought icing, consider using a thicker, decorating-style icing that is specifically designed for piping and decorating.