Description of this recipe: These Christmas Tree Brownies are a festive and delicious treat perfect for holiday parties, family gatherings, or simply enjoying a bit of Christmas cheer. They start with a simple brownie base, transformed into adorable Christmas trees with green-tinted frosting and colorful sprinkles. They’re easy to make, fun to decorate, and guaranteed to bring smiles to everyone who tries them.
Why you will love this recipe:
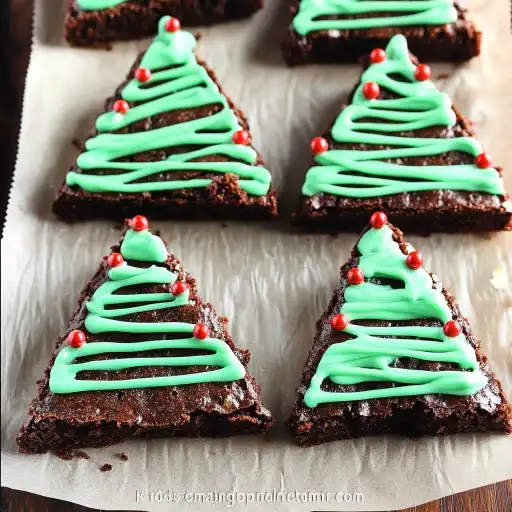
- Festive and Fun: These brownies are visually appealing and perfectly themed for Christmas. The Christmas tree shape and colorful decorations make them a delightful treat for kids and adults alike.
- Easy to Make: Using a brownie mix makes this recipe incredibly easy and quick. The decorating is simple enough for even beginner bakers to handle.
- Customizable: You can customize the decorations to your liking, using different colored sprinkles, candies, or even edible glitter.
- Great for Sharing: These brownies are perfect for sharing at parties, potlucks, or as a homemade gift.
- Delicious: The combination of rich, chocolatey brownies and sweet, creamy frosting is simply irresistible.
Ingredients:
- 1 (16.3 ounce) brownie mix (plus oil and eggs as directed on the package)
- 1 (16 ounce) vanilla frosting
- Green food coloring
- Sprinkles or candy for decorating
- Small candy cane sticks (optional)
Preparation:
Step 1: Preheat the oven to 350°F (175°C). Line a 9×9-inch baking pan with parchment paper. This will make it easy to remove the brownies from the pan after baking. Ensure the parchment paper overhangs the sides of the pan slightly to act as handles.
Step 2: Prepare the brownie mix according to the package directions. Usually, this involves mixing the brownie mix with oil, eggs, and water. Follow the instructions on your specific brownie mix for best results. Be careful not to overmix the batter, as this can lead to tough brownies.
Step 3: Pour the brownie batter into the prepared baking pan. Spread the batter evenly to ensure the brownies bake uniformly. Gently tap the pan on the counter a few times to release any trapped air bubbles.
Step 4: Bake according to the package directions until set. The baking time will vary depending on your oven and the specific brownie mix you are using. A good indication that the brownies are done is when a toothpick inserted into the center comes out with a few moist crumbs attached. Avoid overbaking, as this will make the brownies dry.
Step 5: Allow the brownies to cool in the pan for 15 minutes. Then, use the parchment paper to transfer the brownies to a cooling rack. Let the brownies cool completely before frosting and decorating. This is important because warm brownies will melt the frosting.
Step 6: Once the brownies are fully cooled, use a sharp knife to cut them into three rows. Then, cut those rows at an angle to form 5 triangles per row. You’ll have an odd shape at each end – don’t worry, save these for snacking! These triangles will be the base of your Christmas trees.
Step 7: Add 4 drops of green food coloring to the vanilla frosting. Mix until the color is fully combined and you achieve a vibrant green hue. Add more food coloring if needed, but start with a small amount to avoid making the frosting too dark.
Step 8: Transfer the green frosting to a piping bag fitted with a star tip. If you don’t have a piping bag, you can use a resealable bag with a corner cut off. Pipe the frosting onto the brownie triangles, starting at the bottom and working your way up to create a Christmas tree shape. You can use different piping techniques to create a variety of textures and designs.
Step 9: While the frosting is still wet, decorate the brownie trees with sprinkles or candy. Get creative and use different colors and shapes to make each tree unique. Consider using small candies as ornaments or edible glitter for a sparkling effect.
Step 10: If desired, insert a small candy cane stick into the bottom of each brownie tree to create a “trunk.” This adds an extra touch of sweetness and festive flair.
COOKING Rating: Easy
Serving Suggestions:
- Serve these Christmas Tree Brownies as a dessert at holiday parties or family gatherings.
- Pair them with a glass of milk, hot chocolate, or coffee.
- Package them in festive boxes or bags to give as homemade gifts.
- Serve them alongside other Christmas treats, such as cookies, fudge, or peppermint bark.
- Add a scoop of vanilla ice cream for an extra decadent treat.
Tips:
- Use high-quality brownie mix for the best flavor and texture.
- Don’t overbake the brownies; they should be moist and fudgy.
- Let the brownies cool completely before frosting and decorating.
- Use a piping bag for a neat and professional look, but a resealable bag with a corner cut off works just as well.
- Get creative with your decorations and use a variety of sprinkles, candies, and edible glitter.
- Store the brownies in an airtight container at room temperature for up to 3 days.
- For a richer flavor, add chocolate chips or chopped nuts to the brownie batter.
- If you don’t have green food coloring, you can use a combination of yellow and blue food coloring.
- To make the brownies even more festive, add a few drops of peppermint extract to the frosting.
- If you want to make these brownies ahead of time, you can bake the brownies and cut them into triangles a day or two in advance. Store them in an airtight container at room temperature until you are ready to frost and decorate them.
Prep Time: 15 minutes
Cook Time: 25-30 minutes
Total Time: 1 hour (including cooling time)
Nutritional Information: (per brownie, approximate)
Calories: 250
Protein: 3g
Sodium: 150mg
Conclusion:
These Christmas Tree Brownies are a fun, festive, and delicious treat that are perfect for celebrating the holidays. They are easy to make, customizable, and guaranteed to bring smiles to everyone who tries them. Whether you’re baking with kids, hosting a party, or simply want to enjoy a bit of Christmas cheer, these brownies are the perfect choice. So, gather your ingredients, preheat your oven, and get ready to create some magical Christmas memories! These delightful treats are not just a dessert; they’re a celebration of the season, a testament to the joy of baking, and a sweet reminder of the warmth and love that defines Christmas. Each bite is a perfect blend of chocolatey goodness and festive cheer, making them an irresistible addition to your holiday traditions. So go ahead, indulge in the spirit of Christmas and bake up a batch of these adorable Christmas Tree Brownies. Your taste buds (and your loved ones) will thank you!
Question and Answers:
Q1: Can I use a different type of brownie mix?
A: Absolutely! While this recipe calls for a standard brownie mix, you can definitely experiment with different flavors. Chocolate fudge, dark chocolate, or even a red velvet brownie mix would work beautifully. Just be sure to adjust the baking time as needed based on the package instructions for your chosen mix.
Q2: What if I don’t have green food coloring?
A: No problem! You can easily create a green hue by combining yellow and blue food coloring. Start with a few drops of each and gradually add more until you achieve your desired shade of green. Alternatively, you could use natural food coloring derived from spinach or other green vegetables, although the color may be less vibrant.
Q3: Can I make these brownies ahead of time?
A: Yes, you can! Baking the brownies a day or two in advance is a great way to save time, especially if you’re preparing for a party. Once the brownies are completely cooled, cut them into triangles and store them in an airtight container at room temperature. Frost and decorate them just before serving to ensure the frosting stays fresh and vibrant.
Q4: What other decorations can I use besides sprinkles and candy?
A: The possibilities are endless when it comes to decorating these Christmas Tree Brownies! Consider using edible glitter for a sparkling effect, mini chocolate chips for added texture, or chopped nuts for a nutty crunch. You could also pipe on different colored frosting to create ornaments or garlands. Get creative and let your imagination run wild!
Q5: Can I freeze these brownies?
A: Yes, you can freeze these brownies, but it’s best to freeze them unfrosted and undecorated. Wrap the cooled brownie triangles tightly in plastic wrap and then place them in a freezer-safe bag or container. They can be stored in the freezer for up to 2-3 months. When you’re ready to serve them, thaw them completely at room temperature and then frost and decorate as desired. This will help to prevent the frosting from becoming soggy or discolored.