Description of this recipe
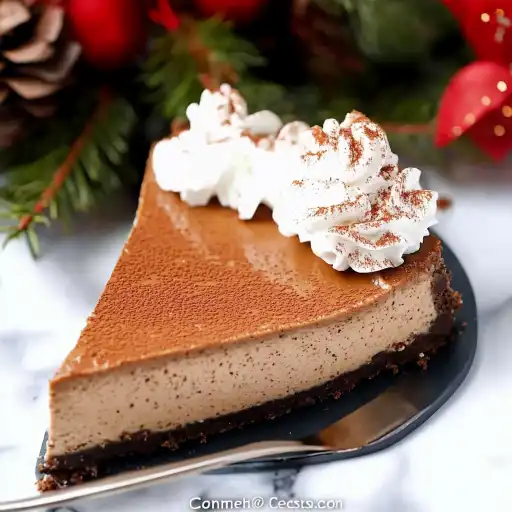
This Gingerbread Cheesecake is a festive and flavorful dessert that combines the warm, spicy notes of gingerbread with the creamy richness of cheesecake. It’s the perfect holiday treat or a delightful indulgence any time of year for those who love the comforting flavors of gingerbread. The gingersnap crust provides a delightful crunch and complements the smooth, spiced filling beautifully. The water bath ensures an even bake and a silky-smooth texture, preventing cracks and maintaining moisture. Whether you’re hosting a holiday gathering or simply craving a unique and delicious dessert, this Gingerbread Cheesecake is sure to impress.
Why you will love this recipe
You’ll fall in love with this Gingerbread Cheesecake because it offers a harmonious blend of textures and tastes. The crunchy gingersnap crust, infused with cinnamon, ginger, nutmeg, and cloves, provides a warm, spicy foundation for the creamy cheesecake filling. The filling itself is a delightful mix of cream cheese, brown sugar, molasses, and a medley of spices that create a comforting, festive flavor profile.
What sets this recipe apart is the water bath technique, which guarantees a perfectly smooth and creamy cheesecake with no cracks on the surface. The gradual cooling process inside the oven further prevents any sudden temperature changes that could cause fissures. The cheesecake’s aroma fills your kitchen as it bakes, evoking feelings of warmth and nostalgia. Each bite delivers a satisfying combination of spice, sweetness, and creaminess that will leave you craving more.
Plus, it’s a showstopper dessert that looks as good as it tastes. Topped with whipped cream and a dusting of cinnamon, it’s an elegant addition to any holiday table or special occasion. Beyond its exquisite flavor, this Gingerbread Cheesecake is also surprisingly simple to make, breaking down into easily manageable steps.
Ingredients:
Crust:
- 2 1/2 cups gingersnap crumbs
- 1 teaspoon ground cinnamon
- 1/2 teaspoon ground ginger
- 1/2 teaspoon ground nutmeg
- 1/8 teaspoon ground cloves
- 1/4 cup unsalted butter, melted
Filling:
- 32 ounces full-fat cream cheese (4 packages), at room temperature
- 1 1/2 cups brown sugar
- 1 teaspoon vanilla extract
- 3 large eggs, at room temperature
- 1/4 cup molasses
- 1/3 cup sour cream
- 1/4 teaspoon salt
- 1 teaspoon ground ginger
- 2 teaspoons ground cinnamon
- 1/2 teaspoon ground nutmeg
- 1/4 teaspoon ground cloves
Preparation:
Step 1: Preheat your oven to 350°F (175°C). Wrap the outside of a 9 or 10-inch springform pan tightly with aluminum foil. This will protect the cheesecake from water seeping in during the water bath.
Step 2: In a food processor, combine the gingersnap crumbs, ground cinnamon, ground ginger, ground nutmeg, and ground cloves. Pulse until the mixture is well combined.
Step 3: Add the melted butter to the gingersnap mixture and pulse again until the crumbs are evenly moistened.
Step 4: Press the crumb mixture firmly onto the bottom of the prepared springform pan and up the sides, creating a crust that extends about an inch high. Use the bottom of a measuring cup or your fingers to ensure the crust is compact and even.
Step 5: In a large mixing bowl, beat the cream cheese until it is light and fluffy. This is crucial to ensure a smooth, lump-free cheesecake filling.
Step 6: Gradually add the brown sugar to the cream cheese, beating until fully combined. Make sure there are no lumps of sugar remaining.
Step 7: Add the sour cream and vanilla extract, mixing until just combined. Be careful not to overmix at this stage to avoid incorporating too much air into the batter.
Step 8: Add the eggs one at a time, mixing until each egg is fully incorporated. Scrape the sides and bottom of the bowl after each addition to ensure everything is evenly blended.
Step 9: Add the molasses, salt, ground ginger, ground cinnamon, ground nutmeg, and ground cloves. Beat until all the ingredients are thoroughly combined, and the batter is smooth and consistent.
Step 10: Pour the cheesecake filling into the prepared gingersnap crust. Smooth the top with a spatula to ensure it is even.
Step 11: Place the springform pan inside a larger baking pan. Carefully pour hot water into the larger pan until it reaches about 1 inch up the sides of the springform pan. This water bath will help the cheesecake bake evenly and prevent it from cracking.
Step 12: Carefully transfer the entire setup to the preheated oven. Bake for 60 minutes.
Step 13: After 60 minutes, turn off the oven but do not open the door. Remove the pan from the water bath and place it on the middle oven rack. Prop the oven door slightly open (a wooden spoon works well) and let the cheesecake cool in the oven for 1 hour. This gradual cooling process is crucial to prevent cracks.
Step 14: After cooling in the oven, transfer the cheesecake to the refrigerator and chill for at least 8 hours, or preferably overnight. This allows the cheesecake to set completely and the flavors to meld together.
Step 15: Before serving, carefully remove the sides of the springform pan. If necessary, run a thin knife around the edge of the cheesecake to loosen it from the pan.
COOKING Rating:
- Difficulty: Intermediate
- Taste: Rich, creamy, and spiced with gingerbread flavors
- Texture: Smooth, dense cheesecake with a crunchy gingersnap crust
Serving Suggestions:
- Serve chilled with a dollop of freshly whipped cream.
- Dust the top with ground cinnamon or nutmeg for an extra touch of spice.
- Garnish with candied ginger or a sprinkle of gingersnap crumbs.
- Pair with a warm beverage like coffee, tea, or spiced cider.
- Drizzle with caramel sauce or a homemade gingerbread syrup.
Tips:
- Ensure all your ingredients, especially the cream cheese and eggs, are at room temperature. This helps to create a smoother batter and prevents lumps.
- Don’t overmix the batter once you add the eggs. Overmixing can incorporate too much air, leading to a cheesecake that rises and then collapses, causing cracks.
- The water bath is crucial for achieving a smooth, creamy texture. Make sure the springform pan is tightly wrapped in foil to prevent water from seeping in.
- If you don’t have a springform pan, you can use a regular cake pan, but be sure to line it with parchment paper with enough overhang to easily lift the cheesecake out after it has chilled.
- When cooling the cheesecake in the oven, resist the urge to open the door completely. The gradual cooling process helps prevent cracking.
- Chilling the cheesecake for at least 8 hours is essential for it to fully set. It’s best to make it a day in advance.
- For a richer flavor, use dark brown sugar instead of light brown sugar.
- If you want a stronger gingerbread flavor, you can add an additional teaspoon of ground ginger to the filling.
Prep Time:
- 30 minutes
Cook Time:
- 60 minutes baking + 1 hour cooling in the oven
Total Time:
- Approximately 9 hours 30 minutes (including chilling time)
Nutritional Information:
Note: Nutritional information is an estimate and can vary based on specific ingredients and serving sizes.
Calories:
- Approximately 450-550 per slice
Protein:
- Approximately 8-10 grams per slice
Sodium:
- Approximately 250-350 mg per slice
Conclusion
This Gingerbread Cheesecake is more than just a dessert; it’s an experience. The harmonious combination of spicy gingerbread flavors and creamy cheesecake texture makes it a standout treat for any occasion. The attention to detail in preparation, from the gingersnap crust to the water bath baking technique, ensures a perfectly smooth and delicious outcome. Whether you’re celebrating the holidays or simply indulging in a sweet treat, this cheesecake is guaranteed to impress. Its rich, comforting flavors and elegant presentation make it a memorable dessert that will have everyone asking for seconds. Enjoy the delightful journey of creating and savoring this exquisite Gingerbread Cheesecake!
Questions and Answers About This Recipe
Q1: Why is it important to use room temperature ingredients for the filling?
A: Using room temperature ingredients, especially the cream cheese and eggs, is crucial for creating a smooth and lump-free cheesecake filling. Room temperature cream cheese blends more easily, preventing stubborn lumps that can affect the texture of the final product. Similarly, room temperature eggs emulsify better with the other ingredients, resulting in a more cohesive and even batter. This contributes to the overall creamy texture and uniform bake of the cheesecake.
Q2: Can I skip the water bath when baking this cheesecake?
A: While you can technically bake the cheesecake without a water bath, it’s highly recommended to use one. The water bath provides a humid environment that helps the cheesecake bake evenly, preventing the edges from drying out and cracking. It also ensures a smoother, creamier texture throughout. If you skip the water bath, you risk a cracked surface and a slightly drier cheesecake.
Q3: What can I do if I don’t have a springform pan?
A: If you don’t have a springform pan, you can use a regular cake pan. To ensure easy removal of the cheesecake, line the bottom of the cake pan with parchment paper, leaving enough overhang on the sides to create handles. After the cheesecake has chilled, you can use the parchment paper to lift it out of the pan. Be careful when transferring it to a serving plate.
Q4: How long should I chill the cheesecake before serving?
A: It’s best to chill the cheesecake for at least 8 hours, or preferably overnight, before serving. This allows the cheesecake to fully set and the flavors to meld together, resulting in a more cohesive and flavorful dessert. Rushing the chilling process can lead to a softer, less stable cheesecake.
Q5: Can I make this cheesecake ahead of time?
A: Absolutely! In fact, this cheesecake is an excellent make-ahead dessert. You can prepare it a day or two in advance and store it in the refrigerator. This not only saves you time on the day of serving but also allows the flavors to develop even further, making the cheesecake even more delicious. Just be sure to keep it covered to prevent it from drying out.