Description of this recipe
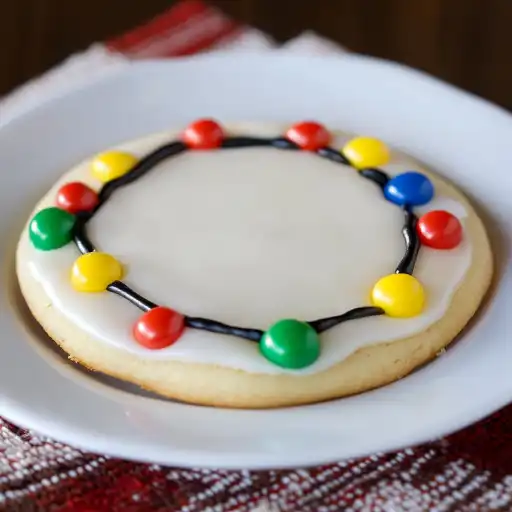
Christmas Lights Cookies are soft, sweet sugar cookies decorated to resemble a strand of colorful Christmas lights. These festive treats are perfect for holiday baking, cookie exchanges, or simply adding a touch of whimsy to your dessert table. With their soft texture, sweet frosting, and vibrant candy “lights,” they’re sure to be a hit with both kids and adults. This recipe guides you through creating the perfect sugar cookie base, a creamy vanilla frosting, and the signature tangled lights design, making them a standout addition to your holiday celebrations.
Why you will love this recipe
You’ll adore these Christmas Lights Cookies for several reasons. First, they are incredibly delicious, offering a delightful balance of sweetness and buttery richness. The soft, melt-in-your-mouth sugar cookie base is perfectly complemented by the smooth, creamy vanilla frosting. Second, they are visually stunning and capture the festive spirit of the holiday season. The vibrant mini M&Ms embedded in the black “light string” frosting create a playful and eye-catching design. Third, these cookies are a fantastic activity to do with family and friends. Decorating the cookies is a fun, creative process that brings everyone together. Finally, they’re a memorable treat that will become a cherished part of your holiday traditions. These cookies are more than just a dessert; they’re a delightful experience that embodies the joy and warmth of Christmas.
Ingredients:
- 2 cups granulated sugar
- 2/3 cup (10 2/3 tablespoons) unsalted butter, softened
- 1/2 cup shortening
- 3 teaspoons vanilla extract, divided
- 2 large eggs
- 5 1/3 cups all-purpose flour
- 2 teaspoons baking powder
- 1 teaspoon baking soda
- 1 teaspoon salt
- 1 1/3 cups sour cream
- 3 cups powdered sugar
- 1 stick (1/2 cup) unsalted butter, softened, for frosting
- 3 tablespoons milk
- Black food coloring
- 10.8 ounces mini M&Ms
Preparation:
Step 1: In a large mixing bowl, cream together the softened butter, shortening, and granulated sugar until the mixture is light and fluffy. This process, typically done with an electric mixer, incorporates air into the fats and sugar, leading to a more tender and airy cookie. Creaming should take several minutes, ensuring the mixture becomes noticeably paler and more voluminous.
Step 2: Add 2 teaspoons of vanilla extract and the eggs to the creamed mixture. Beat well until thoroughly combined. The vanilla extract enhances the overall flavor profile of the cookies, adding a warm, aromatic note. The eggs act as a binding agent, holding the ingredients together and contributing to the cookie’s texture.
Step 3: In a separate bowl, whisk together the all-purpose flour, baking powder, baking soda, and salt. This ensures that the leavening agents (baking powder and baking soda) are evenly distributed throughout the flour, which is crucial for a uniform rise and texture in the cookies.
Step 4: Gradually add the dry ingredients to the wet ingredients, alternating with the sour cream. Begin by adding about one-third of the dry ingredients to the creamed mixture, followed by half of the sour cream. Mix until just combined, then add another third of the dry ingredients, followed by the remaining sour cream. Finish with the last of the dry ingredients. Mix until a soft dough forms. Be careful not to overmix the dough, as this can develop the gluten in the flour, resulting in tough cookies. The sour cream adds moisture and a slight tanginess, which balances the sweetness of the sugar.
Step 5: The dough will be soft and sticky. Cover the bowl with plastic wrap and chill the dough in the refrigerator for at least 2 hours, or preferably overnight. Chilling the dough allows the gluten to relax, making it easier to handle and preventing the cookies from spreading too much during baking. The extended chilling time also allows the flavors to meld together, resulting in a more flavorful cookie.
Step 6: Preheat your oven to 350°F (175°C). Line baking sheets with parchment paper. Parchment paper prevents the cookies from sticking to the baking sheet and makes cleanup easier.
Step 7: On a well-floured surface, roll out the chilled dough to about 1/4-inch thickness. Use a cookie cutter to cut out circular shapes. Re-roll scraps as needed. Rolling the dough to a consistent thickness ensures that the cookies bake evenly. Using a circular cookie cutter is traditional for these cookies, but you can use any shape you prefer.
Step 8: Place the cookie cutouts onto the prepared baking sheets, leaving a little space between each cookie to allow for even baking.
Step 9: Bake for 8-9 minutes, or until the edges are lightly golden brown. Watch the cookies carefully, as they can burn easily.
Step 10: Remove the cookies from the oven and let them cool on the baking sheets for a few minutes before transferring them to a wire rack to cool completely.
Step 11: While the cookies are cooling, prepare the frosting. In a large bowl, cream together the softened butter (for frosting) and powdered sugar until smooth and creamy.
Step 12: Add the remaining 1 teaspoon of vanilla extract and the milk. Beat until the frosting is light and fluffy. Adjust the amount of milk as needed to achieve the desired consistency.
Step 13: Divide the frosting into two smaller bowls. In one bowl, stir in black food coloring until you achieve a deep black color. This will be used for the “light string” design. Leave the other bowl of frosting uncolored; this will be used as the base frosting for the cookies.
Step 14: Spoon the black frosting into a piping bag fitted with a small round tip (#1 or #2).
Step 15: Use a round, flat knife or offset spatula to spread a layer of white frosting onto each cooled cookie. Ensure the entire surface is covered.
Step 16: Pipe the black frosting onto the white frosting in a random, looping pattern, mimicking the look of tangled Christmas lights. Be creative and have fun with this step!
Step 17: While the black frosting is still wet, gently press mini M&Ms into the black frosting to represent the colorful lights. Arrange the M&Ms randomly along the “light string” for a more authentic look.
Step 18: Allow the frosting to set completely before serving or storing the cookies.
COOKING Rating:
Easy to Medium – These cookies require a bit of patience and attention to detail, especially when it comes to decorating, but the steps are straightforward and manageable for most home bakers.
Serving Suggestions:
- Serve these cookies at holiday parties, cookie exchanges, or as a special treat for family and friends.
- Pair them with a glass of cold milk, hot cocoa, or coffee.
- Package them in decorative tins or cellophane bags to give as gifts.
- Arrange them on a festive platter as part of a holiday dessert spread.
Tips:
- To prevent the cookies from spreading too much during baking, make sure to chill the dough thoroughly.
- Use a good quality vanilla extract for the best flavor.
- If the dough becomes too sticky while rolling, dust it with a little extra flour.
- For a smoother frosting, sift the powdered sugar before using it.
- Get creative with the colors and patterns of the mini M&Ms to make each cookie unique.
- Store the decorated cookies in an airtight container at room temperature for up to 3-4 days.
Prep Time:
30 minutes (plus chilling time)
Cook Time:
8-9 minutes
Total Time:
2 hours 40 minutes (including chilling time)
Nutritional Information:
(Approximate values per cookie – will vary based on exact ingredients and portion size)
Calories:
250-300
Protein:
2-3 grams
Sodium:
50-70 mg
Conclusion
Christmas Lights Cookies are a delightful and festive treat that brings the joy of the holiday season to your kitchen. With their soft, sweet texture, creamy frosting, and vibrant candy lights, they are sure to be a hit with everyone. Whether you’re baking them for a party, a cookie exchange, or simply to enjoy with family and friends, these cookies are a memorable and delicious way to celebrate the holidays. So gather your ingredients, put on some festive music, and get ready to create these whimsical and wonderful Christmas Lights Cookies. They’re not just cookies; they’re a little piece of holiday magic!
Questions and Answers about this recipe
Q1: Can I make the dough ahead of time?
A: Absolutely! In fact, it’s highly recommended. The dough needs to chill for at least 2 hours, but you can easily make it a day or two in advance. Just wrap it tightly in plastic wrap and store it in the refrigerator. When you’re ready to bake, let it sit at room temperature for about 15-20 minutes to soften slightly before rolling it out.
Q2: What can I use if I don’t have sour cream?
A: If you don’t have sour cream on hand, you can substitute it with plain Greek yogurt or full-fat plain yogurt. These alternatives will provide a similar moisture content and tanginess to the dough.
Q3: Can I use a different type of frosting?
A: Of course! While the vanilla buttercream frosting is classic for these cookies, you can use any frosting you like. Cream cheese frosting, chocolate frosting, or even a simple glaze would work well. Just make sure the frosting is smooth and easy to spread or pipe.
Q4: How do I prevent the black frosting from bleeding into the white frosting?
A: To minimize bleeding, make sure the white frosting has set slightly before piping the black frosting on top. Also, use a light hand when piping the black frosting and avoid applying too much pressure. If bleeding is a concern, you can also try using gel food coloring instead of liquid food coloring, as it is more concentrated and contains less water.
Q5: Can I freeze these cookies?
A: Yes, you can freeze these cookies, but it’s best to freeze them unfrosted. Bake the cookies and let them cool completely. Then, wrap them individually in plastic wrap or place them in an airtight container. You can freeze them for up to 2-3 months. When you’re ready to serve, thaw the cookies at room temperature and then frost and decorate them as directed.