Description of this recipe
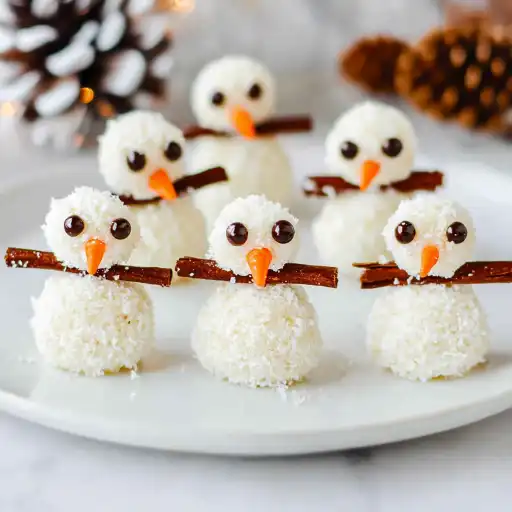
These Snowman Truffles are adorable, bite-sized treats perfect for adding a touch of whimsy to your Christmas celebrations. Crafted from a creamy white chocolate and coconut base, these truffles are not only delicious but also a fun and engaging activity to do with kids during the holiday season. Each truffle is meticulously decorated to resemble a cheerful snowman, complete with chocolate chip eyes, a dried apricot nose, edible pearl smiles, and pretzel stick arms. They are a delightful combination of flavors and textures, offering a sweet, coconutty experience with a satisfying crunch from the pretzel arms.
Why you will love this recipe
There are countless reasons to fall in love with these Snowman Truffles. First and foremost, they are incredibly cute and festive, making them a standout addition to any holiday dessert table. The process of making them is also a joyous experience, perfect for involving children in the kitchen and creating lasting memories. Beyond their visual appeal, the truffles are a delectable treat that balances the richness of white chocolate with the subtle sweetness of coconut. They are also incredibly versatile – you can customize the decorations to your liking, making each snowman unique. Moreover, they are relatively simple to make, requiring no baking and minimal cooking skills. Finally, they can be made ahead of time and stored in the fridge or freezer, making them a convenient option for holiday parties or gatherings.
Ingredients:
For Coconut Truffles:
- 2 cups plus 1 tablespoon coarsely chopped white chocolate, divided
- 1/2 cup coconut cream
- ¾ cup unsweetened shredded coconut, plus more for coating
For Coating:
- ½ cup unsweetened shredded coconut
For Decorations:
- 20 mini chocolate chips for eyes
- 1 dried apricot, cut into tiny wedges for nose
- 30 edible pearls for mouth
- 20 mini pretzel sticks for arms
Preparation:
Step 1: Prepare the White Chocolate and Coconut Mixture
In a medium heat-proof bowl, combine 2 cups of the coarsely chopped white chocolate and the coconut cream. Place the bowl in the microwave and heat in 20-second intervals, stirring in between each interval. This method ensures that the chocolate melts evenly and doesn’t burn. Continue this process until the white chocolate is completely melted and the mixture is smooth. Alternatively, you can melt the white chocolate and coconut cream using a double boiler on the stove, stirring occasionally to prevent sticking and burning. The key is to achieve a smooth, creamy consistency without any lumps.
Step 2: Incorporate Coconut and Chill the Mixture
Once the white chocolate and coconut cream mixture is smooth, add ¾ cup of unsweetened shredded coconut. Stir the coconut into the melted chocolate mixture until it is evenly distributed. The coconut adds texture and flavor to the truffles, complementing the richness of the white chocolate. After the coconut is fully incorporated, cover the bowl tightly with plastic wrap to prevent it from absorbing any odors in the refrigerator. Place the bowl in the refrigerator and chill for 4-6 hours, or until the mixture is firm enough to handle. This chilling process is crucial as it allows the truffles to hold their shape when you roll them into balls.
Step 3: Shape the Truffles
Once the chocolate mixture has chilled and is firm, prepare for the truffle-making process. Place ½ cup of unsweetened shredded coconut in a small bowl. This coconut will be used to coat the truffles, adding an extra layer of texture and flavor. Remove the chocolate mixture from the refrigerator. Use a small ice cream scoop, melon baller, or spoon to scoop out small sections of the chilled mixture. Gently roll each section between your hands to form them into smooth, round balls. The size of the balls should be consistent for a uniform appearance.
Step 4: Coat and Freeze the Truffles
After forming each truffle, roll it in the bowl of shredded coconut until it is fully coated. The coconut should adhere evenly to the surface of the truffle. Place the coated truffles on a baking sheet lined with parchment paper to prevent them from sticking. Once all the truffles are formed and coated, place the baking sheet in the freezer for 20 minutes. This brief freezing period helps the truffles to firm up further, making them easier to decorate without losing their shape.
Step 5: Decorate the Snowman Heads
Remove 10 of the coconut-covered truffles from the freezer. These will serve as the heads of your snowmen. Leave the remaining truffles in the freezer to maintain their firmness. For each snowman head, carefully poke in two mini chocolate chips to create the eyes. Next, take a small dried apricot sliver and gently insert it into the truffle to form the nose. Finally, arrange three edible pearls in a curved line to create the snowman’s smile. These details bring the snowmen to life and add a whimsical touch to the truffles.
Step 6: Melt White Chocolate for Assembly
In a separate small bowl, melt the remaining 1 tablespoon of white chocolate. Use the same microwave method as before, heating in 20-second intervals and stirring in between until the chocolate is smooth and completely melted. This melted white chocolate will act as the “glue” to adhere the snowman heads to the bodies.
Step 7: Assemble the Snowmen
Remove the remaining truffles (the snowman bodies) from the freezer. Dab a small amount of the melted white chocolate on the top of each truffle. Carefully take one of the decorated snowman heads and attach it to the dab of white chocolate on the body. Gently press down to ensure that the head adheres securely to the body.
Step 8: Add the Arms
For the final touch, carefully poke two mini pretzel sticks into each side of the bottom truffle (the snowman’s body). These pretzel sticks will serve as the snowman’s arms. Ensure that the pretzel sticks are inserted firmly but gently to avoid breaking the truffles.
Step 9: Store and Serve
Place the finished Snowman Truffles in an airtight container. Store them in the refrigerator for up to a week, or in the freezer for up to a month. When ready to serve, take the truffles out of the refrigerator or freezer and allow them to thaw slightly before enjoying. Serve chilled for the best taste and texture.
COOKING Rating: Easy
Serving Suggestions:
- Serve as a festive dessert at Christmas parties or holiday gatherings.
- Include them in a dessert platter alongside other holiday treats like cookies, brownies, and candies.
- Package them in small boxes or bags as homemade Christmas gifts for friends and family.
- Serve them with a warm beverage like hot chocolate, coffee, or tea.
- Use them as a fun and interactive activity for children during the holidays.
Tips:
- Use high-quality white chocolate for the best flavor and texture.
- Make sure the coconut cream is thick and creamy, not watery.
- Chill the chocolate mixture thoroughly before shaping the truffles to prevent them from becoming too soft.
- If the truffles become too soft while you are working with them, place them back in the freezer for a few minutes to firm up.
- Get creative with the decorations! Use different candies, sprinkles, or edible glitter to customize your snowmen.
Prep Time: 30 minutes
Cook Time: 5 minutes
Total Time: 4 hours 35 minutes (includes chilling time)
Nutritional Information: (per truffle, approximate)
- Calories: 120
- Protein: 1g
- Sodium: 15mg
Conclusion
These Snowman Truffles are more than just a delicious treat; they are a festive experience that brings joy and creativity to your holiday celebrations. With their adorable appearance and delightful combination of flavors, they are sure to be a hit with both kids and adults. Whether you’re looking for a fun activity to do with your family or a unique dessert to impress your guests, these truffles are the perfect choice. So gather your ingredients, put on some holiday music, and get ready to create these whimsical Snowman Truffles that will brighten up your Christmas season.
5 Questions and Answers about this recipe
Q1: Can I use a different type of chocolate besides white chocolate?
A: While white chocolate is traditionally used for Snowman Truffles to achieve the desired snowy appearance, you can certainly experiment with other types of chocolate. Milk chocolate or dark chocolate would offer a different flavor profile, but they would still be delicious. Keep in mind that the color of the truffles will be different, so they won’t have the same snowman look.
Q2: What can I use if I don’t have coconut cream?
A: If you don’t have coconut cream on hand, you can substitute it with heavy cream or full-fat Greek yogurt. Heavy cream will provide a similar richness and creaminess to the truffles, while Greek yogurt will add a slight tanginess. The texture of the truffles may be slightly different depending on the substitute you use, but they will still be delicious.
Q3: How long can I store the Snowman Truffles?
A: Snowman Truffles can be stored in the refrigerator for up to a week or in the freezer for up to a month. Make sure to store them in an airtight container to prevent them from drying out or absorbing any odors from the refrigerator or freezer. When ready to serve, allow them to thaw slightly before enjoying.
Q4: Can I make these truffles ahead of time?
A: Yes, these truffles are perfect for making ahead of time. In fact, the chilling process requires several hours, so it’s best to plan ahead. You can make the truffles a day or two in advance and store them in the refrigerator until you’re ready to decorate them. Alternatively, you can make the entire recipe ahead of time and store the decorated truffles in the freezer for up to a month.
Q5: Can I use different decorations for the snowmen?
A: Absolutely! One of the great things about these Snowman Truffles is that you can customize the decorations to your liking. Use different candies, sprinkles, edible glitter, or even small pieces of fruit to create unique and whimsical snowmen. Get creative and have fun with it! You can use orange-colored sprinkles for the nose, different colored edible pearls for the mouth, or even mini marshmallows for earmuffs.


