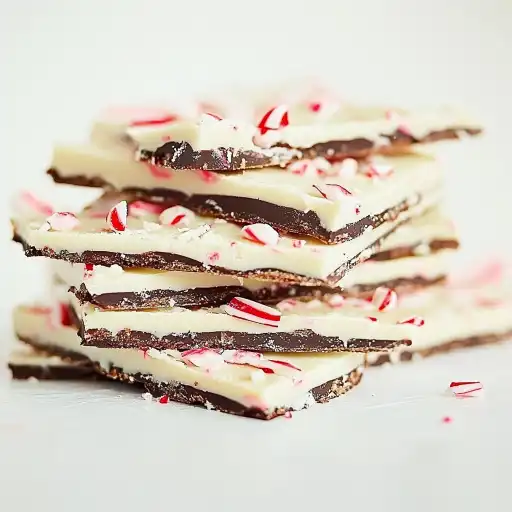
Description of this recipe: Peppermint Bark is a classic holiday confection that combines the rich flavors of dark chocolate and creamy white chocolate with the refreshing taste of peppermint. This delightful treat is not only visually appealing with its vibrant layers but also incredibly satisfying to eat. Perfect for gifting or serving at festive gatherings, homemade Peppermint Bark brings a touch of holiday magic to every bite.
Why you will love this recipe: You’ll absolutely adore this Peppermint Bark recipe for its simplicity and impressive results. With just a few ingredients and easy-to-follow steps, you can create a stunning dessert that rivals store-bought versions. The combination of smooth chocolate layers and crunchy peppermint candy is irresistible, offering a delightful textural contrast. Plus, making it yourself allows you to customize the flavors and decorations, ensuring a unique and memorable treat that everyone will rave about. The joy of sharing this homemade delight with friends and family during the holidays makes it even more special.
Ingredients:
- 24 ounces white chocolate chips, divided
- 12 ounces bittersweet chocolate, melted
- 3 ounces crushed peppermint candy
- ⅓ cup heavy cream
- ½ teaspoon peppermint extract
Preparation:
Prep:
- Step 1: Place the peppermint candy in a plastic bag. Use a rolling pin (or mallet) and crush the peppermint candy into small pieces. Set aside.
- Step 2: Turn a large baking sheet upside down. Cover it with aluminum foil, ensuring the foil is smooth and wrinkle-free. This will make it easier to remove the bark later. Set aside.
Bottom Layer:
- Step 3: Take half of the white chocolate chips (12 ounces) and place them in a microwave-safe glass bowl. Microwave on high for 30 seconds. Remove and stir the chocolate well. Repeat in 15-second intervals, stirring each time, until the chocolate is completely melted and smooth. Be careful not to overheat the chocolate, as it can seize up and become grainy.
- Step 4: Spread the melted white chocolate evenly onto the prepared baking sheet. Use a spatula to ensure a consistent thickness across the entire surface.
- Step 5: Immediately drizzle about half of the crushed peppermint candy evenly over the melted white chocolate layer. Gently press the peppermint pieces into the chocolate to help them adhere.
- Step 6: Chill the baking sheet in the refrigerator for approximately 20-30 minutes, or until the white chocolate layer is firm but not completely hardened.
Middle Layer:
- Step 7: In a small saucepan, combine the bittersweet chocolate, peppermint extract, and heavy cream.
- Step 8: Cook over medium-low heat, stirring constantly, until the chocolate begins to melt. Continue stirring until the mixture is smooth and fully combined. Be careful not to burn the chocolate; reduce heat if necessary.
- Step 9: Remove the saucepan from the heat and allow the chocolate mixture to cool slightly for about 5-10 minutes. This will prevent it from melting the white chocolate layer underneath.
- Step 10: Remove the baking sheet from the refrigerator. Pour the bittersweet chocolate mixture on top of the chilled white chocolate layer. The easiest way to do this is to make three lines of chocolate across the white layer and then gently spread each line with a spatula. Work quickly but carefully to avoid disturbing the bottom layer.
- Step 11: Return the baking sheet to the refrigerator and allow the chocolate to chill for an additional 30-40 minutes, or until the bittersweet chocolate layer is firm.
Top Layer:
- Step 12: Melt the remaining half of the white chocolate chips (12 ounces) in the microwave using the same method as before: microwave in 30-second intervals, stirring each time, until completely melted and smooth.
- Step 13: Remove the baking sheet from the refrigerator. Spread the final layer of melted white chocolate evenly on top of the hardened dark chocolate layer. Again, use a spatula to ensure a smooth and consistent surface.
- Step 14: Immediately drizzle the remaining crushed peppermint candy over the top white chocolate layer. Gently press the peppermint pieces into the chocolate.
- Step 15: Refrigerate the peppermint bark until all layers are completely hardened, which should take about 1-2 hours.
Cutting and Serving:
- Step 16: Once the bark is fully hardened, remove it from the refrigerator. Lift the foil from the baking sheet and carefully peel it away from the bark.
- Step 17: Place the bark on a cutting board. Use a large, sharp knife to cut the peppermint bark into triangles, squares, or any other shape you desire. Applying gentle pressure and using a slight rocking motion works best to prevent the bark from cracking.
- Step 18: Enjoy your homemade Peppermint Bark! Store any leftovers in an airtight container in a cool, dry place or in the refrigerator to maintain its freshness.
COOKING Rating: Easy
Serving Suggestions: Peppermint Bark is a versatile treat that can be enjoyed in numerous ways. Serve it as a festive dessert at holiday gatherings, package it in decorative tins or bags for gifting, or simply enjoy it as a sweet indulgence with a cup of hot cocoa or coffee. It also makes a delightful addition to dessert platters or as a topping for ice cream.
Tips:
- Quality Chocolate: Use high-quality chocolate for the best flavor and texture. Ghirardelli, Guittard, or Valrhona are excellent choices.
- Melting Chocolate: To prevent chocolate from seizing, melt it slowly and stir frequently. Avoid overheating the chocolate.
- Peppermint Extract: Add peppermint extract to the dark chocolate layer for an extra burst of peppermint flavor. Be careful not to add too much, as it can overpower the chocolate.
- Even Layers: Ensure each layer of chocolate is spread evenly for a professional-looking bark.
- Crushed Peppermint: Crush the peppermint candy into small, even pieces for a better texture and appearance.
- Chilling Time: Allow sufficient chilling time between each layer to prevent the layers from mixing and ensure a clean, distinct look.
Prep Time: 20 minutes Cook Time: 10 minutes Total Time: 3 hours
Nutritional Information: (Note: Nutritional information is an estimate and may vary based on specific ingredients and portion sizes.) Calories: Approximately 200 calories per serving Protein: 2 grams Sodium: 15 milligrams
Conclusion: Homemade Peppermint Bark is a delightful and festive treat that’s perfect for the holiday season. With its combination of rich chocolate layers and refreshing peppermint crunch, it’s sure to be a crowd-pleaser. This recipe is simple to follow and allows for customization, making it a fun and rewarding baking project. Whether you’re gifting it to loved ones or enjoying it yourself, Peppermint Bark is a sweet way to spread holiday cheer.
Five Questions and Answers About This Recipe:
- Can I use milk chocolate instead of bittersweet chocolate?
- Yes, you can substitute milk chocolate for bittersweet chocolate. However, keep in mind that milk chocolate is sweeter and has a milder flavor, which will change the overall taste of the bark. If you prefer a richer, less sweet bark, stick with bittersweet or dark chocolate.
- How do I prevent the chocolate from seizing when melting it?
- To prevent chocolate from seizing, melt it slowly over low heat, either in the microwave or in a double boiler. When using the microwave, heat in short intervals (30 seconds) and stir well between each interval. Avoid adding water or any other liquids directly to the chocolate, as this can cause it to seize. If the chocolate starts to seize, try adding a small amount of vegetable oil or shortening to help smooth it out.
- Can I make this recipe ahead of time?
- Yes, Peppermint Bark can be made several days in advance and stored in an airtight container in a cool, dry place or in the refrigerator. In fact, chilling the bark for an extended period can enhance its flavor and texture.
- What can I use instead of heavy cream in the middle layer?
- If you don’t have heavy cream on hand, you can substitute it with half-and-half or whole milk. However, the texture of the chocolate layer may be slightly different, as heavy cream adds richness and smoothness. You can also use a dairy-free alternative like coconut cream for a vegan option, but be mindful of the flavor it might impart.
- How do I cut the bark without it cracking?
- To cut the bark cleanly without it cracking, make sure it is fully hardened in the refrigerator. Use a large, sharp knife and apply gentle pressure with a slight rocking motion. You can also warm the knife under hot water and dry it before cutting; this will help it glide through the chocolate more easily. Avoid using excessive force, as this can cause the bark to shatter.