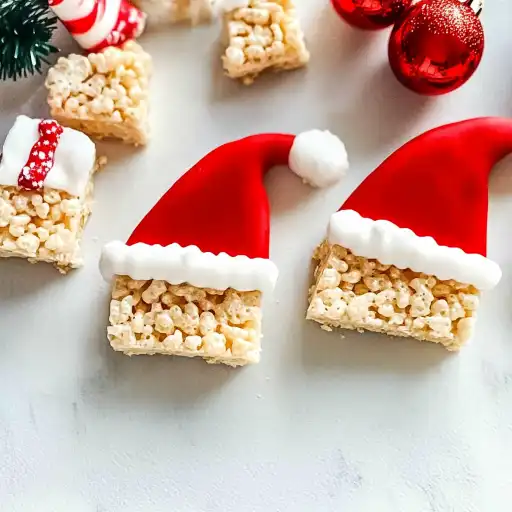
Delight in the festive spirit with these adorable Santa Hat Christmas Rice Krispie Treats! This no-bake recipe transforms ordinary Rice Krispie treats into charming, edible Santa hats perfect for holiday parties, school events, or a fun family activity. With just a few simple ingredients and easy-to-follow instructions, you can create a batch of these whimsical treats that will bring smiles to everyone’s faces. These treats are not only visually appealing but also offer the classic, beloved taste of Rice Krispie treats with a sweet, chocolatey twist.
Why You Will Love This Recipe
These Santa Hat Christmas Rice Krispie Treats are a guaranteed hit for several reasons:
- Festive and Fun: They instantly capture the holiday spirit with their cute Santa hat design.
- Easy to Make: The recipe requires minimal cooking skills and is perfect for getting kids involved in the kitchen.
- No-Bake: No oven required! These treats come together quickly without the need for baking.
- Delicious: The combination of classic Rice Krispie treats, melted candy, and marshmallows offers a delightful blend of textures and flavors.
- Versatile: Perfect for parties, gifts, or a festive family treat.
Ingredients:
- 16 Rice Cereal Treats (pre-made)
- 1 cup Red Candy Melts
- 1/4 cup White Candy Melts
- 4 1/2 tablespoons Vegetable Shortening
- 10-ounce bag Mini Marshmallows
Preparation:
Step 1: Prepare Your Workspace. Line a baking sheet with parchment paper or wax paper. This will prevent the treats from sticking and make cleanup a breeze. Unwrap all 16 pre-made Rice Krispie treats and set them out on a cutting board or another piece of parchment paper. Having everything ready to go will streamline the decorating process.
Step 2: Melt the Red Candy Melts. In a medium, microwave-safe bowl, combine 1 cup of red candy melts with 2 tablespoons of vegetable shortening. The shortening helps to thin the candy melts, creating a smoother, more dippable consistency. Microwave the mixture for 1 minute at 50% power. Carefully remove the bowl from the microwave and stir with a rubber spatula. If the candy melts are not completely melted, place the bowl back in the microwave for 30 seconds at 50% power and stir again. Continue this process in 15-second intervals at 50% power, stirring between each heating session, until you have a smooth, honey-like texture. Be cautious not to overheat the candy melts, as they can burn easily.
Step 3: Dip the Rice Krispie Treats. Hold a Rice Krispie treat at a diagonal and carefully dip half of it into the melted red candy. Allow the excess candy to drip back into the bowl to avoid a thick, uneven coating. Place the dipped treat on the parchment paper-lined baking sheet.
Step 4: Add the Marshmallow Pom-Pom. While the red candy is still wet, gently press one mini marshmallow into the top corner of each dipped Rice Krispie treat. This will create the “pom-pom” on the Santa hat.
Step 5: Chill the Treats. Once you have dipped all the treats and added the marshmallows, place the baking sheet in the refrigerator for 5 minutes to allow the red candy to set slightly. This will make it easier to add the white chocolate “fur” trim without smudging the red candy.
Step 6: Melt the White Candy Melts. While the Rice Krispie treats are chilling, prepare the white candy melts. In a separate, microwave-safe bowl, combine 1/4 cup of white candy melts with 1/2 teaspoon of vegetable shortening. Microwave for 1 minute at 50% power. Stir with a rubber spatula. Repeat in 15-second intervals at 50% power, stirring between each heating session, until the white candy melts are smooth and completely melted.
Step 7: Prepare the Piping Bag. Place a disposable piping bag in a tall cup or jar with the open end folded over the rim. This will make it easier to pour the melted white candy melts into the bag without making a mess. Carefully pour the melted white candy into the piping bag. Twist the top of the bag to secure the candy.
Step 8: Add the “Fur” Trim. Remove the treats from the refrigerator. Carefully cut off the very tip of the piping bag with scissors. Gently pipe a line of melted white candy along the base of the red chocolate to create the “fur” trim of the Santa hat. Apply even pressure to the piping bag as you move along the edge to create a consistent line.
Step 9: Final Chill. Once all the treats are decorated with the white chocolate “fur” trim, place the baking sheet back in the refrigerator for another 5 minutes to allow the white candy to set completely.
Step 10: Serve and Enjoy! Once the candy has set, remove the Santa Hat Christmas Rice Krispie Treats from the refrigerator and serve immediately. These treats are best enjoyed fresh, but can be stored in an airtight container at room temperature for up to 3 days.
COOKING Rating:
Easy
Serving Suggestions:
- Serve as a festive treat at holiday parties or gatherings.
- Package them in cellophane bags and tie with ribbon for cute homemade gifts.
- Include them in a dessert platter or cookie exchange.
- Enjoy them as a fun activity with kids during the holiday season.
- Pair them with a glass of milk or hot cocoa for a cozy treat.
Tips:
- Use High-Quality Candy Melts: High-quality candy melts will melt more smoothly and have a better flavor.
- Don’t Overheat the Candy Melts: Overheating can cause the candy melts to seize up and become unusable. Microwave in short intervals and stir frequently.
- Work Quickly: Candy melts set quickly, so work efficiently to dip the treats and add the decorations before the candy hardens.
- Get Creative: Feel free to add other decorations, such as sprinkles or edible glitter, to customize your Santa Hat Rice Krispie Treats.
- Make Ahead: These treats can be made a day or two in advance and stored in an airtight container.
Prep Time:
20 minutes
Cook Time:
5 minutes
Total Time:
25 minutes
Nutritional Information (per serving):
Note: Nutritional information is an estimate and may vary based on specific ingredients used.
- Calories: 200
- Protein: 2g
- Sodium: 100mg
Conclusion
These Santa Hat Christmas Rice Krispie Treats are a delightful and easy way to spread holiday cheer. With their festive design and delicious taste, they are sure to be a hit with both kids and adults. Whether you’re looking for a fun activity to do with your family, a unique treat to bring to a party, or a homemade gift to share with friends, these Santa Hat Rice Krispie Treats are the perfect choice. So gather your ingredients, put on some holiday music, and get ready to create some sweet memories!
Questions and Answers:
Q1: Can I use regular chocolate instead of candy melts?
A: While you can technically use regular chocolate, candy melts are recommended for this recipe because they melt more smoothly and set up more firmly, creating a cleaner, more professional-looking finish. Regular chocolate can be more prone to blooming (developing a white film on the surface) and may not hold its shape as well. If you do use regular chocolate, consider adding a small amount of coconut oil to help it melt more smoothly.
Q2: How can I prevent the candy melts from seizing up?
A: The most common reason for candy melts seizing up is overheating. To prevent this, microwave the candy melts in short intervals (30 seconds or less) at 50% power and stir well between each interval. Avoid adding any water or steam to the candy melts, as this can also cause them to seize. If your candy melts do seize up, try adding a small amount of vegetable shortening to help loosen them.
Q3: Can I make these treats ahead of time?
A: Yes, these treats can be made a day or two in advance and stored in an airtight container at room temperature. However, keep in mind that the Rice Krispie treats may become slightly softer over time. For the best results, store them in a single layer to prevent the decorations from smudging.
Q4: What can I use if I don’t have disposable piping bags?
A: If you don’t have disposable piping bags, you can use a zip-top plastic bag instead. Simply fill the bag with the melted white candy melts, seal it tightly, and snip off a tiny corner of the bag with scissors to create a makeshift piping bag. You can also use a spoon to drizzle the white candy over the treats, although this may not give you as precise of a result.
Q5: Can I use different colors of candy melts?
A: Absolutely! Feel free to get creative with the colors of candy melts. You could use green candy melts for a “Christmas tree” version of these treats or use a variety of colors to create a rainbow effect. Just be sure to melt each color separately to prevent them from mixing together.


