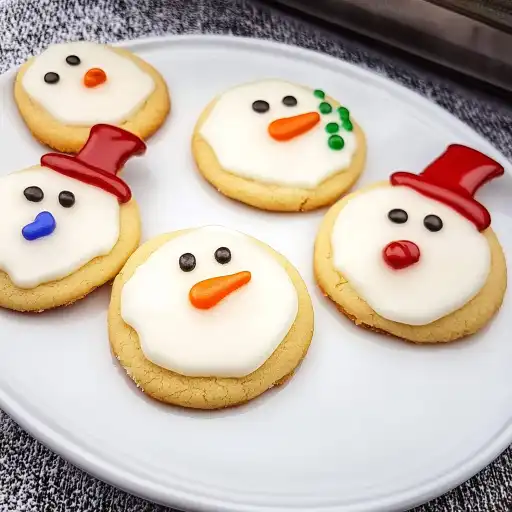
Delight in the magic of the holiday season with these adorable Melted Snowman Sugar Cookies! These delightful treats are as fun to make as they are to eat. Perfect for Christmas parties, school events, or a festive cookie exchange, these cookies bring a whimsical touch to any occasion. With a soft, chewy sugar cookie base, a blanket of sweet, melty icing, and charming candy decorations, these snowmen are sure to melt hearts and spread holiday cheer.
Why You Will Love This Recipe
These Melted Snowman Sugar Cookies are incredibly easy to make, especially when using store-bought sugar cookie dough. They’re a fantastic activity to do with kids, allowing them to unleash their creativity with the decorations. The combination of the soft cookie, smooth icing, and colorful candies creates a delightful texture and flavor profile that’s hard to resist. Plus, who can say no to a cookie that looks like a melting snowman? They’re guaranteed to be a hit at any holiday gathering and will bring smiles to everyone’s faces.
Ingredients:
- 16 oz package ready-to-bake sugar cookie dough
- 2 cups powdered sugar
- 3–4 tbsp milk
- 12 Mini Reese’s Cups, cut in half
- 48 mini chocolate chips
- 24 orange sprinkles
- 48 Mini M&Ms
Preparation:
Step 1: Prepare the Baking Sheet and Preheat the Oven
Begin by preheating your oven to 450°F (232°C). Line a baking sheet with parchment paper. This ensures that the cookies don’t stick and makes for easy cleanup. Parchment paper also helps the cookies bake evenly.
Step 2: Arrange Cookie Dough on the Baking Sheet
Place the sugar cookie dough on the prepared baking sheet. Leave approximately 2–3 inches (5-7cm) between each cookie to allow for spreading during baking. This spacing is crucial to prevent the cookies from merging into one giant cookie!
Step 3: Bake the Cookies
Bake the cookies for 13–15 minutes, or until they are golden brown around the edges and cooked through. Keep a close eye on them, as baking times may vary depending on your oven.
Step 4: Cool the Cookies
Once baked, remove the baking sheet from the oven and let the cookies cool on the sheet for about 2 minutes. This allows them to firm up slightly before transferring them to a wire rack.
Step 5: Transfer to Wire Rack and Cool Completely
Carefully move the cookies to a wire rack and let them cool completely, about 10 minutes. Ensure they are completely cool before you begin decorating, as warm cookies will cause the icing to melt and run.
Step 6: Prepare the Reese’s Cup Hats
While the cookies are cooling, cut the Mini Reese’s Cups in half. These will serve as the snowmen’s hats. Set them aside for later use.
Step 7: Make the Icing
In a small bowl, combine the powdered sugar and milk. Mix well until you achieve a thick, smooth icing consistency. If the icing is too thick, add a tiny splash of milk. If it’s too thin, add more powdered sugar. The consistency should be thick enough to hold its shape but still spreadable.
Step 8: Ice the Cookies
Working in small batches, add a spoonful of icing to each cookie. Gently spread it out in an uneven circle, allowing it to drip slightly over the edges to mimic a “melty” effect. The key is to make each cookie look uniquely melted for added charm.
Step 9: Add the Reese’s Cup Hat
Carefully place half a Reese’s Cup on top of the iced cookie to serve as the snowman’s hat. Press it gently into the icing to secure it in place.
Step 10: Add the Face and Buttons
Under the hat, add two mini chocolate chips for the eyes and an orange sprinkle for the nose. Place two Mini M&Ms below the nose to create the buttons. Be creative and have fun with the placement to give each snowman its unique personality.
Step 11: Let the Icing Set
Allow the icing to set for 20–30 minutes before serving. This will ensure that the decorations stay in place and the icing hardens slightly for a better eating experience.
COOKING Rating: Easy
Serving Suggestions:
Serve these Melted Snowman Sugar Cookies at your next holiday gathering, Christmas party, or school event. They pair perfectly with a glass of cold milk, hot cocoa, or a warm cup of coffee. You can also package them in festive cellophane bags and tie them with ribbon for a delightful homemade gift.
Tips:
- Cookie Dough: Store-bought sugar cookie dough makes this recipe incredibly simple, but feel free to use your favorite homemade sugar cookie recipe for a more personal touch.
- Icing Consistency: Ensure your icing is thick enough to hold the decorations in place. If it’s too thin, add more powdered sugar; if too thick, add a tiny splash of milk.
- Decoration Timing: Decorate just a few cookies at a time so the icing doesn’t set before you add the candies. This will ensure they adhere properly.
- Nose Alternative: If you don’t have orange sprinkles for the nose, you can substitute with an orange Mini M&M or a small piece of another orange candy.
- Cooling Time: Make sure the cookies are completely cool before decorating. This prevents the icing from melting and running.
Prep Time: 25 minutes Cook Time: 15 minutes Total Time: 40 minutes
Nutritional Information: (per cookie, approximate) Calories: 170 kcal Protein: 1g Sodium: 50mg
Conclusion:
These Melted Snowman Sugar Cookies are more than just a sweet treat; they’re a delightful and festive way to celebrate the holiday season. Easy to make and endlessly customizable, they’re perfect for getting the whole family involved in some holiday baking fun. Whether you’re looking for a crowd-pleasing dessert for a Christmas party or a fun activity to do with the kids, these cookies are sure to bring joy and smiles. So gather your ingredients, preheat your oven, and get ready to create some adorably melty snowmen that everyone will love! Enjoy the process and the delicious results!
Questions and Answers About This Recipe:
Q1: Can I make these cookies ahead of time?
A: Absolutely! You can bake the sugar cookies a day in advance and store them in an airtight container at room temperature. Then, decorate them the next day when you’re ready to add the melty snowman details. This can save you time and make the process more manageable, especially if you’re preparing for a large event.
Q2: What if I don’t have Reese’s Cups? What can I use instead for the snowman’s hat?
A: If you don’t have Reese’s Cups, you can get creative with alternatives! Consider using small chocolate-covered marshmallows, mini brownies cut into triangles, or even large chocolate chips. Another fun option is to mold fondant or marzipan into small hat shapes. The key is to find something that resembles a hat and complements the overall look of the melted snowman.
Q3: My icing is too runny. How can I fix it?
A: If your icing is too runny, don’t worry, it’s an easy fix! Gradually add more powdered sugar, one tablespoon at a time, until you achieve the desired consistency. Mix thoroughly after each addition. The icing should be thick enough to hold its shape when dolloped onto the cookie but still spreadable.
Q4: Can I use different types of sprinkles or candies for the decorations?
A: Absolutely! Feel free to get creative with the decorations. Use different colors of M&Ms, various types of sprinkles, or even edible glitter to add some sparkle. Consider using licorice pieces for the snowman’s smile or pretzel sticks for arms. The possibilities are endless, so let your imagination run wild!
Q5: How should I store the finished cookies?
A: Store the finished Melted Snowman Sugar Cookies in an airtight container at room temperature. They will stay fresh for about 3–4 days. To prevent the cookies from sticking together, you can place a sheet of parchment paper between layers. Avoid storing them in the refrigerator, as this can cause the icing to become sticky and the cookies to dry out.