Description of this recipe
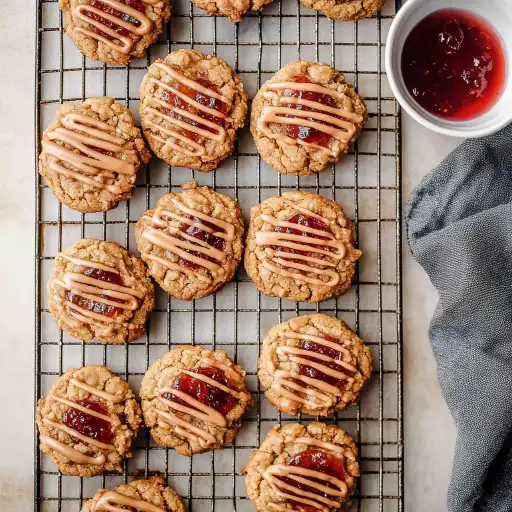
These Easy Peanut Butter and Jelly Cookies are a delightful twist on the classic sandwich, transformed into a soft, chewy, and utterly irresistible treat. Perfect for kids and adults alike, these cookies combine the comforting flavors of peanut butter and your favorite fruit spread in a single, scrumptious bite. Whether you need a quick snack, a fun baking project with the family, or a nostalgic dessert, these cookies are sure to hit the spot.
Why you will love this recipe
You’ll fall in love with these cookies for several reasons. First, they are incredibly easy to make, requiring simple ingredients and straightforward steps. The recipe is adaptable, allowing you to customize the jelly flavor to your preference. The cookies are soft and chewy, with a delightful combination of peanut butter richness and fruity sweetness. They are also gluten-free, making them a great option for those with dietary restrictions. Plus, who can resist the nostalgic charm of peanut butter and jelly?
Ingredients:
- 1/2 cup organic cane sugar
- 1/2 cup golden brown sugar
- 1/4 cup unsalted butter, room temperature
- 2 large eggs at room temperature
- 1 teaspoon baking powder
- 1 teaspoon pure vanilla extract
- 3/4 cup creamy peanut butter, plus more for drizzling
- 2 1/4 cups rolled oats, gluten-free
- 1/2 cup fruit spread (jelly flavor of your choice)
Preparation:
Step 1: Preheat your oven to 350°F (175°C). If your jelly or jam has been in the fridge, remove it to allow it to come to room temperature. This will make it easier to work with when filling the cookies.
Step 2: In a large stand mixing bowl, add the softened butter and both the organic cane sugar and golden brown sugar. Using a paddle attachment, combine on low speed until the mixture is light and fluffy. Creaming the butter and sugars together is essential for achieving the right texture in your cookies, so take your time with this step.
Step 3: Crack the eggs into a smaller, separate bowl and lightly beat them. Add the eggs to the batter, followed by the baking powder and pure vanilla extract. Mix until everything is well combined. The eggs should be at room temperature to ensure they incorporate smoothly into the batter, creating a uniform consistency.
Step 4: Add the creamy peanut butter to the mixture and continue to mix until fully incorporated. Ensure the peanut butter is well blended, as it is a key flavor component of these cookies.
Step 5: Add the gluten-free rolled oats and combine until just mixed. Be careful not to overmix, as this can result in tougher cookies. Once the oats are incorporated, place the batter in the refrigerator for about 10 minutes to allow it to regain some stiffness. This chilling period helps prevent the cookies from spreading too much during baking.
Step 6: On a large baking sheet lined with parchment paper, scoop out the cookie dough using a 2-inch scoop. Ensure the cookies are spaced about 2 inches apart to prevent them from sticking together. Gently form each scoop into a ball and then flatten it slightly with the prongs of a fork in a crisscross pattern. This not only gives the cookies a classic look but also helps them bake evenly.
Step 7: Bake in the preheated oven for 12 minutes. Keep a close eye on the cookies to ensure they don’t overbake. They should be lightly golden around the edges but still soft in the center.
Step 8: When done, remove the baking sheet from the oven and let the cookies cool for about 10 minutes on the sheet before carefully transferring them to a wire cooling rack to cool completely. This prevents them from breaking apart while still warm.
Step 9: Once the cookies are completely cool, use the back of a 1/2 teaspoon to gently press an indentation in the center of each cookie to create a well for the jelly. Be careful not to press too hard, especially if the cookies are still slightly warm, as they can crumble easily.
Step 10: In a small bowl, give the jelly a good stir to ensure it’s smooth and easy to spread. Then, add about 1/2 teaspoon of jelly to each cookie, filling the well. Use your favorite jelly flavor, such as strawberry, grape, or raspberry, for a personalized touch.
Step 11: For the peanut butter drizzle, place about 1/4 cup of the creamy peanut butter into a microwave-safe dish. Microwave on high for 20 seconds, then stir. Place it back in the microwave for another 20 seconds or so, stirring until the peanut butter is smooth and has a drizzling consistency.
Step 12: Gently drizzle the melted peanut butter over the top of the cookies using a fork or small whisk. This adds an extra layer of peanut butter flavor and creates a visually appealing finish.
COOKING Rating:
Easy
Serving Suggestions:
- Serve these cookies as a delightful snack with a glass of milk or a cup of tea.
- Pack them in lunchboxes for a sweet and comforting treat.
- Offer them as a crowd-pleasing dessert at parties and gatherings.
- Enjoy them warm or at room temperature, depending on your preference.
Tips:
- Make sure your butter and eggs are at room temperature for better incorporation and a smoother batter.
- Chilling the dough before baking helps prevent the cookies from spreading too thin.
- Use your favorite jelly flavor to customize the cookies to your taste.
- Don’t overbake the cookies; they should be soft and slightly chewy.
- For a richer flavor, use natural peanut butter.
- Store the cookies in an airtight container at room temperature to maintain their freshness.
Prep Time:
15 minutes
Cook Time:
12 minutes
Total Time:
27 minutes
Nutritional Information (per cookie):
- Calories: Approximately 150-180
- Protein: 4-5 grams
- Sodium: 50-70 mg
Note: Nutritional information is an estimate and may vary based on specific ingredients used.
Conclusion
These Easy Peanut Butter and Jelly Cookies are a simple yet satisfying treat that brings together the classic combination of peanut butter and jelly in a delightful cookie form. With their soft, chewy texture and customizable flavors, these cookies are perfect for any occasion and are sure to become a family favorite. Whether you’re baking with kids, looking for a quick dessert, or simply craving a nostalgic bite, these cookies are a guaranteed hit. So, gather your ingredients and get ready to enjoy the delightful flavors of homemade peanut butter and jelly cookies!
Questions and Answers About This Recipe
Q1: Can I use different types of jelly?
A: Absolutely! One of the best things about this recipe is its versatility. You can use any type of jelly or jam that you love. Strawberry, grape, raspberry, or even mixed berry preserves would all work wonderfully. Feel free to experiment with different flavors to find your favorite combination.
Q2: Can I substitute the peanut butter with another nut butter?
A: Yes, you can definitely substitute the peanut butter. Almond butter, cashew butter, or sunflower seed butter are all great alternatives. Keep in mind that using a different nut butter will slightly alter the flavor profile of the cookies, but they will still be delicious.
Q3: How do I store these cookies to keep them fresh?
A: To keep these cookies fresh, store them in an airtight container at room temperature. They should stay soft and delicious for up to 3-4 days. Avoid storing them in the refrigerator, as this can dry them out.
Q4: Can I make these cookies ahead of time?
A: Yes, you can make the cookie dough ahead of time and store it in the refrigerator for up to 24 hours. Just make sure to wrap it tightly in plastic wrap to prevent it from drying out. When you’re ready to bake, simply scoop out the dough and proceed with the recipe.
Q5: What can I do if my cookies are too crumbly?
A: If your cookies are turning out too crumbly, it could be due to a few reasons. First, make sure you are not overbaking them. The cookies should be lightly golden around the edges but still soft in the center. Second, ensure that your butter and eggs are at room temperature, as this helps with proper incorporation of the ingredients. Finally, avoid overmixing the dough, as this can also lead to a crumbly texture. If all else fails, try adding a tablespoon of milk or water to the dough to help bind the ingredients together.