Description of this recipe
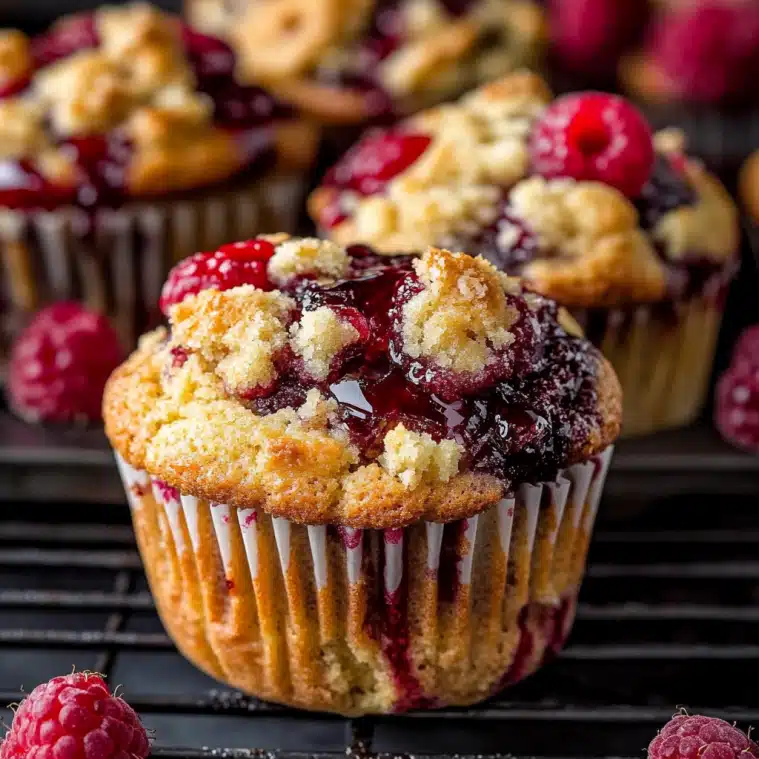
These Cherry Cobbler Muffins combine the best of both worlds: the comforting taste of cherry cobbler and the convenience of a handheld muffin. Bursting with juicy cherries and topped with a buttery crumble, these muffins are perfect for breakfast, brunch, or a delightful afternoon treat. They’re easy to make, incredibly delicious, and sure to become a family favorite.
Why you will love this recipe
You’ll absolutely adore these Cherry Cobbler Muffins because they are:
- Easy to make: With simple ingredients and straightforward instructions, anyone can whip up a batch of these muffins in no time.
- Deliciously flavorful: The combination of sweet cherries, a hint of cinnamon, and a buttery crumble topping creates a symphony of flavors that will tantalize your taste buds.
- Perfectly portable: These muffins are ideal for on-the-go snacking, packing in lunchboxes, or serving at picnics and potlucks.
- Versatile: You can use fresh, frozen, or canned cherries, making this recipe suitable for any time of year. Feel free to experiment with different types of cherries for a unique twist.
- Comforting: They evoke the warm, comforting feeling of homemade cherry cobbler in a convenient and satisfying muffin form.
- Crowd-pleasing: Both kids and adults will love these muffins, making them a guaranteed hit at any gathering.
- Freezable: Make a big batch and freeze some for later. They thaw beautifully and taste just as good as fresh.
- Customizable: Add nuts, chocolate chips, or different spices to personalize the recipe to your liking.
Ingredients:
For the Muffin Batter:
- 2 cups all-purpose flour
- ½ cup granulated sugar
- ¼ cup brown sugar, packed
- 2 teaspoons baking powder
- ½ teaspoon baking soda
- ½ teaspoon salt
- 1 teaspoon cinnamon (optional)
- 2 large eggs
- ¾ cup milk (whole or 2%)
- ⅓ cup vegetable oil or melted butter
- 1 teaspoon vanilla extract
For the Cherry Filling:
- 1½ cups cherries (fresh, frozen, or canned), pitted and halved
- 1 tablespoon flour
- 1 tablespoon sugar (optional, for tart cherries)
For the Crumble Topping:
- ½ cup all-purpose flour
- ¼ cup brown sugar
- 3 tablespoons cold butter, cut into cubes
- Pinch of cinnamon (optional)
Preparation:
Step 1: Preheat your oven to 375°F (190°C). Prepare your muffin tin by lining it with paper liners or greasing it lightly with cooking spray. This will ensure that your muffins release easily after baking.
Step 2: Prepare the crumble topping. In a small bowl, combine the flour, brown sugar, and cinnamon (if using). Cut in the cold butter using a pastry blender or your fingertips until the mixture resembles coarse crumbs. It’s important to keep the butter cold so that the topping becomes nice and crumbly. Once prepared, refrigerate the crumble topping until you are ready to assemble the muffins. This helps the butter stay firm and prevents the topping from melting too quickly in the oven.
Step 3: Prepare the cherry filling. In a separate bowl, gently toss the pitted and halved cherries with the flour. If you are using tart cherries, you may want to add a tablespoon of sugar to balance the acidity. The flour helps to absorb any excess moisture from the cherries and prevents them from sinking to the bottom of the muffins during baking. Set the cherry filling aside while you prepare the muffin batter.
Step 4: Make the muffin batter. In a large bowl, whisk together the flour, granulated sugar, brown sugar, baking powder, baking soda, salt, and cinnamon (if using). Make sure to whisk the dry ingredients thoroughly to ensure that the baking powder and baking soda are evenly distributed. This will help the muffins rise properly and have a light and airy texture.
Step 5: In another bowl, whisk together the eggs, milk, vegetable oil (or melted butter), and vanilla extract. The wet ingredients should be well combined to create a smooth and uniform batter.
Step 6: Gently pour the wet ingredients into the dry ingredients. Stir until just combined. Be careful not to overmix the batter, as this can result in tough muffins. A few lumps are okay. The batter should be thick but pourable.
Step 7: Gently fold in the cherry filling. Be careful not to crush the cherries while folding them into the batter. Distribute the cherries evenly throughout the batter.
Step 8: Fill the muffin cups. Using an ice cream scoop or a spoon, fill each muffin cup about ¾ full with the cherry-studded batter.
Step 9: Sprinkle the crumble topping evenly over the filled muffin cups. Don’t be shy with the topping – it adds a delightful buttery crunch to the muffins.
Step 10: Bake the muffins in the preheated oven for 18–22 minutes, or until they are golden brown and a toothpick inserted into the center comes out clean. The baking time may vary depending on your oven, so start checking for doneness around 18 minutes.
Step 11: Let the muffins cool in the muffin tin for 5 minutes before transferring them to a wire rack to cool completely. This prevents the muffins from sticking to the tin and allows them to cool evenly.
COOKING Rating:
Easy
Serving Suggestions:
- Serve warm with a dollop of whipped cream or vanilla ice cream.
- Enjoy as a breakfast treat with a cup of coffee or tea.
- Pack in lunchboxes for a delightful midday snack.
- Serve at brunch alongside other breakfast favorites like eggs, bacon, and fruit salad.
- Bring to potlucks and gatherings – these muffins are always a hit!
- Drizzle with a simple glaze made from powdered sugar and milk for an extra touch of sweetness.
- Serve with a side of yogurt or cottage cheese for a more balanced and satisfying meal.
- Warm them up slightly and serve as a dessert with a scoop of ice cream.
Tips:
- Use room-temperature ingredients for a smoother batter.
- Don’t overmix the batter – it’s okay if there are a few lumps.
- For a richer flavor, use melted butter instead of vegetable oil.
- If using frozen cherries, do not thaw them before using, as this will prevent too much liquid to be added.
- Store leftover muffins in an airtight container at room temperature for up to 3 days or in the refrigerator for up to a week.
- Reheat the muffins in the microwave or oven for a few seconds to restore their warmth and flavor.
- Freeze leftover muffins for longer storage. Wrap them individually in plastic wrap and store them in a freezer bag for up to 2 months.
- Add a handful of chopped nuts (such as walnuts or pecans) to the crumble topping for extra crunch and flavor.
- Mix a tablespoon of lemon zest into the muffin batter for a bright and zesty flavor.
- Substitute the cherries with other fruits like blueberries, raspberries, or peaches for a different variation.
Prep Time:
20 minutes
Cook Time:
20 minutes
Total Time:
40 minutes
Nutritional Information:
(Per muffin, estimated)
Calories: 250
Protein: 4g
Sodium: 200mg
Conclusion
These Cherry Cobbler Muffins are a delightful treat that combines the comforting flavors of cherry cobbler with the convenience of a muffin. They’re easy to make, customizable, and perfect for any occasion. Whether you’re enjoying them for breakfast, brunch, or a sweet snack, these muffins are sure to bring a smile to your face. So, gather your ingredients, preheat your oven, and get ready to bake a batch of these irresistible muffins. Your family and friends will thank you for it!
Questions and Answers:
Q1: Can I use frozen cherries instead of fresh cherries?
A: Absolutely! Frozen cherries work perfectly well in this recipe. There is no need to thaw them before using. Add them directly to the batter. If you thaw them first, they may release too much liquid, which could make the muffins soggy.
Q2: Can I make these muffins ahead of time?
A: Yes, you can! These muffins are great for making ahead of time. Store them in an airtight container at room temperature for up to 3 days or in the refrigerator for up to a week. You can also freeze them for longer storage.
Q3: Can I add nuts to the crumble topping?
A: Certainly! Adding chopped nuts to the crumble topping is a great way to add extra flavor and texture. Walnuts, pecans, or almonds would all be delicious choices. Simply mix the nuts in with the other crumble topping ingredients before refrigerating.
Q4: What can I use if I don’t have brown sugar?
A: If you don’t have brown sugar on hand, you can make your own by mixing granulated sugar with a tablespoon of molasses per cup of sugar. Mix well until the molasses is evenly distributed. Alternatively, you can substitute the brown sugar with an equal amount of granulated sugar, although the muffins may not have quite the same depth of flavor.
Q5: Can I make these muffins gluten-free?
A: Yes, you can adapt this recipe to be gluten-free. Simply substitute the all-purpose flour with a gluten-free all-purpose flour blend. Be sure to choose a blend that contains xanthan gum or another binding agent to help hold the muffins together. The baking time may vary slightly, so keep an eye on the muffins and check for doneness with a toothpick.