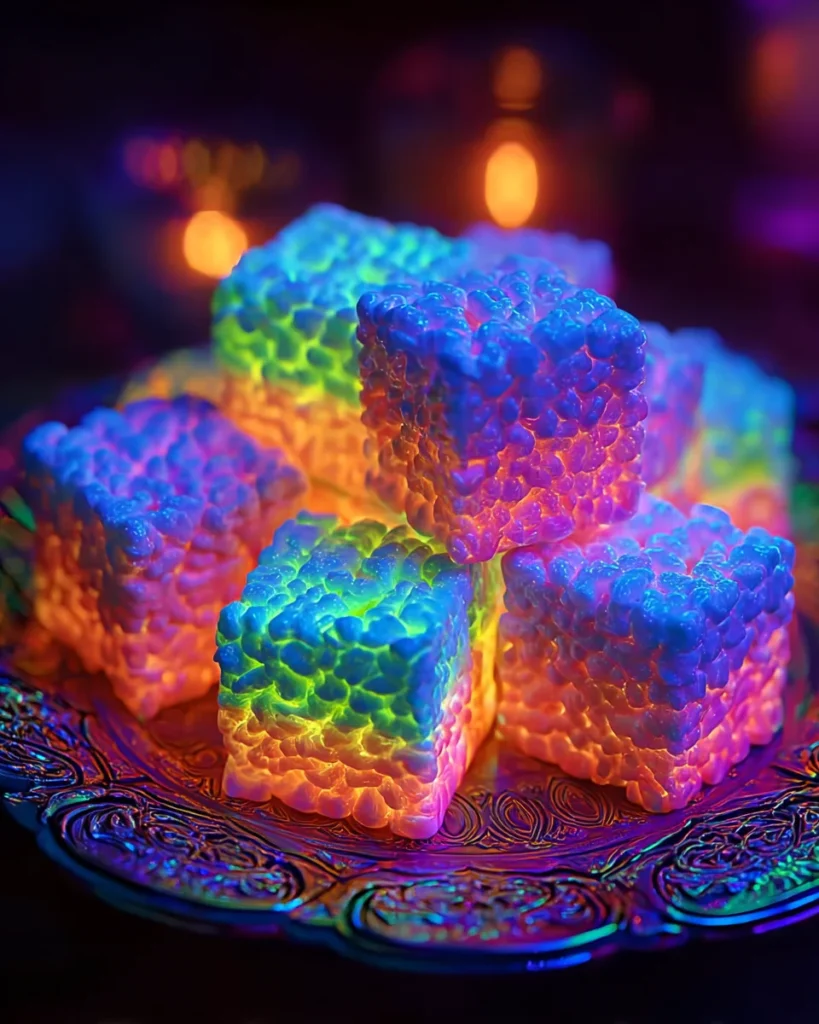
Description of this recipe: Glow-in-the-Dark Rice Krispies Treats are a whimsical and eye-catching twist on a classic favorite. By incorporating tonic water, which contains quinine, these treats magically glow under a blacklight, creating a fun and memorable experience. Perfect for parties, Halloween, or any occasion where you want to add a touch of wonder, these treats are as delicious as they are visually stunning. With the option of adding neon food coloring, you can customize the glow to match any theme or mood. These treats combine the satisfying crunch of Rice Krispies cereal with the gooey sweetness of melted marshmallows, resulting in a treat that’s both nostalgic and innovative. Get ready to impress your friends and family with these easy-to-make, glow-in-the-dark delights!
Why you will love this recipe: You’ll adore these Glow-in-the-Dark Rice Krispies Treats for their sheer novelty and the joy they bring. Imagine the looks of amazement when you turn on a blacklight and these unassuming treats suddenly burst into a luminous glow! Beyond the visual appeal, they offer the comforting taste of classic Rice Krispies Treats, making them a hit with both kids and adults. The recipe is straightforward and requires minimal ingredients, ensuring a quick and hassle-free baking experience. Moreover, the option to add neon food coloring allows for endless creativity, enabling you to tailor the treats to specific themes or color schemes. Whether you’re hosting a party, looking for a unique dessert, or simply want to add a bit of magic to your day, these Glow-in-the-Dark Rice Krispies Treats are guaranteed to be a conversation starter and a delightful treat. The combination of ease, taste, and visual appeal makes this recipe a surefire winner.
Ingredients:
- 6 cups Rice Krispies cereal
- 4 cups mini marshmallows
- 3 tablespoons unsalted butter
- 1/4 cup tonic water (must contain quinine for the glow effect)
- Neon food coloring (optional, but highly recommended for maximum visual impact)
Preparation:
Step 1: Prepare the Pan Lightly grease a 9×13-inch baking pan or silicone molds with butter or cooking spray. This step is crucial to prevent the Rice Krispies Treats from sticking, ensuring easy removal and clean cuts. If using silicone molds, lightly coat each mold to ensure the treats come out smoothly. Set the prepared pan or molds aside, ready to receive the marshmallow mixture.
Step 2: Melt the Butter In a large, non-stick saucepan, melt 3 tablespoons of unsalted butter over low heat. Using low heat is essential to prevent the butter from burning, which can affect the overall taste of the treats. Stir the butter occasionally to ensure it melts evenly and doesn’t stick to the bottom of the pan. Once the butter is completely melted, proceed to the next step.
Step 3: Add Marshmallows and Melt Add 4 cups of mini marshmallows to the melted butter in the saucepan. Continue to stir constantly over low heat until the marshmallows are completely melted and the mixture is smooth. Stirring constantly is key to preventing the marshmallows from sticking and burning. The mixture should be uniformly melted with no lumps. This step is crucial for achieving the desired gooey consistency of the treats.
Step 4: Incorporate Tonic Water Remove the saucepan from the heat. Immediately add 1/4 cup of tonic water to the melted marshmallow mixture. Stir vigorously until the tonic water is thoroughly combined. The tonic water is what gives the treats their glow-in-the-dark properties under a blacklight, thanks to the quinine it contains. Ensure it’s mixed in well to distribute the glowing effect evenly throughout the treats.
Step 5: Add Neon Food Coloring (Optional) If desired, divide the marshmallow mixture into separate bowls, depending on how many colors you want to create. Add a few drops of neon food coloring to each bowl and stir until the color is evenly distributed. Neon food coloring enhances the visual impact of the glow-in-the-dark effect, making the treats even more vibrant under a blacklight. Be careful not to add too much food coloring, as it can alter the consistency of the mixture.
Step 6: Combine with Rice Krispies Cereal Add 6 cups of Rice Krispies cereal to the marshmallow mixture. Gently stir to coat the cereal evenly. Ensure every piece of cereal is covered with the marshmallow mixture to create a cohesive treat. Be gentle while stirring to avoid crushing the cereal, which can affect the texture of the treats.
Step 7: Press into Pan or Molds Spoon the Rice Krispies mixture into the prepared baking pan or silicone molds. Press the mixture firmly and evenly into place using a spatula or your hands (lightly dampened to prevent sticking). This ensures a compact and uniform structure for the treats. For the baking pan, press down firmly to create a smooth surface. If using silicone molds, fill each mold completely and press to ensure the mixture fills all the details.
Step 8: Cool and Set Allow the treats to cool at room temperature for 1 to 2 hours, or until they are firm and set. This cooling period allows the marshmallow mixture to solidify, making the treats easier to cut and handle. If you’re in a hurry, you can place the treats in the refrigerator for a quicker set, but be careful not to over-chill them, as this can make them too hard.
Step 9: Cut and Serve Once the treats are fully cooled and set, cut them into squares with a sharp knife, or carefully remove them from the silicone molds. If using a baking pan, use a clean, sharp knife to cut neat squares. Wipe the knife clean between cuts to prevent sticking. If using silicone molds, gently peel back the mold to release the treats.
Step 10: Enjoy Under Blacklight For the ultimate experience, serve the Glow-in-the-Dark Rice Krispies Treats under a blacklight to reveal their luminous glow. Watch as they transform into a mesmerizing display of light and color, perfect for parties, gatherings, or a fun nighttime snack. Enjoy the combination of classic taste and visual spectacle!
COOKING Rating: Easy
Serving Suggestions: Serve these Glow-in-the-Dark Rice Krispies Treats at parties, Halloween gatherings, or as a fun dessert for kids and adults alike. They make a fantastic addition to themed events, especially those with a blacklight setup. Pair them with other glow-in-the-dark snacks and decorations for a truly immersive experience. You can also serve them with a side of vanilla ice cream or a drizzle of melted chocolate for an extra touch of indulgence. For a creative presentation, arrange the treats on a platter under a blacklight to showcase their vibrant glow.
Tips:
- Use fresh marshmallows for the best results. Stale marshmallows may not melt as smoothly.
- Ensure your tonic water contains quinine, as this is the ingredient that causes the glow-in-the-dark effect.
- Don’t overcook the marshmallows, as this can make the treats hard.
- Lightly dampen your hands or spatula with water to prevent the Rice Krispies mixture from sticking when pressing it into the pan or molds.
- For extra flavor, add a pinch of salt to the marshmallow mixture to balance the sweetness.
- Experiment with different neon food coloring combinations to create unique and vibrant glows.
- Store the treats in an airtight container at room temperature to maintain their freshness and prevent them from becoming too hard.
- If you don’t have neon food coloring, you can use regular food coloring, but the glow effect will be less pronounced.
- For a fun twist, add sprinkles or edible glitter to the treats before they cool for extra sparkle.
Prep Time: 15 minutes
Cook Time: 10 minutes
Total Time: 25 minutes + 1-2 hours cooling time
Nutritional Information: (Note: Nutritional information is approximate and can vary based on specific ingredients and serving size.) Calories: Approximately 150-200 per serving Protein: Approximately 1-2 grams per serving Sodium: Approximately 50-75mg per serving
Conclusion: Glow-in-the-Dark Rice Krispies Treats are a delightful and innovative twist on a classic favorite. These treats offer a unique visual experience, glowing brilliantly under a blacklight, making them perfect for parties, themed events, or simply adding a bit of fun to your day. The recipe is easy to follow, requiring minimal ingredients and preparation time, ensuring a hassle-free baking experience. Whether you’re looking to impress your friends and family or simply want to create a memorable dessert, these Glow-in-the-Dark Rice Krispies Treats are sure to be a hit. So gather your ingredients, turn on the blacklight, and get ready to enjoy a treat that’s both delicious and dazzling! The combination of taste, visual appeal, and ease of preparation makes this recipe a must-try for anyone looking to add a touch of magic to their baking repertoire. Enjoy the fun and the flavor!
5 Questions and Answers About This Recipe:
- Question: What makes these Rice Krispies Treats glow in the dark? Answer: The glow-in-the-dark effect comes from the quinine in tonic water. When exposed to ultraviolet (UV) light from a blacklight, quinine fluoresces, causing the treats to emit a luminous glow. It’s essential to use tonic water that contains quinine to achieve this effect.
- Question: Can I use regular food coloring instead of neon food coloring? Answer: Yes, you can use regular food coloring, but the glow effect will be less pronounced. Neon food coloring contains pigments that enhance the fluorescence under a blacklight, resulting in a more vibrant and noticeable glow. If you don’t have neon food coloring, regular food coloring will still add color, but the overall glow-in-the-dark effect won’t be as dramatic.
- Question: How long do these treats stay fresh? Answer: These Glow-in-the-Dark Rice Krispies Treats will stay fresh for about 2-3 days when stored in an airtight container at room temperature. Over time, they may become slightly harder, but they will still be safe to eat. To maintain their freshness, avoid storing them in the refrigerator, as this can make them too hard.
- Question: Can I make these treats without tonic water? Answer: Yes, you can make Rice Krispies Treats without tonic water, but they won’t glow in the dark. If you want to make regular Rice Krispies Treats, simply omit the tonic water from the recipe and proceed with the remaining ingredients. The treats will still be delicious, just without the glow-in-the-dark effect.
- Question: What are some variations I can try with this recipe? Answer: There are many fun variations you can try! You can add sprinkles or edible glitter for extra sparkle, mix in chocolate chips or M&Ms for added flavor, or use different types of cereal, such as Cocoa Krispies or Fruity Pebbles, for a colorful twist. You can also experiment with different extracts, such as vanilla or almond, to enhance the flavor of the marshmallow mixture. Get creative and customize the treats to your liking!