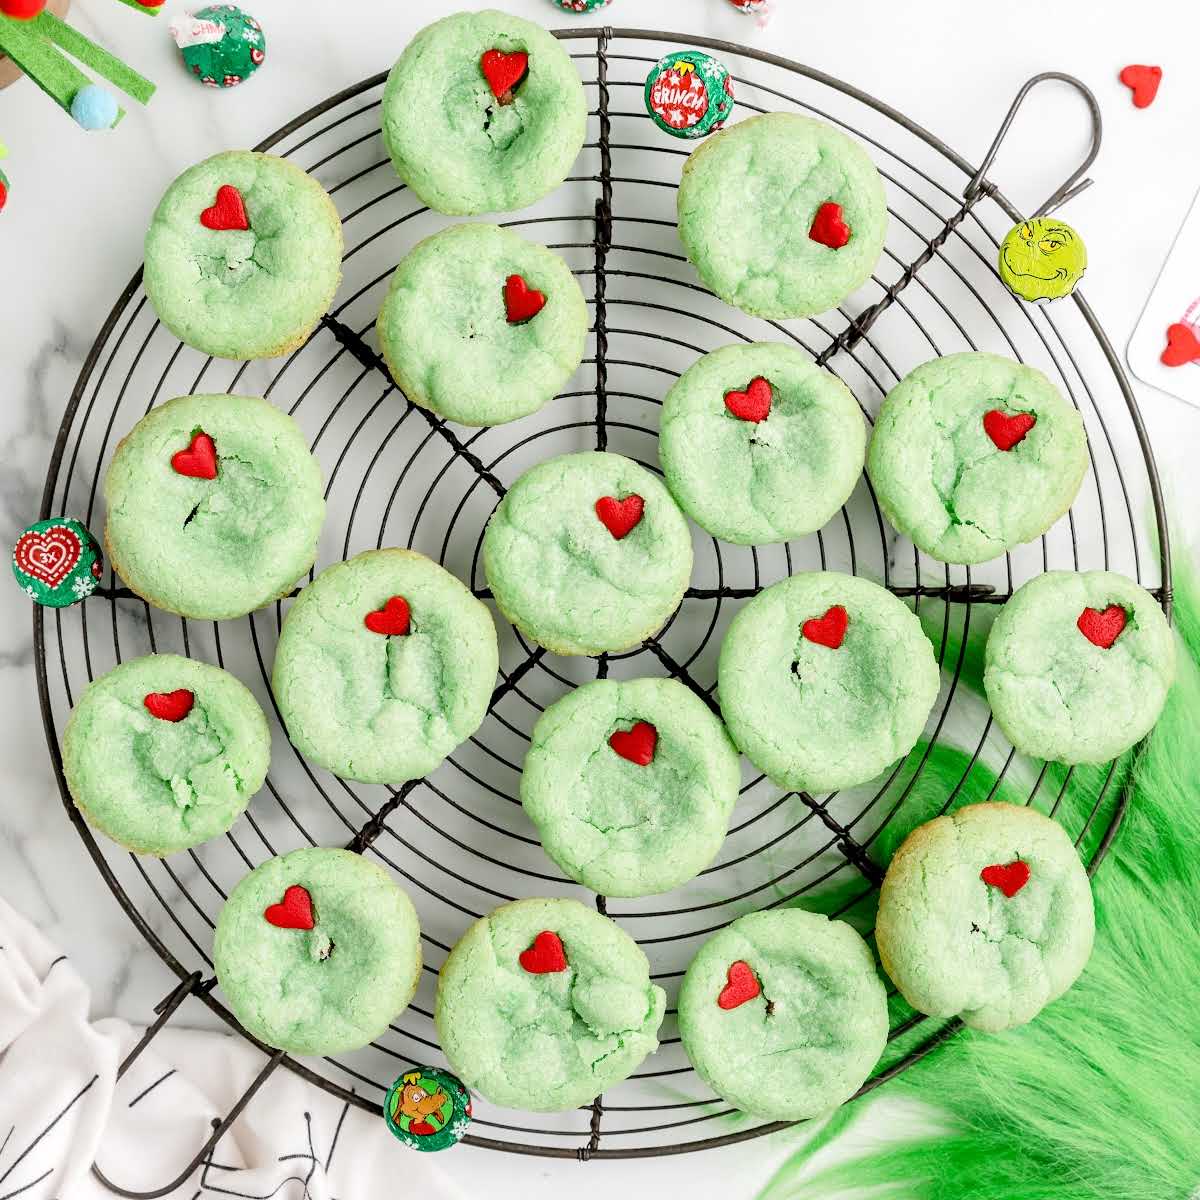
Description of this recipe: Grinch Cookies are delightful, festive treats perfect for the holiday season. These vibrant green cookies are not only visually appealing but also incredibly delicious, making them a hit at Christmas parties, bake sales, or as a fun family baking project. Each cookie is stuffed with a Hershey’s Kiss, adding a sweet, chocolatey surprise that complements the soft, chewy texture of the sugar cookie base. Decorated with a heart-shaped sprinkle, these cookies embody the spirit of the Grinch, whose heart grew three sizes on Christmas Day.
Why you will love this recipe: You’ll adore this Grinch Cookies recipe because it’s simple, fun, and delivers impressive results. The recipe uses a sugar cookie mix as a base, cutting down on prep time and making it accessible for bakers of all skill levels. The vibrant green color is achieved with gel food coloring, ensuring a rich, even hue that captures the essence of the Grinch. The hidden Hershey’s Kiss center adds a delightful surprise element that both kids and adults will love. Plus, the heart-shaped sprinkle on top adds a touch of whimsy and completes the Grinch-inspired look. These cookies are not only delicious but also a joy to make, making them a perfect addition to your holiday baking traditions. Whether you’re baking with family, bringing a treat to a holiday gathering, or simply want to spread some Christmas cheer, these Grinch Cookies are guaranteed to bring smiles and festive joy.
Ingredients:
- 18 Hershey’s Kisses, unwrapped
- 17.5 ounces sugar cookie mix
- ¼ cup all-purpose flour
- 1 large egg
- ½ cup unsalted butter, room temperature
- ¾ teaspoon green gel food coloring
- 18 large heart candy sprinkles
Preparation:
Step 1: Preheat the oven to 375°F (190°C). Prepare a mini muffin pan by lightly spraying it with baker’s spray or lining it with paper cups. This will prevent the cookies from sticking and make them easy to remove.
Step 2: In a small bowl, whisk together the egg and green gel food coloring until the food coloring is thoroughly combined with the beaten egg. This ensures an even distribution of color throughout the cookie dough.
Step 3: In a large mixing bowl, using a handheld mixer on low speed, combine the sugar cookie mix, all-purpose flour, unsalted butter, and the egg mixture. Mix for 2 to 3 minutes, or until thoroughly combined. The dough will be very thick, which is normal and necessary for the cookies to hold their shape.
Step 4: Using a 1½ tablespoon (1½-inch) cookie scoop, scoop out a ball of dough. Flatten it into a 3-inch disc in your hand. Place an unwrapped Hershey’s Kiss into the center of the disc. Carefully pull the sides of the dough up to cover the candy completely, shaping it into a ball. Ensure that the Hershey’s Kiss candy remains upright when placed into the mini muffin tin.
Step 5: Place the dough balls into the prepared muffin tin, making sure that the Hershey’s Kiss is still in the upright position. Bake for 10 to 12 minutes. Keep a close eye on the cookies; you don’t want them to brown. The goal is to ensure the center is not raw while maintaining a soft texture.
Step 6: Once the Grinch stuffed cookie cups are removed from the oven, immediately place one heart sprinkle, offset to the right from the center, onto each cookie cup. This adds the final Grinch-like touch to the cookies.
Step 7: Let the cookies cool in the mini muffin tin for at least 10 minutes before removing them. This allows them to set slightly, preventing them from breaking apart. After 10 minutes, carefully remove the cookies and place them on a wire rack to cool completely.
COOKING Rating: Easy
Serving Suggestions: Grinch Cookies are perfect for serving at Christmas parties, holiday gatherings, or as a special treat for family and friends. They can be arranged on a festive platter, placed in decorative tins for gifting, or served warm with a glass of milk or hot cocoa. These cookies also make a fun addition to a holiday dessert table or cookie exchange.
Tips:
- Room Temperature Butter: Ensure that your butter is at room temperature for easier mixing and a smoother dough consistency. If you forget to take the butter out in advance, you can microwave it in short intervals (5-10 seconds) until softened, but be careful not to melt it.
- Gel Food Coloring: Gel food coloring is recommended for achieving a vibrant green color without altering the consistency of the dough. Liquid food coloring may require you to add more to achieve the desired color, which can affect the dough’s texture.
- Don’t Overbake: Keep a close watch on the cookies while they’re baking to prevent them from browning. Overbaking will result in dry, hard cookies. The cookies should be soft and slightly set when they’re done.
- Hershey’s Kisses: Make sure to unwrap all the Hershey’s Kisses before you start making the dough. This will save you time and prevent any last-minute scrambling.
- Heart Sprinkle Placement: Placing the heart sprinkle slightly off-center mimics the Grinch’s heart growing, adding a fun and thematic touch to the cookies.
- Cooling Time: Allowing the cookies to cool in the muffin tin for 10 minutes helps them to set and prevents them from breaking when you remove them.
Prep Time: 20 minutes Cook Time: 12 minutes Total Time: 32 minutes
Nutritional Information: (per cookie, approximate) Calories: 150 Protein: 2g Sodium: 50mg
Conclusion: Grinch Cookies are a delightful and festive treat that embodies the spirit of the holiday season. With their vibrant green color, hidden Hershey’s Kiss center, and whimsical heart sprinkle, these cookies are sure to bring joy and smiles to everyone who tries them. The recipe is simple and fun, making it perfect for baking with family or for adding a special touch to your holiday gatherings. Whether you’re a seasoned baker or just starting out, these Grinch Cookies are a must-try for spreading Christmas cheer. So gather your ingredients, preheat your oven, and get ready to create some Grinch-inspired magic in your kitchen! These cookies are not just a treat; they’re a celebration of the holidays and the joy of sharing delicious homemade goodies with loved ones.
Q&A:
Question 1: Can I use a different type of chocolate instead of Hershey’s Kisses? Answer: Absolutely! While Hershey’s Kisses are the traditional choice for this recipe, you can easily substitute them with other small chocolate candies such as chocolate caramels, mini peanut butter cups, or even small chunks of your favorite chocolate bar. Just make sure the candies are small enough to be completely enclosed in the cookie dough.
Question 2: What if I don’t have green gel food coloring? Can I use liquid food coloring or another color? Answer: Yes, you can use liquid food coloring, but keep in mind that you may need to use more to achieve the desired vibrant green color. This can slightly alter the consistency of the dough, so add it gradually. Alternatively, you can use another color entirely! Red or white would be great for Christmas.
Question 3: Can I make the dough ahead of time and bake the cookies later? Answer: Yes, you can definitely make the dough ahead of time. Wrap it tightly in plastic wrap and store it in the refrigerator for up to 2 days. When you’re ready to bake, let the dough sit at room temperature for about 15-20 minutes to soften slightly before scooping and shaping it. You can also freeze the dough for longer storage. Thaw it in the refrigerator overnight before using.
Question 4: My cookies are spreading out too much while baking. What am I doing wrong? Answer: There are a few reasons why your cookies might be spreading too much. First, make sure your oven is at the correct temperature. Second, ensure that your butter wasn’t too soft or melted when you made the dough. If the dough is too warm, the cookies will spread. Try chilling the dough in the refrigerator for 30 minutes before baking. Also, avoid over-greasing the muffin tin, as this can contribute to spreading.
Question 5: Can I make these cookies without using a mini muffin tin? Answer: Yes, you can make these cookies without a mini muffin tin, but they will have a slightly different shape. Instead of placing the dough balls in a muffin tin, place them on a parchment-lined baking sheet. Gently flatten them slightly with your hand before baking. Keep a close eye on the baking time, as they may bake a little faster on a flat sheet.