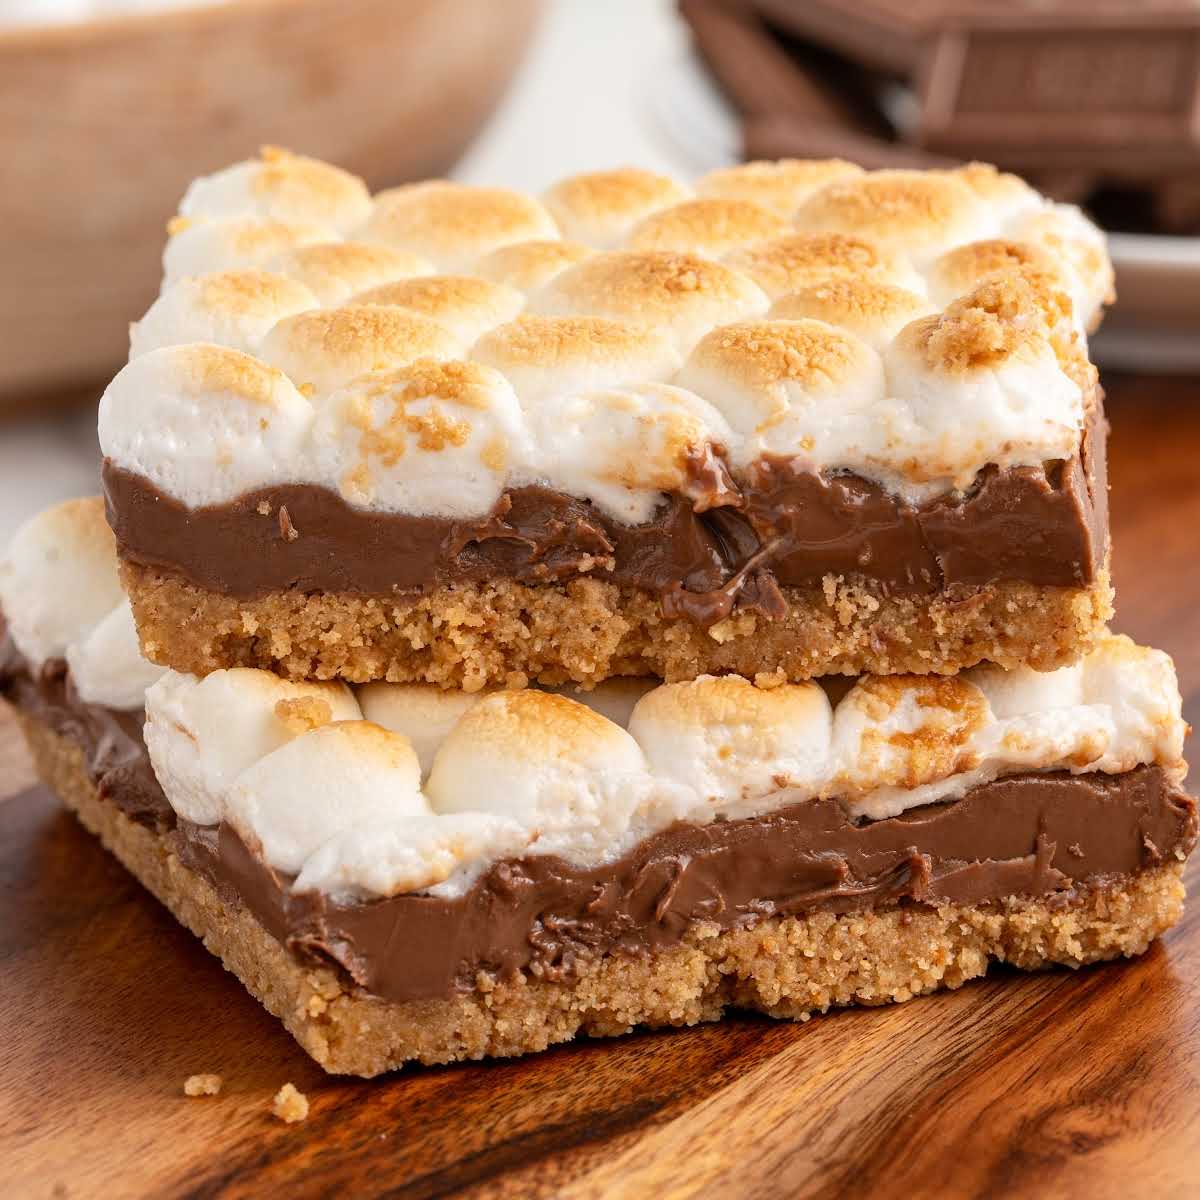
S’mores bars are a delightful reimagining of the beloved campfire s’more. These bars capture all the gooey, chocolatey, and graham cracker goodness in a convenient and easy-to-make dessert. Imagine sinking your teeth into a rich graham cracker crust, topped with a layer of melty Hershey’s chocolate, and finished with perfectly toasted marshmallows. This recipe brings the joy of s’mores indoors, allowing you to enjoy this classic treat year-round, without the need for a campfire.
Why You Will Love This Recipe
These s’mores bars are incredibly easy to make, requiring minimal effort and readily available ingredients. The recipe is perfect for both novice and experienced bakers, offering a foolproof way to create a crowd-pleasing dessert. They are incredibly versatile. They can be customized with different types of chocolate, flavored marshmallows, or even a sprinkle of sea salt for a touch of sophistication. Best of all, s’mores bars are undeniably delicious. The combination of textures and flavors creates a symphony in your mouth, making them irresistible to both children and adults. They’re a guaranteed hit at parties, potlucks, or even as a simple after-dinner treat.
Ingredients:
- 2 cups graham cracker crumbs
- ½ cup powdered sugar
- 8 to 12 tablespoons butter, melted
- 4 Hershey’s chocolate bars (4.4-ounce bars)
- 10 ounces mini marshmallows (1 package)
Preparation:
Step 1: Preheat the oven to 350°F (175°C). Grease a 9 x 13-inch baking pan with non-stick butter spray. This ensures the bars will release easily after baking, preventing them from sticking to the bottom of the pan.
Step 2: In a medium bowl, combine the graham cracker crumbs, powdered sugar, and melted butter. Use a spoon or your hands to mix the ingredients until they are evenly moistened and resemble wet sand. The powdered sugar adds a touch of sweetness to the crust, while the melted butter binds the ingredients together, creating a cohesive base for the bars.
Step 3: Press the graham cracker mixture into the bottom of the prepared baking pan. Distribute the mixture evenly and use your fingers or the back of a spoon to firmly pack it along the bottom and slightly up the sides of the pan. A well-compacted crust is essential for holding the layers of chocolate and marshmallows, creating a stable and delicious bar.
Step 4: Bake the graham cracker crust for approximately 5 to 8 minutes, or until the edges begin to turn golden brown. This pre-baking step helps to set the crust, preventing it from becoming soggy when the chocolate and marshmallows are added. Keep a close eye on the crust to prevent it from burning.
Step 5: Remove the pan from the oven and let the crust cool slightly. This allows the crust to firm up before adding the chocolate, preventing it from melting too quickly.
Step 6: Arrange the Hershey’s chocolate bars on top of the graham cracker crust, covering as much of the crust as possible. Break the chocolate bars into smaller pieces if necessary to ensure even coverage. The layer of chocolate is a crucial component of the s’mores bars, providing a rich and decadent counterpoint to the sweet marshmallows and graham cracker crust.
Step 7: Place the pan back in the oven for approximately 3 minutes, or until the chocolate just begins to melt and becomes shiny. This brief baking time softens the chocolate, making it easy to spread and creating a luscious, gooey layer.
Step 8: Remove the pan from the oven and let it cool for 1 to 2 minutes. Then, evenly distribute the mini marshmallows on top of the melted chocolate, packing them close together. The marshmallows are the final layer of the s’mores bars, adding a delightful sweetness and a soft, pillowy texture.
Step 9: Turn the oven to broil and place the pan in the oven. Keep a close eye on the s’mores bars, as they can burn quickly under the broiler. Broil for about 2 minutes, or until the marshmallows are lightly browned and toasted to your liking. The broiling process gives the marshmallows a beautiful golden-brown color and a slightly caramelized flavor.
Step 10: Remove the pan from the oven and let the s’mores bars cool completely before cutting them into squares. This allows the chocolate and marshmallows to set, making it easier to cut and serve the bars.
COOKING Rating: Easy
Serving Suggestions:
Serve the s’mores bars at room temperature or slightly chilled. They are delicious on their own, but can also be served with a scoop of vanilla ice cream or a dollop of whipped cream. For an extra touch of flavor, drizzle the bars with melted chocolate or caramel sauce.
Tips:
- For a richer flavor, use dark chocolate instead of milk chocolate.
- Add a sprinkle of sea salt on top of the marshmallows before broiling for a sweet and salty treat.
- If you don’t have graham cracker crumbs, you can crush graham crackers in a food processor or by placing them in a zip-top bag and crushing them with a rolling pin.
- To prevent the marshmallows from sticking to the knife when cutting the bars, lightly grease the knife with butter or cooking spray.
- Store leftover s’mores bars in an airtight container at room temperature for up to 3 days.
Prep Time: 15 minutes
Cook Time: 13-18 minutes
Total Time: 28-33 minutes
Nutritional Information: (estimated, per serving)
Calories: 250
Protein: 3g
Sodium: 100mg
Conclusion:
S’mores bars are a simple yet satisfying dessert that is sure to please everyone. With their gooey chocolate, toasted marshmallows, and crunchy graham cracker crust, they offer a delightful combination of flavors and textures. Whether you’re looking for a quick and easy treat for a weeknight dessert or a crowd-pleasing option for a party, these s’mores bars are the perfect choice. So gather your ingredients, preheat your oven, and get ready to experience the irresistible magic of s’mores in a convenient and delicious bar form. This recipe is a testament to the fact that the simplest of ingredients, when combined with a touch of creativity, can create something truly extraordinary. Enjoy the smiles and compliments that are sure to follow when you share these delightful s’mores bars with your loved ones.
Questions and Answers about S’mores Bars:
Q1: Can I use different types of chocolate in this recipe?
A: Absolutely! While Hershey’s milk chocolate bars are a classic choice for s’mores, you can easily substitute them with other types of chocolate to suit your preferences. Dark chocolate offers a richer, more intense flavor, while semi-sweet chocolate provides a balanced sweetness. You can even experiment with flavored chocolate bars, such as caramel-filled or peanut butter cup chocolate, for a unique twist. Just be sure to choose a chocolate that melts well and complements the other ingredients in the bars.
Q2: What if I don’t have a broiler? Can I still make these s’mores bars?
A: Yes, you can still make these s’mores bars without a broiler. Instead of broiling, simply bake the bars in the oven at 350°F (175°C) for an additional 5-7 minutes, or until the marshmallows are lightly browned and toasted. Keep a close eye on the bars to prevent the marshmallows from burning. The broiling method is preferred for its speed and ability to create a perfectly toasted marshmallow topping, but baking them in the oven will still yield delicious results.
Q3: Can I make these s’mores bars ahead of time?
A: Yes, you can definitely make these s’mores bars ahead of time. Once the bars have cooled completely, cut them into squares and store them in an airtight container at room temperature for up to 3 days. They can also be stored in the refrigerator for up to a week, but the graham cracker crust may soften slightly. Making the bars ahead of time is a great option for parties or gatherings, as it allows you to focus on other preparations without having to worry about dessert.
Q4: Can I add any other ingredients to these s’mores bars?
A: Absolutely! One of the great things about this recipe is its versatility. You can easily customize the bars by adding other ingredients to suit your taste. Some popular additions include:
- A sprinkle of sea salt on top of the marshmallows for a sweet and salty flavor
- Chopped nuts, such as pecans or walnuts, for added texture and flavor
- A layer of peanut butter between the graham cracker crust and the chocolate
- A drizzle of caramel sauce or melted chocolate over the finished bars
- Different flavored marshmallows, such as strawberry or chocolate
Q5: The graham cracker crust is too crumbly and won’t hold together. What am I doing wrong?
A: If the graham cracker crust is too crumbly, it’s likely that you haven’t used enough melted butter. Add 1-2 tablespoons more melted butter to the graham cracker crumbs and mix well until the mixture is evenly moistened and resembles wet sand. You should be able to press the mixture firmly into the bottom of the pan and have it hold its shape. Another tip is to use a measuring cup or the bottom of a glass to firmly press the graham cracker mixture into the pan, ensuring that it is well-compacted and holds together.