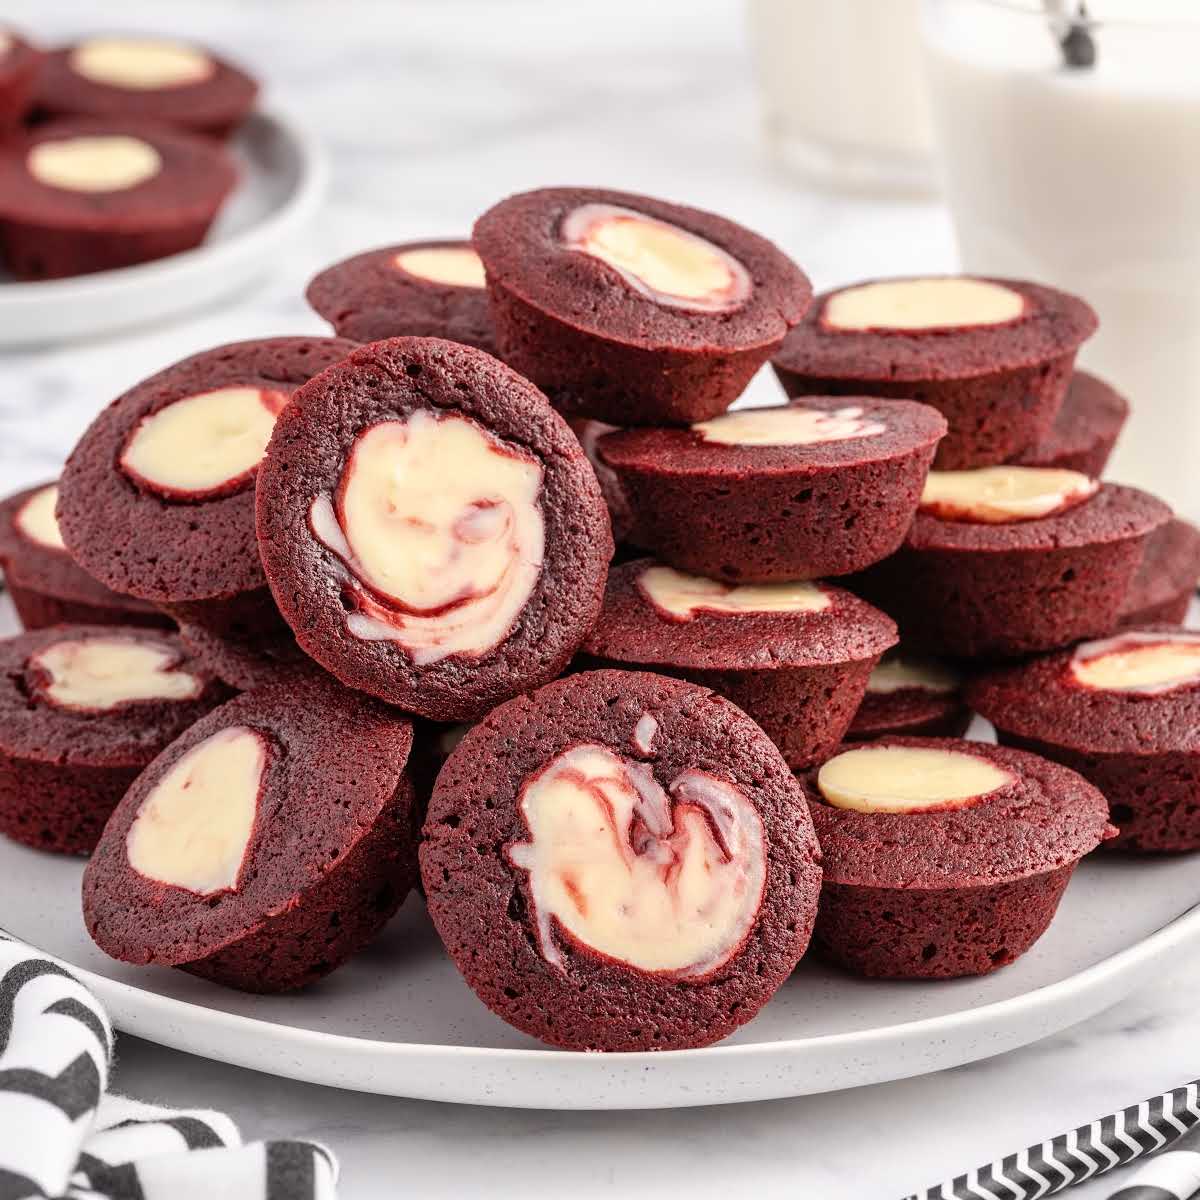
These Mini Red Velvet Cheesecakes are a delightful twist on classic red velvet cake and creamy cheesecake. These bite-sized treats combine the rich, slightly tangy flavor of red velvet with the smooth, decadent texture of cheesecake, all in a perfectly portioned mini form. Ideal for parties, holidays, or any occasion that calls for a touch of elegance and sweetness.
Why You Will Love This Recipe
These mini cheesecakes are not only incredibly delicious but also visually appealing, making them a crowd-pleaser at any gathering. The vibrant red hue of the red velvet base contrasts beautifully with the creamy white cheesecake filling, creating an eye-catching dessert that tastes as good as it looks. They’re also surprisingly easy to make, with simple steps that yield impressive results. Plus, the mini size makes them perfect for portion control and easy serving!
Ingredients:
Red Velvet Base:
- 1 cup all-purpose flour
- 1/4 cup unsweetened cocoa powder
- ¾ cup (1 ½ sticks) salted sweet cream butter, melted and cooled
- 1 1/4 cups granulated sugar
- 1 tablespoon red gel food color (Sunny Side Up Bakery brand recommended)
- 2 teaspoons pure vanilla extract
- 2 large eggs, room temperature and beaten
Cheesecake Filling:
- 8 ounces cream cheese, softened
- 1/4 cup granulated sugar
- 1 teaspoon pure vanilla extract
- 1 large egg yolk
Preparation:
Step 1: Preheat and Prep
Preheat your oven to 350°F (175°C). Lightly spray a mini muffin pan with nonstick cooking spray. This will prevent the cheesecakes from sticking and ensure easy removal. Set the prepared pan aside.
Step 2: Combine Dry Ingredients
In a small mixing bowl, whisk together the all-purpose flour and unsweetened cocoa powder. Whisking ensures that the cocoa powder is evenly distributed throughout the flour, preventing any clumps and creating a smooth base for the red velvet portion. Set this mixture aside.
Step 3: Mix Wet Ingredients
In a medium-sized mixing bowl, combine the melted and cooled butter, granulated sugar, red gel food color, vanilla extract, and beaten eggs. Whisk these ingredients together until they are thoroughly combined, forming a uniform and vibrant red mixture. The melted butter should be cooled to prevent the eggs from cooking.
Step 4: Combine Wet and Dry
Gradually stir the flour mixture into the wet ingredients. Continue stirring just until the flour mixture is well incorporated. Be careful not to overmix the batter, as this can lead to a tough texture. A few streaks of flour are okay, but ensure that there are no large pockets of dry ingredients.
Step 5: Prepare Cheesecake Filling
In a separate medium-sized mixing bowl, add the softened cream cheese. Use a handheld mixer at medium-high speed to beat the cream cheese for 1 minute, until it is smooth and creamy. This step is crucial for ensuring that the cheesecake filling is lump-free and has a luxurious texture.
Step 6: Sweeten and Flavor
Add the granulated sugar and vanilla extract to the cream cheese mixture. Mix for another 1 to 1 ½ minutes until well combined. The mixture should be light and fluffy. Scrape down the sides of the bowl to ensure that all ingredients are evenly incorporated.
Step 7: Add Egg Yolk
Add the egg yolk to the cream cheese mixture and mix just until no yellow streaks are visible. Be careful not to overmix at this stage, as it can cause the filling to become too thin. The egg yolk adds richness and helps to bind the cheesecake filling.
Step 8: Assemble Mini Cheesecakes
Transfer the cheesecake mixture to either a disposable piping bag or a quart-size ziplock bag. This makes it easier to portion the filling into the mini muffin pan.
Step 9: Layer Bases and Filling
Add 1 tablespoon of the red velvet base to each of the prepared mini muffin cups. This forms the bottom layer of the cheesecakes.
Step 10: Pipe Cheesecake Filling
Snip the end of the piping bag or ziplock bag off. Squeeze about 2 teaspoons of the cheesecake filling into the center of each red velvet base. The filling should be evenly distributed across the surface of the red velvet base.
Step 11: Bake
Bake in the preheated oven for 8 to 9 minutes. The cheesecakes should be set around the edges but still slightly soft in the center.
Step 12: Cool and Chill
Remove the mini muffin pan from the oven and allow the cheesecakes to cool for 20 to 30 minutes before removing them from the pan. This allows the cheesecakes to set slightly, preventing them from falling apart. Transfer the cooled cheesecakes to a wire rack to cool completely. Once cooled, refrigerate them for at least 2 hours before serving to allow them to fully set.
COOKING Rating: Easy
Serving Suggestions:
- Serve chilled as a delightful dessert for parties, holidays, or any special occasion.
- Garnish with a dusting of cocoa powder, a dollop of whipped cream, or fresh berries for an extra touch of elegance.
- Pair with a cup of coffee or tea for a perfect afternoon treat.
- Arrange them on a dessert platter for a visually stunning presentation.
- Drizzle with melted white chocolate or a raspberry sauce for added flavor and decoration.
Tips:
- Ensure that the cream cheese is fully softened before mixing to prevent lumps in the cheesecake filling.
- Do not overmix the red velvet batter or the cheesecake filling, as this can result in a tough texture.
- Cool the melted butter before adding it to the wet ingredients to prevent the eggs from cooking.
- Use a gel food color for the red velvet base to achieve a vibrant and consistent color. Liquid food color may thin out the batter.
- Refrigerate the mini cheesecakes for at least 2 hours before serving to allow them to fully set and develop their flavors.
Prep Time: 20 minutes
Cook Time: 8-9 minutes
Total Time: 2 hours 30 minutes (including cooling and chilling time)
Nutritional Information (per mini cheesecake):
- Calories: Approximately 150-180
- Protein: 2-3 grams
- Sodium: 50-70 mg (depending on butter)
Conclusion:
These Mini Red Velvet Cheesecakes are a delightful and elegant dessert that combines the best of both worlds – the rich, tangy flavor of red velvet cake and the creamy, decadent texture of cheesecake. Their mini size makes them perfect for portion control and easy serving, while their vibrant appearance and delicious taste make them a crowd-pleaser at any gathering. Whether you’re hosting a party, celebrating a holiday, or simply craving a sweet treat, these mini cheesecakes are sure to impress. Enjoy the process of baking these delightful desserts and savor every bite of their exquisite flavor!
Questions and Answers about this Recipe:
Q1: Can I use a different type of food coloring for the red velvet base?
A: While gel food coloring is highly recommended for achieving a vibrant and consistent red color, you can use liquid food coloring if necessary. However, be aware that liquid food coloring may not provide the same intensity of color and could slightly thin out the batter. If using liquid food coloring, you may need to use a larger quantity to achieve the desired red hue.
Q2: Can I make these mini cheesecakes ahead of time?
A: Absolutely! These Mini Red Velvet Cheesecakes are perfect for making ahead of time. In fact, they taste even better after they have been refrigerated for at least 2 hours, as this allows the flavors to fully develop and the cheesecake filling to set properly. You can store them in an airtight container in the refrigerator for up to 3-4 days.
Q3: Can I use a different type of pan if I don’t have a mini muffin pan?
A: While a mini muffin pan is ideal for creating the perfectly portioned mini cheesecakes, you can use a regular-sized muffin pan if you don’t have a mini one. However, you will need to adjust the baking time accordingly. Regular-sized cheesecakes will require a longer baking time, typically around 15-20 minutes. Keep an eye on them and remove them from the oven when they are set around the edges but still slightly soft in the center.
Q4: Can I freeze these mini cheesecakes?
A: Yes, you can freeze these Mini Red Velvet Cheesecakes for longer storage. To freeze them, place them in a single layer on a baking sheet and freeze until solid. Once frozen, transfer them to an airtight container or freezer bag. They can be stored in the freezer for up to 2-3 months. When ready to serve, thaw them in the refrigerator overnight.
Q5: What can I use instead of vanilla extract?
A: If you don’t have vanilla extract on hand, you can substitute it with other flavorings such as almond extract, rum extract, or even a pinch of cinnamon. These alternatives will add a unique twist to the flavor of the cheesecakes. Alternatively, you can simply omit the vanilla extract altogether, although it does contribute to the overall flavor profile. “