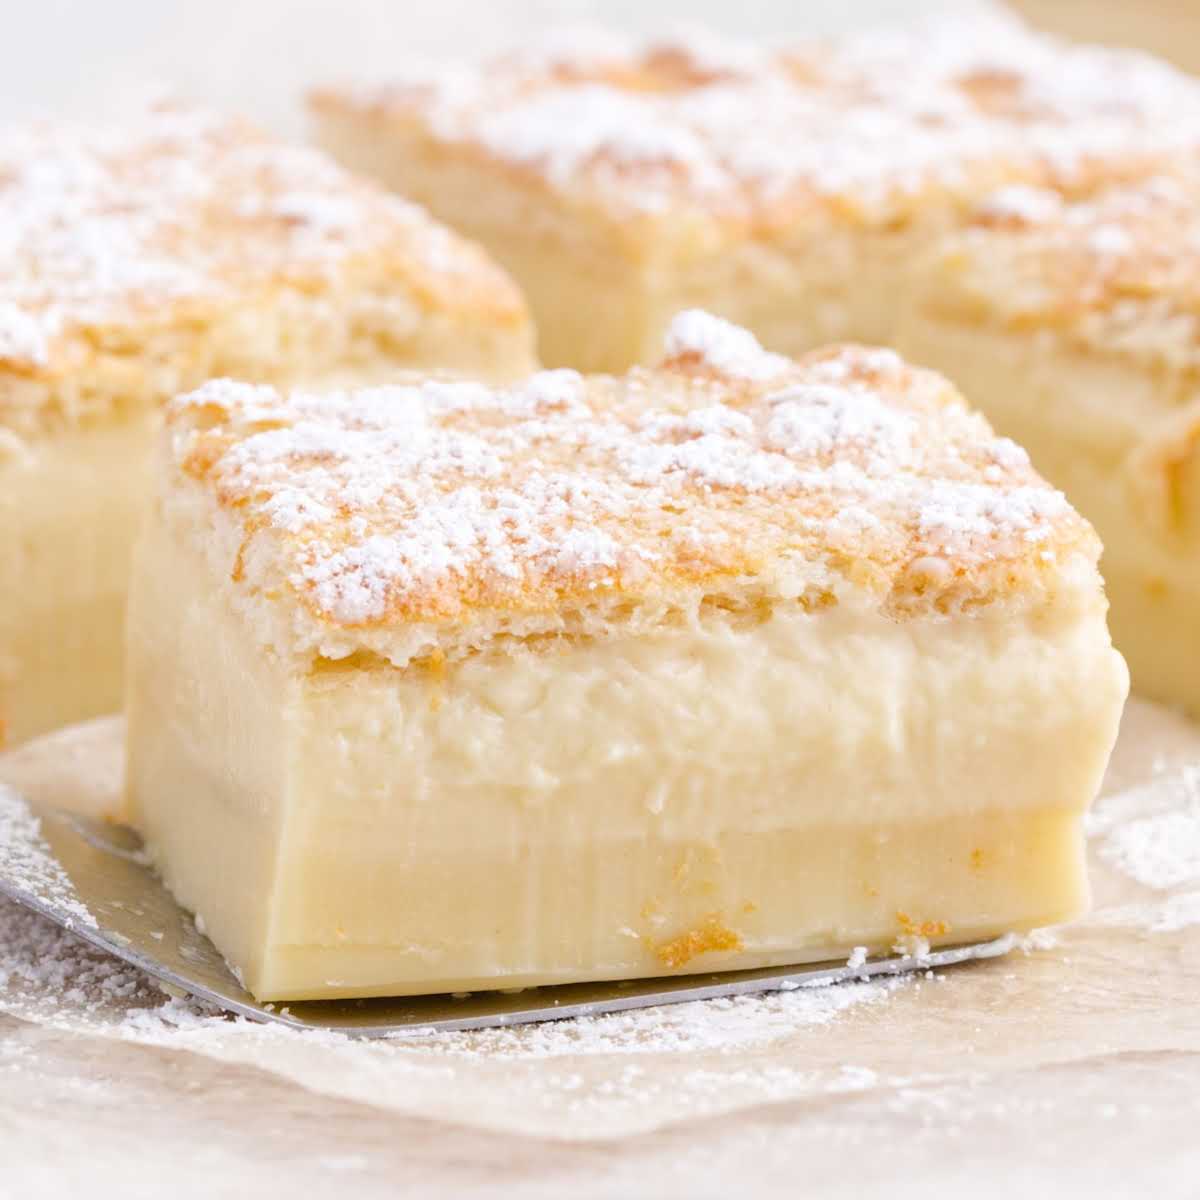
Description of this recipe Magic Custard Cake, also known as Impossible Cake or Gâteau Magique, is a delightful and somewhat mysterious dessert that magically creates three distinct layers from a single batter. As it bakes, it separates into a dense, cake-like base, a creamy custard center, and a light, airy sponge-like top. This unique texture combination offers a symphony of flavors and consistencies in every bite, making it a truly special and impressive treat.
Why you will love this recipe You’ll fall in love with Magic Custard Cake for its simplicity and the fascinating way it transforms in the oven. Unlike traditional cakes that require careful layering and precise mixing, this recipe streamlines the process, delivering a show-stopping dessert with minimal effort. The magic lies in the batter’s unique composition and baking method, which naturally creates those beautiful, distinct layers. It’s a perfect choice for both novice bakers seeking a confidence-boosting recipe and experienced cooks looking to add a touch of whimsy to their dessert repertoire. Moreover, its delicate flavor profile and creamy texture make it a crowd-pleaser, ideal for any occasion from family gatherings to elegant dinner parties. Prepare to be amazed by the effortless elegance and delightful taste of this extraordinary cake.
Ingredients:
4 large eggs, separated and at room temperature 1 cup baker’s sugar, superfine sugar ½ cup salted butter, melted and cooled 2 teaspoons vanilla extract 1 cup all-purpose flour 1 ½ cups whole milk, lukewarm ½ cup heavy cream, lukewarm
Preparation:
Step 1: Preheat and Prepare Preheat your oven to 325°F (160°C). Ensure the oven rack is positioned in the center. Butter an 8”x8” square baking pan thoroughly. You can also line the bottom with parchment paper for easy removal, but buttering the pan is essential to prevent sticking. Set the prepared pan aside.
Step 2: Combine Egg Yolks and Sugar In a mixing bowl, add the egg yolks and superfine sugar. Using an electric mixer (handheld or stand mixer), beat the mixture until it becomes pale yellow and creamy. This process should take approximately 1 to 2 minutes. The mixture should lighten in color and increase slightly in volume. Proper aeration at this stage is crucial for the cake’s final texture.
Step 3: Incorporate Butter and Vanilla Add the melted and cooled butter to the egg yolk and sugar mixture. Ensure the butter has cooled to prevent cooking the egg yolks. Mix until fully combined, creating a smooth and emulsified base. Stir in the vanilla extract, blending it evenly throughout the mixture. The vanilla enhances the overall flavor profile, adding a warm and inviting aroma.
Step 4: Add Flour Gradually add the all-purpose flour to the wet ingredients. Mix until just combined, being careful not to overmix. Overmixing can develop the gluten in the flour, resulting in a tougher cake. The batter should be smooth with no visible lumps of flour.
Step 5: Combine Milk and Cream In a separate bowl or measuring cup, combine the lukewarm whole milk and heavy cream. The milk and cream should be at a temperature that feels slightly warm to the touch; this helps to ensure they incorporate smoothly into the batter. Slowly pour the milk and cream mixture into the batter, mixing to combine. Ensure the mixture is homogenous, but again, avoid overmixing.
Step 6: Beat Egg Whites In a clean, grease-free bowl, add the egg whites. Using a stand mixer with the whisk attachment or a handheld electric mixer, beat the egg whites until stiff peaks form. Stiff peaks are achieved when the egg whites stand straight up when the whisk is lifted from the bowl. Be careful not to overwhip, which can make the egg whites dry and difficult to incorporate.
Step 7: Incorporate Egg Whites Use a large whisk to gently fold the beaten egg whites into the batter. This step is critical to achieving the cake’s signature layered texture. Add the egg whites in 2 to 3 additions, whisking only slightly with each addition. The goal is to incorporate the egg whites without completely deflating them. The batter will have two distinct textures: a very thin, runny batter with lightly incorporated egg whites floating on top. This is normal and necessary for the cake to separate into layers during baking.
Step 8: Pour into Pan Pour the batter carefully into the prepared baking pan. The batter will appear thin and somewhat separated, but this is expected.
Step 9: Bake Bake in the preheated oven for approximately 40 to 45 minutes. The cake is done when the center is still jiggly but doesn’t slosh when the pan is gently shaken. The top should be lightly browned. Keep a close eye on the cake during the last few minutes of baking to prevent over-browning.
Step 10: Cool Completely Remove the cake from the oven and allow it to cool completely in the pan. This step is crucial for the cake to set properly and develop its distinct layers.
Step 11: Chill and Serve Once cooled, allow the cake to sit for 2 to 3 hours, or preferably overnight in the refrigerator before dusting with powdered sugar and cutting into 9 pieces. It is best to remove the pieces from the pan one at a time rather than trying to remove the entire cake at once. Serve chilled and enjoy the magic of the three distinct layers.
COOKING Rating: Easy
Serving Suggestions: Magic Custard Cake is delightful on its own, but here are a few serving suggestions to enhance the experience:
Dust with Powdered Sugar: A classic and simple way to add a touch of sweetness and elegance. Fresh Berries: Serve with a side of fresh berries such as strawberries, raspberries, or blueberries to complement the cake’s delicate flavor. Whipped Cream: A dollop of lightly sweetened whipped cream adds richness and enhances the creamy texture. Fruit Coulis: Drizzle with a homemade or store-bought fruit coulis (raspberry or strawberry work particularly well) for added flavor and visual appeal. Vanilla Ice Cream: Pair with a scoop of vanilla ice cream for a comforting and indulgent dessert. Hot Beverage: Enjoy a slice of Magic Custard Cake with a cup of coffee, tea, or hot chocolate for a cozy treat.
Tips: Room Temperature Ingredients: Ensure that the eggs are at room temperature for better emulsification and volume. Lukewarm Milk and Cream: Using lukewarm milk and cream helps to incorporate the liquids smoothly into the batter without affecting the egg yolks. Gentle Folding: Be gentle when folding the egg whites into the batter to maintain the airiness of the whites, which is crucial for creating the distinct layers. Don’t Overmix: Avoid overmixing the batter at any stage, as this can result in a tougher cake. Cool Completely: Allow the cake to cool completely before chilling, as this helps the layers to set properly. Patience is Key: Be patient while the cake bakes and cools. The magic happens gradually!
Prep Time: 20 minutes
Cook Time: 40-45 minutes
Total Time: 3-4 hours (includes cooling and chilling)
Nutritional Information: (per serving, approximate) Calories: 250 Protein: 5g Sodium: 150mg
Conclusion Magic Custard Cake is more than just a dessert; it’s an experience. The way it transforms from a seemingly simple batter into a multi-layered marvel is truly enchanting. With its creamy custard center, dense cake-like base, and airy sponge top, each bite offers a unique and delightful combination of textures and flavors. This recipe is perfect for those who appreciate the beauty of simplicity and the wonder of culinary magic. Whether you’re a seasoned baker or a novice in the kitchen, Magic Custard Cake is sure to impress and delight. So, gather your ingredients, follow the steps, and prepare to be amazed by the fail-proof method that brings this extraordinary cake to life. Enjoy the magic!
Questions and Answers about this recipe
Question 1: Why is it called “Magic” Custard Cake? Answer: It’s called “Magic” Custard Cake because of the way it magically separates into three distinct layers—a dense cake-like base, a creamy custard center, and a light, airy sponge-like top—from a single batter during baking. This unique transformation seems almost like culinary sorcery!
Question 2: Can I use a different size pan for this recipe? Answer: While the recipe is optimized for an 8”x8” square pan, you can use a 9-inch square pan if that’s what you have on hand. However, keep in mind that the cake may bake a bit faster and be slightly thinner. Avoid using larger pans, as the cake may not set properly.
Question 3: What if my egg whites don’t form stiff peaks? Answer: Achieving stiff peaks is crucial for the cake’s texture. Ensure your bowl and whisk are clean and grease-free, as even a small amount of grease can prevent the egg whites from whipping properly. Also, make sure no yolk gets into the whites. If you’re still having trouble, try chilling the bowl and beaters in the freezer for a few minutes before whipping.
Question 4: Can I make this cake ahead of time? Answer: Absolutely! Magic Custard Cake is an excellent make-ahead dessert. In fact, it’s often better when made a day in advance, as the flavors have more time to meld and the layers set completely. Store it in the refrigerator, covered, and dust with powdered sugar just before serving.
Question 5: What can I do if the top of the cake is browning too quickly in the oven? Answer: If you notice the top of the cake browning too quickly, you can tent it loosely with aluminum foil. This will help to shield the top from the direct heat, allowing the cake to continue baking evenly without burning. Just make sure the foil doesn’t touch the batter directly.