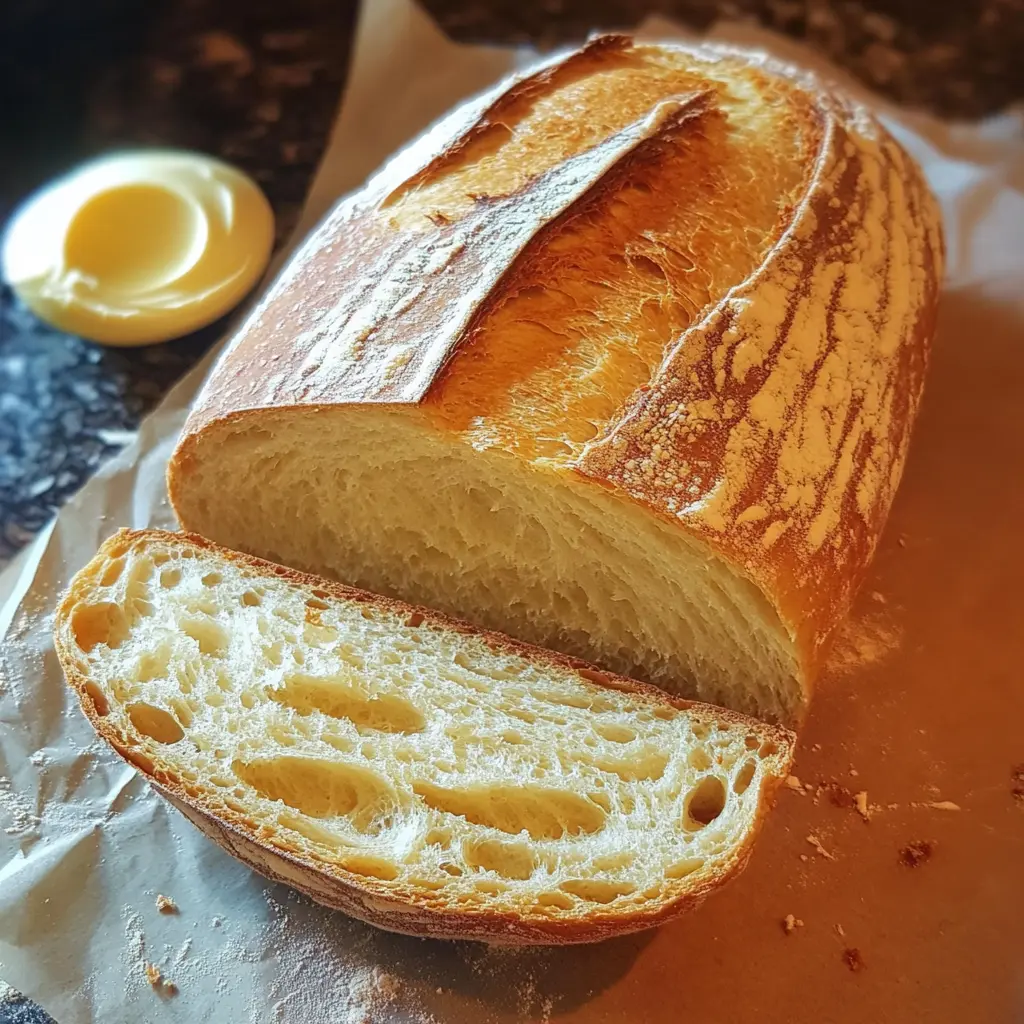
Description: This recipe delivers a remarkably crusty and flavorful loaf of bread, achieved with minimal effort thanks to the magic of a Dutch oven. The high heat and trapped steam create a perfect environment for achieving a bakery-quality loaf in your own kitchen.
Why you will love this recipe:
- Incredible Crust: The Dutch oven creates a steamy environment that results in an exceptionally crisp and crackly crust, a hallmark of artisan bread.
- Soft and Chewy Interior: Beneath the crust lies a soft, airy, and slightly chewy crumb, providing a delightful contrast in textures.
- Simple Ingredients: This recipe uses only four basic ingredients: flour, water, yeast, and salt, showcasing the power of simple elements when combined correctly.
- Minimal Kneading: Unlike traditional bread recipes that require extensive kneading, this recipe utilizes a no-knead or minimal knead technique, making it accessible to bakers of all skill levels.
- Impressive Results: Despite its simplicity, this bread produces a loaf that rivals those from professional bakeries, making it a guaranteed crowd-pleaser.
- Versatile: Enjoy this bread on its own, with butter, as a base for sandwiches, or alongside soups and stews. Its rustic flavor pairs well with a wide variety of dishes.
Introduction
The art of bread baking, often perceived as complex and time-consuming, can be wonderfully simplified with the help of a Dutch oven. This method, which mimics the steam-injected ovens used in professional bakeries, allows you to create a bakery-worthy crusty loaf right in your home kitchen. The magic lies in the Dutch oven’s ability to trap steam, creating a humid environment that promotes a beautiful rise and a perfectly crisp crust.
This recipe is designed for ease and convenience, perfect for both novice and experienced bakers. The minimal kneading and overnight proofing (optional, but highly recommended) allow the dough to develop complex flavors and textures, resulting in a bread that is both satisfying and impressive. The beauty of this recipe is in its simplicity – with just four ingredients and a little patience, you can achieve a loaf that will rival those from artisan bakeries.
The slow fermentation process, especially with the overnight proofing, enhances the bread’s flavor profile. It allows the yeast to work its magic, developing a subtle tang and depth of flavor that is simply unattainable with quick-rise methods. Furthermore, the extended fermentation strengthens the gluten structure, resulting in a more open and airy crumb.
Imagine the aroma of freshly baked bread filling your home, the satisfying crackle as you slice through the crust, and the soft, chewy texture as you take your first bite. This recipe is not just about making bread; it’s about creating an experience, a moment of simple pleasure that you can share with family and friends.
Ingredients:
- 500g strong white bread flour, plus extra for dusting
- 4g fast-action dried yeast
- 10g fine sea salt, sea salt flakes or table salt
- 325g room-temperature water
Preparation:
Step 1: In a large bowl, combine the flour and yeast. Mix well to ensure the yeast is evenly distributed. This will help the dough rise consistently.
Step 2: Add the room-temperature water to the flour and yeast mixture. Use your hands or a spatula to mix until a shaggy dough forms. Ensure that all the flour is incorporated, scraping down the sides of the bowl if necessary. Cover the bowl with a damp tea towel and let the dough rest for 30 minutes. This resting period, known as autolyse, allows the flour to fully hydrate, resulting in a more extensible dough.
Step 3: Sprinkle the salt over the dough. Working with wet hands, incorporate the salt by stretching and folding the dough. To do this, reach under one side of the dough, lift it up, and fold it over onto the opposite side. Rotate the bowl 90 degrees and repeat. Continue this process for about 5 minutes until the salt is fully incorporated and the dough becomes smoother and more elastic. This process is crucial for developing the gluten structure, which will give the bread its characteristic chewiness.
Step 4: Lightly flour a work surface. Turn the dough out onto the floured surface. Knead the dough for 5 minutes, using the stretch and fold technique. This involves stretching the dough, folding it back onto itself, and turning it 90 degrees. This technique is gentler than traditional kneading and helps to develop the gluten without overworking the dough. After kneading, the dough should be smooth, elastic, and slightly sticky. Form the dough into a tight ball.
Step 5: Place the dough ball in a clean, lightly oiled bowl. Cover the bowl with a damp tea towel or plastic wrap and let it rise at room temperature for 1 hour, or until doubled in size. Alternatively, for a deeper flavor, transfer the dough to the refrigerator and let it rise overnight (8-12 hours). The cold fermentation process slows down the yeast activity, resulting in a more complex flavor profile.
Step 6: Once the dough has doubled in size, gently turn it out onto a lightly floured work surface. Knead it gently a few times to deflate it slightly. Shape the dough into a round or oblong shape, depending on the shape of your Dutch oven.
Step 7: Line a proving basket or bowl with a clean tea towel and dust it generously with flour. Place the shaped dough into the prepared basket or bowl, seam-side up. Cover with a damp tea towel and let it proof for 40 minutes to 1 hour at room temperature, or 2-3 hours in the refrigerator. The final proof allows the dough to develop its final rise and airy texture.
Step 8: Preheat your oven to 230°C (450°F). Place a Dutch oven with its lid inside the oven while it preheats. This ensures that the Dutch oven is thoroughly heated, which is essential for creating a crispy crust.
Step 9: Carefully remove the hot Dutch oven from the oven. Place a square of parchment paper on top of the proofed dough. Invert the dough onto the parchment paper, so the seam side is now facing down. Slash the top of the dough with a sharp knife or lame. This allows the dough to expand evenly during baking and creates an attractive scoring pattern.
Step 10: Using the parchment paper as handles, carefully lower the dough into the hot Dutch oven. Cover with the lid and bake for 25 minutes.
Step 11: Remove the lid and continue baking for another 5-10 minutes, or until the crust is deeply golden brown and the bread sounds hollow when tapped on the bottom. The final uncovered baking allows the crust to develop its characteristic crispness.
Step 12: Carefully remove the bread from the Dutch oven and transfer it to a wire rack to cool completely before slicing. Allowing the bread to cool completely before slicing prevents it from becoming gummy.
COOKING Rating:
Easy
Serving Suggestions:
- Serve warm with butter, olive oil, or your favorite spread.
- Use for sandwiches, toast, or bruschetta.
- Pair with soups, stews, or salads.
- Enjoy as a side with cheese and charcuterie.
Tips:
- For a more pronounced sourdough flavor, use a portion of whole wheat flour or rye flour.
- Experiment with different scoring patterns to create unique designs on the crust.
- If you don’t have a Dutch oven, you can bake the bread on a baking stone with a tray of water in the bottom of the oven to create steam.
- Make sure your dutch oven is safe to be empty in a high heat oven
Prep Time:
20 minutes
Cook Time:
30-35 minutes
Total Time:
2 hours (excluding overnight proofing)
Nutritional Information (approximate per slice):
Calories: 200 Protein: 7g Sodium: 200mg
Conclusion
This Rustic Dutch Oven Crusty Bread recipe offers a simple and rewarding way to create a bakery-quality loaf in the comfort of your own home. The minimal effort required combined with the impressive results makes it a recipe that you’ll want to make again and again. The crusty exterior and soft, chewy interior make it a perfect accompaniment to any meal, or simply enjoyed on its own. Embrace the joy of bread baking and savor the satisfaction of creating something truly special with your own hands. So, gather your ingredients, preheat your Dutch oven, and prepare to be amazed by the incredible bread you can create.
Questions and Answers:
Q1: Can I use all-purpose flour instead of bread flour?
A: While bread flour is recommended for its higher protein content, which contributes to a chewier texture and better rise, you can substitute all-purpose flour. However, the resulting bread may be slightly less chewy and have a less open crumb structure. If using all-purpose flour, consider adding a tablespoon of vital wheat gluten to improve the texture.
Q2: What if I don’t have a Dutch oven?
A: If you don’t have a Dutch oven, you can still bake this bread on a baking stone or baking sheet. To create a steamy environment, place a tray of water in the bottom of the oven during the first half of baking. This will help to create a crispier crust.
Q3: Can I add herbs or other flavorings to the dough?
A: Absolutely! This recipe is a great base for experimenting with different flavors. You can add herbs such as rosemary, thyme, or oregano to the dough during the kneading process. You can also add grated cheese, olives, or sun-dried tomatoes for a savory twist. Be mindful not to add too many ingredients, as this can affect the dough’s rise and texture.
Q4: How do I know if my bread is fully cooked?
A: The best way to determine if your bread is fully cooked is to check its internal temperature. Use a digital thermometer to check the temperature in the center of the loaf. It should reach 200-210°F (93-99°C). You can also tap the bottom of the loaf – if it sounds hollow, it’s likely done.
Q5: Can I freeze this bread?
A: Yes, this bread freezes well. Allow the bread to cool completely before wrapping it tightly in plastic wrap and then placing it in a freezer bag. For best results, freeze the bread within a few hours of baking. When ready to use, thaw the bread at room temperature or in the oven at a low temperature. Reheating the bread in the oven will help to restore its crispy crust.