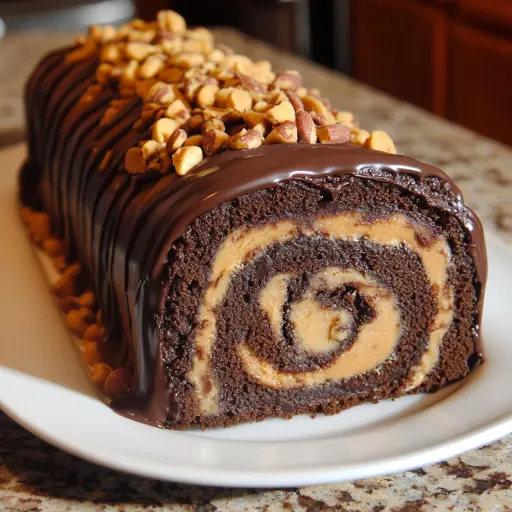
Description: Indulge in the irresistible combination of rich chocolate cake and creamy peanut butter filling with this delightful Chocolate & Peanut Butter Dream Roll. This dessert is a perfect balance of flavors and textures, offering a soft, moist cake swirled with a luscious peanut butter cream and studded with miniature peanut butter cups. It’s surprisingly easy to make and guaranteed to impress!
Ingredients:
For the Cake:
- 1 cup all-purpose flour
- ½ cup unsweetened cocoa powder
- ½ teaspoon baking powder
- ¼ teaspoon salt
- 4 large eggs
- ½ cup granulated sugar
- ¼ cup powdered sugar (for sprinkling)
For the Filling:
- ½ cup smooth peanut butter
- 1 cup powdered sugar
- ½ cup heavy cream
- ¼ cup chopped mini peanut butter cups
Preparation:
Step 1: Preheat the Oven
Begin by preheating your oven to 350°F (175°C). This is crucial for ensuring the cake bakes evenly and achieves the perfect texture. Next, line a 9×13-inch baking pan with parchment paper. The parchment paper not only prevents the cake from sticking but also makes it incredibly easy to lift the cake out of the pan after baking, which is essential for the rolling process. Smooth the parchment paper down so it lays flat against the pan, ensuring a uniform baking surface.
Step 2: Prepare the Cake Batter
In a large mixing bowl, combine the eggs and granulated sugar. Use an electric mixer (either a stand mixer or a handheld mixer) to whip the mixture together until it becomes light and airy. This typically takes around 5 minutes. The goal here is to incorporate air into the mixture, which will contribute to the cake’s light and fluffy texture. You’ll know it’s ready when the mixture has visibly increased in volume and has a pale yellow color.
Step 3: Sift Dry Ingredients
In a separate bowl, sift together the all-purpose flour, unsweetened cocoa powder, baking powder, and salt. Sifting is an important step because it helps to remove any lumps and aerates the dry ingredients, ensuring they are evenly distributed in the batter. This results in a smoother, more consistent cake texture. After sifting, gently fold the dry mixture into the egg mixture. It’s important to fold rather than stir to avoid deflating the air that you whipped into the eggs and sugar. Combine until just incorporated; be careful not to overmix, as this can lead to a tough cake.
Step 4: Bake the Cake
Pour the cake batter into the prepared pan, spreading it evenly across the surface. Ensure that the batter is uniformly distributed to avoid any uneven baking. Place the pan in the preheated oven and bake for 12-15 minutes. The cake is done when it springs back lightly when gently pressed on the surface. It should also appear set around the edges. Keep a close eye on the cake to prevent it from overbaking, as this can make it dry and difficult to roll.
Step 5: Prepare for Rolling
While the cake is baking, prepare a clean kitchen towel by generously sprinkling it with powdered sugar. The powdered sugar will prevent the cake from sticking to the towel as it cools, making it easier to roll. Once the cake is done, immediately remove it from the oven and carefully flip it over onto the prepared towel. Gently peel off the parchment paper from the bottom of the cake. Starting from one of the short ends, roll the cake up tightly with the towel. This step is crucial because it helps the cake maintain its shape as it cools, preventing it from cracking when you later add the filling. Set the rolled cake aside to cool for about 10 minutes.
Step 6: Make the Peanut Butter Filling
In a separate bowl, pour the heavy cream and begin whipping it with an electric mixer until soft peaks form. This indicates that the cream is starting to thicken but is not yet stiff. Add the powdered sugar and smooth peanut butter to the whipped cream. Continue mixing until the filling is smooth, creamy, and well combined. Taste the filling and adjust the sweetness if necessary by adding more powdered sugar. The filling should be thick enough to spread easily but not so stiff that it’s difficult to work with. Finally, gently fold in the chopped mini peanut butter cups. These add a delightful textural contrast and an extra burst of peanut butter flavor.
Step 7: Assemble the Roll
Once the cake has cooled for about 10 minutes, gently unroll it. Be careful not to tear the cake as you unroll it. Spread the peanut butter filling evenly over the surface of the cake, ensuring that it reaches all the edges. Once the cake is covered with filling, carefully roll it back up, starting from one end. As you roll, try to keep the roll tight to prevent any gaps from forming. If the cake cracks slightly, don’t worry – it will still taste delicious. Once the cake is rolled up, gently transfer it to a serving platter.
Step 8: Finish and Serve
To give the cake a polished look, sprinkle powdered sugar generously over the top of the rolled cake. This not only adds a touch of sweetness but also creates a beautiful presentation. Slice the cake into individual servings using a serrated knife for clean cuts. Serve immediately and enjoy the perfect balance of chocolate and peanut butter.
Why You Will Love This Recipe
This Chocolate & Peanut Butter Dream Roll is a guaranteed crowd-pleaser for several reasons:
- Flavor Combination: The marriage of rich chocolate and creamy peanut butter is a classic for a reason. This recipe elevates the combination to new heights with a light, fluffy chocolate cake and a decadent peanut butter cream filling.
- Impressive Presentation: The rolled cake looks elegant and inviting, making it perfect for parties or special occasions. The sprinkle of powdered sugar adds a touch of sophistication.
- Surprisingly Easy: Despite its impressive appearance, this recipe is relatively straightforward and doesn’t require advanced baking skills.
- Textural Delight: The soft cake, creamy filling, and crunchy peanut butter cups provide a wonderful contrast in textures that is simply irresistible.
- Versatile: This cake can be made ahead of time and stored in the refrigerator, making it a convenient dessert option for busy hosts.
COOKING Rating
- Difficulty: Medium
- Prep Time: 20 minutes
- Cook Time: 15 minutes
Serving Suggestions:
- Serve chilled for a refreshing dessert.
- Pair with a scoop of vanilla ice cream for an extra indulgence.
- Drizzle with melted chocolate or peanut butter for added richness.
- Garnish with a few extra peanut butter cups for visual appeal.
- Serve with a cup of coffee or a glass of milk for a perfect pairing.
Tips:
- Ensure all ingredients are at room temperature for better mixing and a smoother batter.
- Don’t overbake the cake, as it will become dry and difficult to roll.
- Roll the cake while it’s still warm to prevent cracking.
- Use a good quality peanut butter for the best flavor.
- If the filling is too thick, add a tablespoon of milk or cream to thin it out.
- Refrigerate the cake for at least 30 minutes before slicing for cleaner cuts.
- For a gluten-free version, use a gluten-free all-purpose flour blend.
- To make this recipe vegan, substitute the eggs with applesauce or a commercial egg replacer, use plant-based milk instead of heavy cream, and use a vegan peanut butter.
Prep Time:
20 minutes
Cook Time:
12-15 minutes
Total Time:
45 minutes (including cooling and assembly)
Nutritional Information: (Approximate, per serving)
- Calories: 350
- Protein: 8g
- Fat: 20g
- Sodium: 150mg
Conclusion
The Chocolate & Peanut Butter Dream Roll is a delectable dessert that combines the best of both worlds: rich chocolate cake and creamy peanut butter filling. It’s a relatively simple recipe that yields impressive results, making it perfect for any occasion. Whether you’re baking for a special celebration or just want to treat yourself, this roll is sure to satisfy your sweet cravings. Enjoy the perfect harmony of flavors and textures in every bite!
Questions and Answers about the Recipe:
Question 1: Can I use a different type of nut butter in the filling?
Answer: Absolutely! While peanut butter is the star of this recipe, you can definitely experiment with other nut butters. Almond butter, cashew butter, or even sunflower seed butter can be used as delicious alternatives. Each will impart its unique flavor to the filling, creating a slightly different but equally satisfying experience. Keep in mind that the consistency and sweetness level might vary, so adjust the powdered sugar accordingly to achieve the desired taste and texture.
Question 2: Is it essential to use parchment paper for baking the cake?
Answer: While not absolutely essential, using parchment paper is highly recommended for baking the cake. Parchment paper acts as a non-stick barrier between the cake and the pan, making it incredibly easy to lift the cake out after baking without any sticking or tearing. This is especially crucial for a roll cake, where a smooth, intact cake surface is necessary for rolling. If you don’t have parchment paper, you can grease and flour the pan thoroughly, but the risk of sticking increases.
Question 3: Can I make the cake ahead of time and assemble it later?
Answer: Yes, you can definitely make the cake ahead of time! Once the cake is baked and cooled, roll it up in the powdered sugar-dusted towel as instructed and store it in the refrigerator for up to 24 hours. When you’re ready to assemble, simply unroll the cake, spread the filling, and roll it back up. This is a great way to break up the preparation process and make the dessert more manageable, especially if you’re short on time.
Question 4: What’s the best way to prevent the cake from cracking when rolling?
Answer: Preventing cracks in the cake when rolling is all about technique and timing. First, make sure not to overbake the cake, as this can make it dry and brittle. Rolling the cake while it’s still warm (but not too hot to handle) is crucial, as it’s more pliable at this stage. Gently but firmly roll the cake with the towel, keeping the roll tight. Avoid overfilling the cake, as too much filling can cause it to crack when rolled. If a few small cracks do appear, don’t worry too much – they won’t affect the taste, and you can cover them with powdered sugar!
Question 5: Can I freeze the Chocolate & Peanut Butter Dream Roll?
Answer: Yes, you can freeze the Chocolate & Peanut Butter Dream Roll, but it’s best to do so before adding the final dusting of powdered sugar. Wrap the rolled cake tightly in plastic wrap, then in a layer of aluminum foil, and freeze for up to 2 months. When ready to serve, thaw the cake in the refrigerator overnight. Once thawed, dust with powdered sugar before slicing and serving. Keep in mind that freezing can sometimes affect the texture of the cake and filling slightly, but it will still be delicious.