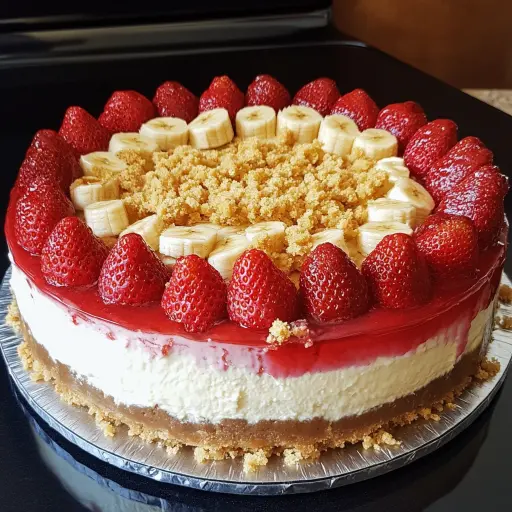
Description: A delightful fusion of creamy cheesecake, sweet strawberries, crunchy golden Oreos, and comforting banana pudding, all in one decadent dessert. This recipe creates a stunning half-and-half cheesecake, perfect for pleasing a crowd with diverse preferences!
Ingredients:
For the Crust:
- 2 cups crushed vanilla wafers or graham crackers (about 40 vanilla wafers or 14 graham cracker sheets)
- ½ cup (1 stick) melted unsalted butter
- ¼ cup granulated sugar
For the Cheesecake Base:
- 16 oz (2 packages) cream cheese, softened to room temperature
- ¾ cup granulated sugar
- 2 large eggs
- 1 tsp pure vanilla extract
- ½ cup sour cream
For the Strawberry Crunch Layer:
- 1 cup crushed golden Oreos (about 14 cookies)
- 2 tbsp melted unsalted butter
- ½ cup fresh strawberries, finely chopped
- ½ cup strawberry glaze or strawberry preserves
For the Banana Pudding Layer:
- 1 cup banana pudding (store-bought or homemade – see tips for homemade recipe option)
- 1 banana, sliced into thin rounds
- ½ cup whipped cream (stabilized, for best results)
For the Toppings:
- Fresh strawberries, halved or sliced
- Fresh bananas, sliced into thin rounds
- Strawberry syrup (optional)
- Crushed vanilla wafers or graham crackers (for extra crunch)
Preparation:
Step 1: Prepare the Crust: In a medium-sized bowl, combine the crushed vanilla wafers or graham crackers, melted butter, and granulated sugar. Mix thoroughly until all the crumbs are moistened and the mixture resembles wet sand.
Step 2: Press the Crust: Transfer the crumb mixture to a 9-inch springform pan, or a similarly sized foil pan that is easy to cut. Press the mixture evenly and firmly into the bottom of the pan. Use the bottom of a measuring cup or a flat-bottomed glass to ensure the crust is compact and uniform.
Step 3: Bake the Crust: Preheat your oven to 350°F (175°C). Bake the crust for 8-10 minutes, or until it is lightly golden and fragrant. This step helps to set the crust and prevent it from becoming soggy later. Remove the pan from the oven and let the crust cool completely. This is a crucial step; allow the crust to cool to room temperature before adding the cheesecake filling.
Step 4: Make the Cheesecake Base: While the crust is cooling, prepare the cheesecake filling. In a large mixing bowl (or the bowl of a stand mixer), beat the softened cream cheese and granulated sugar together until the mixture is completely smooth and creamy. This is very important, as lumps of cream cheese can affect the texture of the final cheesecake. Beat for 2-3 minutes on medium speed, scraping down the sides of the bowl as needed.
Step 5: Add Eggs and Flavorings: Add the eggs one at a time, beating well after each addition. Be careful not to over-beat the mixture at this stage, as over-beating can incorporate too much air, leading to cracks in the cheesecake during baking. Mix in the vanilla extract and sour cream until just combined. The sour cream adds richness and tang to the cheesecake, balancing the sweetness.
Step 6: Assemble the Layers:
- Strawberry Crunch Side: In a separate small bowl, combine the crushed golden Oreos and melted butter. Mix well until the crumbs are moistened. Sprinkle this mixture evenly over one half of the cooled cheesecake base. Drizzle the strawberry glaze or preserves over the top of the Oreo crunch layer. The amount of glaze can be adjusted to your preference, but aim for a thin, even coating. Then, gently place your chopped fresh strawberries over the glaze.
- Banana Pudding Side: On the other half of the cheesecake base, carefully spread the banana pudding in an even layer. Arrange the sliced banana rounds artfully over the banana pudding.
Step 7: Add the Final Touches: Once both sides are prepared, it’s time for the final garnish. Arrange fresh strawberry halves and sliced bananas attractively on their respective sides of the cheesecake. For an extra touch of decadence, drizzle strawberry syrup over the strawberry side. Sprinkle crushed vanilla wafers or graham crackers around the edges of the cheesecake or on top for added texture and visual appeal.
Step 8: Chill: Cover the cheesecake loosely with plastic wrap and refrigerate for at least 4 hours, or preferably overnight. This chilling period allows the flavors to meld together and the cheesecake to set completely.
Why you will love this recipe:
This Strawberry Crunch Cheesecake and Banana Pudding Cheesecake is a showstopper dessert that will be the highlight of any gathering! You’ll love the unique combination of flavors and textures. The creamy, tangy cheesecake base perfectly complements the sweet and fruity toppings. The strawberry crunch layer adds a delightful crispy contrast to the soft cheesecake, while the banana pudding side provides a comforting and familiar flavor profile. This recipe is a crowd-pleaser, offering something for everyone, and it’s surprisingly easy to make despite its impressive appearance. It’s a guaranteed winner!
COOKING Rating: Intermediate
Serving Suggestions:
- Serve chilled directly from the refrigerator.
- Cut into slices and serve with a dollop of whipped cream.
- Garnish with extra fresh strawberries and banana slices for a more festive presentation.
- Pair with a scoop of vanilla ice cream or a light sorbet for a refreshing contrast.
- Serve with coffee, tea, or a glass of chilled milk.
Tips:
- Use full-fat cream cheese for the richest and creamiest texture.
- Ensure the cream cheese is softened to room temperature for a smooth batter.
- Do not over-beat the cheesecake batter, as this can cause cracks during baking.
- To prevent cracks, bake the cheesecake in a water bath. Wrap the springform pan tightly in foil and place it in a larger pan. Fill the larger pan with hot water until it reaches halfway up the sides of the springform pan.
- For a homemade banana pudding, combine 1 (3.4 oz) package of instant vanilla pudding mix with 2 cups of cold milk. Whisk until smooth, then fold in 1/2 cup of whipped cream.
- Stabilized whipped cream will hold its shape better and prevent the banana pudding side from becoming soggy.
- Store leftovers in an airtight container in the refrigerator for up to 3 days.
- You can substitute different fruit glazes or preserves for the strawberry glaze, such as raspberry or blueberry.
- If using store-bought banana pudding, choose a good-quality brand for the best flavor.
Prep Time: 30 minutes Cook Time: 40 minutes Total Time: 4 hours 10 minutes (includes chilling time)
Nutritional Information: (Approximate, per serving – will vary based on exact ingredients and serving size)
- Calories: 550-650
- Protein: 8-10g
- Sodium: 250-350mg
Conclusion:
This Strawberry Crunch Cheesecake and Banana Pudding Cheesecake recipe is a delightful adventure in dessert making. It’s a recipe that combines the best of both worlds, offering a balanced mix of creamy cheesecake richness, fruity sweetness, and satisfying crunch. The visual appeal alone is enough to impress your guests, and the flavor combination will keep them coming back for more. Whether you’re celebrating a special occasion or simply want to indulge in a memorable treat, this cheesecake is sure to be a hit. Don’t be afraid to get creative with the toppings and customize it to your liking. Happy baking!
Questions and Answers about this Recipe:
Q1: Can I make this cheesecake ahead of time?
A: Absolutely! In fact, this cheesecake is best made a day in advance. The chilling time allows the flavors to meld together and the cheesecake to set properly. You can prepare the entire cheesecake, including the toppings, and keep it refrigerated for up to 24 hours before serving. Just be sure to cover it loosely with plastic wrap to prevent it from drying out.
Q2: Can I substitute the graham crackers for vanilla wafers in the crust?
A: Yes, you can definitely substitute graham crackers for the vanilla wafers in the crust. Both options work well and provide a delicious base for the cheesecake. Vanilla wafers will give the crust a slightly sweeter and more delicate flavor, while graham crackers will offer a more rustic and slightly nutty flavor. The choice is really up to your personal preference!
Q3: What if I don’t have a springform pan?
A: If you don’t have a springform pan, you can use a regular 9-inch cake pan lined with parchment paper. Make sure the parchment paper extends up the sides of the pan to make it easier to remove the cheesecake after baking. Keep in mind that removing the cheesecake from a regular cake pan can be a bit tricky, so be gentle and patient. Alternatively, you could use a disposable foil pan of the same size for an easier clean up.
Q4: My cheesecake cracked while baking. What did I do wrong?
A: Cheesecake cracks are a common occurrence, but there are a few things you can do to prevent them. First, make sure you are not over-beating the batter, as this can incorporate too much air. Second, bake the cheesecake in a water bath to ensure even baking and prevent the top from drying out too quickly. Third, don’t open the oven door frequently during baking, as this can cause temperature fluctuations. Finally, let the cheesecake cool slowly in the oven after baking, with the door slightly ajar.
Q5: Can I freeze this cheesecake?
A: Yes, you can freeze this cheesecake, but keep in mind that the texture of the toppings may change slightly after thawing. To freeze, wrap the entire cheesecake tightly in plastic wrap and then in aluminum foil. Freeze for up to 2 months. When ready to serve, thaw the cheesecake in the refrigerator overnight. You may want to add fresh toppings after thawing to freshen up the appearance.