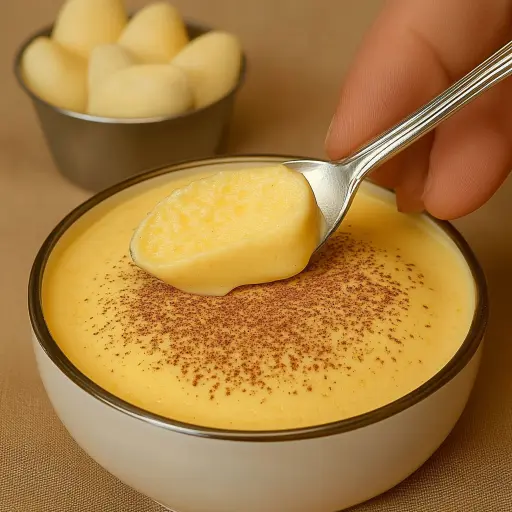
Description: Indulge in the simple elegance of this homemade vanilla dessert cream. Infused with the pure essence of vanilla bean, this velvety smooth custard is a delightful treat that’s surprisingly easy to make. Perfect as a standalone dessert or as a luscious component in more elaborate creations, this recipe is a testament to the power of fresh, quality ingredients.
Ingredients:
- 500 ml (approximately 2 cups) Whole Milk: The foundation of our creamy delight. Whole milk provides richness and body, essential for the luxurious texture we’re aiming for.
- 1 Vanilla Bean: The star of the show! A fresh vanilla bean imparts an unparalleled depth of flavor and aroma. If unavailable, use 1 teaspoon of high-quality vanilla extract, but the bean is highly recommended.
- 4 Large Egg Yolks: These contribute to the custard’s rich, creamy texture and golden hue. Make sure your eggs are fresh for the best results.
- 100 g (approximately 1/2 cup) Granulated Sugar: Adds sweetness and helps create the smooth texture of the cream. You can adjust the amount slightly to your preference.
- 30 g (approximately 1/4 cup) Cornstarch (Maizena): Acts as a thickening agent, ensuring the cream sets to the perfect consistency. Be sure to whisk it thoroughly to avoid lumps.
- 30 g (approximately 2 tablespoons) Unsalted Butter (Optional): Adds an extra layer of richness and a beautiful, glossy sheen to the finished cream. While optional, it’s highly recommended for a truly decadent experience.
Preparation:
Step 1: Vanilla Infusion: In a medium-sized saucepan, pour in the whole milk. Take your vanilla bean and, using a sharp paring knife, carefully slice it lengthwise in half. Gently scrape out the tiny black seeds from each half of the bean. Add both the scraped seeds and the split bean pod to the milk in the saucepan. This dual infusion method maximizes the vanilla flavor. Place the saucepan over medium heat and bring the milk to a gentle simmer. Do not boil! Once simmering, remove from the heat and allow the vanilla to infuse into the milk for 10-15 minutes. This allows the vanilla flavor to fully develop. After the infusion, remove the vanilla bean pod.
Step 2: Egg Yolk Mixture: While the milk is infusing, prepare the egg yolk mixture. In a medium-sized bowl, combine the egg yolks and granulated sugar. Using a whisk or an electric hand mixer, beat the mixture together until it becomes pale yellow and slightly thickened. This process, known as “blanching,” helps to dissolve the sugar and create a smoother final product. Add the cornstarch to the egg yolk and sugar mixture. Whisk vigorously to ensure the cornstarch is fully incorporated and there are no lumps. A smooth mixture is crucial for a lump-free cream.
Step 3: Tempering the Eggs: This is a crucial step to prevent the eggs from scrambling. Gradually pour the hot vanilla-infused milk into the egg yolk mixture, whisking constantly and rapidly. Start by adding a small stream of the hot milk while whisking continuously, then gradually increase the flow as the mixture warms. This process, called tempering, raises the temperature of the egg yolks gently and prevents them from cooking too quickly.
Step 4: Cooking the Cream: Pour the tempered mixture back into the saucepan. Place the saucepan over low heat and cook, stirring constantly with a heat-resistant spatula or wooden spoon, until the cream thickens to a custard-like consistency. This usually takes about 5-7 minutes. It’s important to stir constantly to prevent scorching on the bottom of the pan. The cream is ready when it coats the back of a spoon and leaves a clear line when you run your finger through it.
Step 5: Finishing Touches: Once the cream has thickened, remove the saucepan from the heat. If desired, add the unsalted butter and stir until it is completely melted and incorporated into the cream. The butter will add richness and a beautiful sheen.
Step 6: Cooling and Refrigeration: Pour the hot cream evenly into individual ramekins or a larger serving dish. To prevent a skin from forming on the surface, gently press a piece of plastic wrap directly onto the surface of the cream while it’s still hot. Allow the cream to cool to room temperature before transferring it to the refrigerator. Refrigerate for at least 2 hours, or preferably longer, to allow the cream to set completely.
Why You Will Love This Recipe:
This recipe is a winner for several reasons. First, it is surprisingly simple to make, requiring only a handful of ingredients and straightforward steps. The use of a fresh vanilla bean elevates the flavor profile to something truly special, creating a dessert that is both comforting and elegant. The texture is incredibly smooth and creamy, making each spoonful a pure delight. Beyond its simplicity and exquisite taste, this dessert is also incredibly versatile. It can be enjoyed on its own, used as a filling for pastries, or served alongside fresh fruit. Furthermore, this recipe is easily customizable. You can adjust the sweetness to your liking, experiment with different flavor infusions, or even add a touch of liqueur for an extra kick. The homemade touch makes it a truly memorable dessert that is sure to impress.
COOKING Rating: Easy
Serving Suggestions:
- Classic Presentation: Serve the chilled vanilla cream in individual ramekins, garnished with fresh berries, a sprinkle of cocoa powder, or a dusting of confectioners’ sugar.
- Fruit Pairing: Enhance the flavor by serving with a side of fresh seasonal fruit such as raspberries, strawberries, blueberries, or sliced peaches.
- Pastry Filling: Use the vanilla cream as a filling for tarts, éclairs, or cream puffs.
- Cake Layering: Spread a layer of vanilla cream between layers of cake for added moisture and flavor.
- Warm Sauce Substitute: Serve a slightly warmed cream as a rich sauce on a chocolate lava cake.
Tips:
- Vanilla Bean Substitute: If you cannot find a vanilla bean, substitute with 1 teaspoon of high-quality vanilla extract. Add the extract after the cream has thickened and been removed from the heat.
- Preventing Lumps: Ensure the cornstarch is fully incorporated into the egg yolk mixture to prevent lumps from forming during cooking.
- Constant Stirring: Stir the cream constantly while cooking to prevent it from sticking to the bottom of the pan and scorching.
- Skin Prevention: To prevent a skin from forming on the surface of the cooling cream, gently press a piece of plastic wrap directly onto the surface.
- Adjusting Sweetness: Adjust the amount of sugar to your liking. Taste the mixture before adding it back to the saucepan and adjust accordingly.
- Storing Leftovers: Store any leftover vanilla cream in an airtight container in the refrigerator for up to 3 days.
Prep Time: 25 minutes
Cook Time: 10 minutes
Total Time: 35 minutes (plus 2+ hours chilling time)
Nutritional Information: (Approximate, per serving)
- Calories: 210 kcal
- Protein: 5g
- Sodium: 60mg (depending on salt content of butter)
Conclusion:
This Homemade Vanilla Dessert Cream recipe is a delightful treat that is both easy to make and incredibly versatile. The use of a fresh vanilla bean elevates the flavor to something truly special, while the smooth, creamy texture is simply irresistible. Whether you are looking for a simple dessert to enjoy on its own or a versatile component for more elaborate creations, this recipe is sure to become a favorite. The combination of whole milk, egg yolks, and a touch of sweetness creates a classic custard base that can be customized with your favorite flavors and toppings. Enjoy the process of creating this homemade dessert, and savor every spoonful of this silken vanilla bean dream.
Questions and Answers About This Recipe:
- Q: Can I use a different type of milk?
- A: While whole milk is recommended for its richness, you can use 2% milk for a slightly lighter version. However, the texture may not be as creamy. Plant-based milks can also be used, but be aware that they may alter the flavor and consistency of the final product.
- Q: Can I make this recipe without cornstarch?
- A: Cornstarch is essential for thickening the cream to the desired consistency. Without it, the cream will be too thin and runny. You could experiment with other thickening agents like tapioca starch, but the results may vary.
- Q: How can I prevent the eggs from scrambling?
- A: Tempering the eggs properly is key to preventing them from scrambling. Add the hot milk to the egg yolk mixture very gradually, whisking constantly. This will gently raise the temperature of the eggs and prevent them from cooking too quickly.
- Q: What if my cream is lumpy?
- A: If your cream becomes lumpy, you can try passing it through a fine-mesh sieve to remove any lumps. Additionally, make sure the cornstarch is fully incorporated before cooking and stir constantly to prevent sticking.
- Q: Can I add other flavors to this cream?
- A: Absolutely! This recipe is a great base for experimenting with other flavors. You can add lemon zest, orange zest, a pinch of cinnamon, or even a splash of liqueur to customize the flavor to your liking. Add any flavorings after the cream has thickened and been removed from the heat.