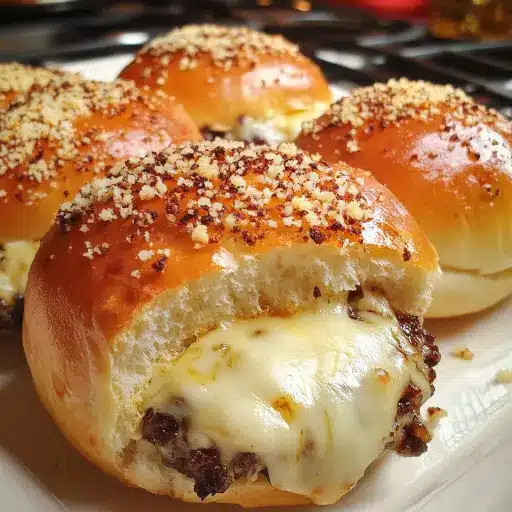
Description: These Garlic Parmesan Cheeseburger Bombs are a fun, flavorful, and portable twist on the classic cheeseburger. Imagine a juicy, seasoned ground beef and cheddar cheese filling, encased in a soft, buttery biscuit, and then bathed in a fragrant garlic-parmesan glaze. Perfect for game day, parties, or a quick and satisfying weeknight meal, these bombs are sure to be a crowd-pleaser!
Ingredients:
- 1 pound ground beef (80/20 blend recommended for flavor and juiciness)
- 1 small onion, finely diced (yellow or white onion work well)
- 1 teaspoon garlic powder
- 1/2 teaspoon salt (or to taste)
- 1/2 teaspoon black pepper (freshly ground is best)
- 1 cup shredded cheddar cheese (sharp cheddar adds a nice bite, but mild cheddar is also fine)
- 1 can (16 ounces) refrigerated biscuit dough (look for the flaky or grand variety for best results)
- 4 tablespoons butter, melted (unsalted butter is preferred so you can control the salt level)
- 2 cloves garlic, minced (freshly minced is key for the best garlic flavor)
- 1/4 cup grated Parmesan cheese (use real Parmesan, not the powdered kind in a green can)
- 1 tablespoon chopped fresh parsley (or 1 teaspoon dried parsley) (fresh parsley adds a vibrant freshness)
Preparation:
Step 1: Preheat Oven: Begin by preheating your oven to 375°F (190°C). This ensures that the oven is at the correct temperature when you place the cheeseburger bombs inside, allowing them to cook evenly and achieve that perfect golden-brown color. Line a baking sheet with parchment paper or lightly grease it. Parchment paper will prevent the bombs from sticking to the baking sheet and make for easier cleanup. If you don’t have parchment paper, a light coating of cooking spray will do the trick.
Step 2: Cook the Beef Filling: In a large skillet over medium heat, crumble the ground beef and add the finely diced onion. Cook, stirring occasionally, until the beef is browned and the onion is tender and translucent. This process typically takes about 5-7 minutes. Be sure to break up the beef into small pieces as it cooks to ensure a more even distribution in the filling. Once cooked, drain any excess grease from the skillet. Excess grease can make the cheeseburger bombs soggy, so it’s important to remove it. After draining, return the skillet to the stovetop and stir in the garlic powder, salt, and pepper. These seasonings will enhance the flavor of the beef filling and create a delicious savory base. Remove the skillet from the heat and let the mixture cool slightly. This is important because if the filling is too hot, it can melt the cheese and make the biscuit dough difficult to work with.
Step 3: Prepare the Biscuits: On a lightly floured surface, carefully flatten each biscuit into a 4–5 inch circle. You can use a rolling pin for this, but gently pressing them with your fingers also works well. Aim for a uniform thickness to ensure even cooking. Place a generous spoonful (about 2 tablespoons) of the beef mixture in the center of each dough circle. Make sure to leave some space around the edges so you can seal the bombs properly. Top with a sprinkle of shredded cheddar cheese. The amount of cheese is up to your preference, but about a tablespoon per bomb is a good starting point.
Step 4: Form the Bombs: Carefully pull the edges of the dough up around the filling, pinching to seal and form a ball. Ensure that the seam is completely sealed to prevent the filling from leaking out during baking. If the dough is sticky, you can lightly dampen your fingers with water to help it adhere. Place each cheeseburger bomb seam-side down on the prepared baking sheet. This will help prevent the seam from opening up during baking.
Step 5: Make the Garlic Butter: In a small bowl, combine the melted butter, minced garlic, and chopped parsley. The combination of butter, garlic, and parsley creates a flavorful and aromatic glaze that will infuse the cheeseburger bombs with a rich, savory taste. Fresh parsley is ideal, but dried parsley can be used as a substitute.
Step 6: Brush and Bake: Brush each cheeseburger bomb generously with the garlic butter mixture. Ensure that the entire surface of the bomb is coated with the garlic butter to create a golden-brown crust and enhance the flavor. Sprinkle grated Parmesan cheese over the tops of the bombs. The Parmesan cheese will add a salty, nutty flavor and create a crispy topping.
Step 7: Bake: Place the baking sheet in the preheated oven and bake for 15–18 minutes, or until the cheeseburger bombs are golden brown and the biscuit dough is cooked through. The baking time may vary depending on your oven, so keep a close eye on them and adjust the time as needed. To ensure that the beef filling is cooked through, you can use a meat thermometer to check the internal temperature. It should reach 160°F (71°C).
Step 8: Serve: Remove the cheeseburger bombs from the oven and let them cool slightly on the baking sheet before transferring them to a serving platter. Serve warm.
Why You Will Love This Recipe
These Garlic Parmesan Cheeseburger Bombs are a guaranteed hit for so many reasons! First, they’re incredibly flavorful. The savory beef filling, melty cheddar cheese, and fragrant garlic-parmesan coating create a symphony of tastes that will leave you craving more. Second, they’re fun and unique. They offer a playful twist on the traditional cheeseburger, making them perfect for parties or a special family dinner. Third, they’re portable and convenient. Their compact size makes them easy to eat on the go, pack in a lunchbox, or serve as appetizers. Finally, they’re easy to make. With just a few simple ingredients and straightforward instructions, you can whip up a batch of these delicious bombs in no time.
Serving Suggestions:
- Serve with your favorite dipping sauces, such as ketchup, ranch dressing, mustard, or even a homemade garlic aioli.
- Pair them with a simple side salad or some crispy french fries for a complete meal.
- Arrange them on a platter as appetizers for a party or gathering.
- Serve them warm with a dollop of sour cream or guacamole.
- Cut them in half and serve them on a slider bun for mini cheeseburger sliders.
Tips:
- To save time, you can prepare the beef filling ahead of time and store it in the refrigerator until ready to use.
- For a spicier version, add a pinch of red pepper flakes to the beef filling or the garlic butter mixture.
- If you don’t have biscuit dough, you can use pizza dough or puff pastry as a substitute.
- To prevent the filling from leaking out, make sure to seal the edges of the dough tightly.
- For a vegetarian option, substitute the ground beef with plant-based ground meat or cooked lentils.
Prep Time: 20 minutes Cook Time: 15-18 minutes Total Time: 35-38 minutes
Nutritional Information: (Per serving, approximate)
- Calories: 350-400
- Protein: 20-25g
- Sodium: 500-600mg
Conclusion
Garlic Parmesan Cheeseburger Bombs are a fun, flavorful, and easy-to-make dish that is sure to please everyone. Their combination of savory beef, melted cheese, and aromatic garlic-parmesan glaze makes them irresistible. Whether you’re looking for a quick weeknight meal, a crowd-pleasing appetizer, or a unique twist on the classic cheeseburger, these bombs are the perfect choice. So gather your ingredients, preheat your oven, and get ready to enjoy a taste sensation that will have you coming back for more!
Questions and Answers
- Q: Can I use a different type of cheese?
- A: Absolutely! While cheddar cheese is a classic choice, you can easily substitute it with other types of cheese, such as Monterey Jack, mozzarella, pepper jack, or even a blend of cheeses. Each cheese will bring its own unique flavor and texture to the cheeseburger bombs, so feel free to experiment and find your favorite combination.
- Q: Can I make these ahead of time?
- A: Yes, you can definitely make these ahead of time. You can prepare the beef filling a day in advance and store it in the refrigerator until ready to use. You can also assemble the cheeseburger bombs and store them in the refrigerator for up to 24 hours before baking. However, it’s best to brush them with the garlic butter and sprinkle with Parmesan cheese just before baking to prevent the dough from becoming soggy.
- Q: What if I don’t have biscuit dough?
- A: If you don’t have biscuit dough, you can use pizza dough or puff pastry as a substitute. Pizza dough will create a slightly chewier texture, while puff pastry will result in a more flaky and buttery bomb. You can also make your own homemade biscuit dough if you’re feeling adventurous.
- Q: Can I freeze these cheeseburger bombs?
- A: Yes, you can freeze these cheeseburger bombs for longer storage. After baking, let them cool completely before wrapping them individually in plastic wrap and then placing them in a freezer-safe bag or container. They can be stored in the freezer for up to 2-3 months. When ready to eat, thaw them in the refrigerator overnight and then reheat them in the oven or microwave until heated through.
- Q: Can I add any other ingredients to the beef filling?
- A: Absolutely! The beef filling is a blank canvas, so feel free to add other ingredients to customize the flavor. Some great additions include diced bell peppers, mushrooms, jalapenos, bacon bits, or your favorite burger seasoning blend. Just be sure to adjust the cooking time as needed to ensure that all of the ingredients are cooked through.