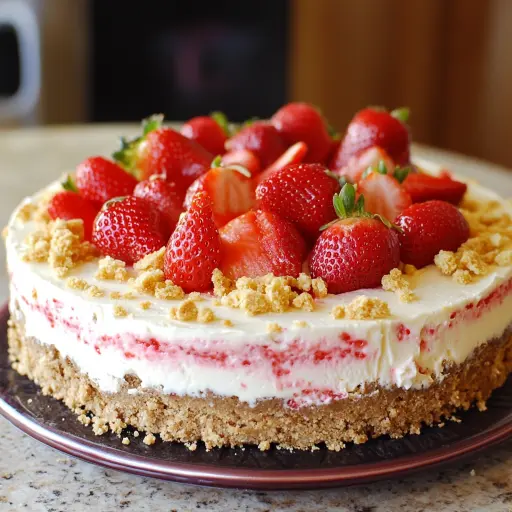
Description: This no-bake Berrylicious Strawberry Crunch Cheesecake is a delightful dessert that combines the creamy richness of cheesecake with the sweet, refreshing flavor of fresh strawberries and the satisfying crunch of graham crackers. It’s incredibly easy to make, requiring no baking, and is perfect for summer gatherings, potlucks, or any occasion where you want a show-stopping dessert that’s both delicious and visually appealing. The layers of graham cracker crust, creamy cheesecake filling, juicy strawberry layer, and crunchy topping create a symphony of textures and flavors that will leave everyone wanting more. This recipe is a guaranteed crowd-pleaser and a great way to showcase the season’s best strawberries.
Ingredients:
- For the Crust:
- 2 cups crushed graham crackers (approximately 14 graham cracker squares)
- 1/2 cup (1 stick) unsalted butter, melted
- For the Cheesecake Filling:
- 2 cups heavy whipping cream, cold
- 1 cup cream cheese, softened to room temperature
- 1/2 cup powdered sugar, sifted
- 1 teaspoon pure vanilla extract
- For the Strawberry Layer:
- 2 cups fresh strawberries, hulled and sliced
- 1/4 cup strawberry jam (high-quality, seedless preferred)
- For Topping & Garnish:
- Extra crushed graham crackers (about 1/2 cup)
- Whole strawberries, for garnish
Preparation:
Step 1: Prepare the Graham Cracker Crust
- In a medium-sized mixing bowl, combine the crushed graham crackers and melted butter. Ensure the graham crackers are finely crushed for a smooth crust. If using a food processor, pulse until finely ground.
- Mix the graham crackers and melted butter thoroughly until all the crumbs are moistened and the mixture resembles wet sand. This ensures the crust will hold together well.
Step 2: Press the Crust into the Pan
- Transfer the graham cracker mixture to a 9-inch springform pan. A springform pan is essential for easy removal of the cheesecake.
- Using the bottom of a measuring cup or your fingers, firmly press the graham cracker mixture evenly into the bottom of the pan. Make sure the crust is compact and consistent in thickness.
- To create a slightly raised edge, you can press some of the mixture up the sides of the pan, about 1/2 inch. This will help contain the filling.
- Place the prepared crust in the refrigerator to chill while you prepare the cheesecake filling. This allows the crust to firm up and prevents it from crumbling when the filling is added.
Step 3: Make the Cheesecake Filling
- In a large mixing bowl, using an electric mixer (stand mixer or handheld mixer), beat the heavy whipping cream on medium-high speed until stiff peaks form. Be careful not to overwhip, or the cream will become grainy.
- In a separate bowl, beat the softened cream cheese, powdered sugar, and vanilla extract until smooth and creamy. Ensure the cream cheese is completely softened to avoid lumps in the filling. Sifting the powdered sugar helps prevent clumps as well.
- Gently fold the whipped cream into the cream cheese mixture. Be careful not to deflate the whipped cream; fold until just combined. This will ensure a light and airy cheesecake filling.
Step 4: Assemble the Cheesecake
- Remove the chilled graham cracker crust from the refrigerator.
- Spread the cheesecake filling evenly over the chilled crust. Use a spatula or offset knife to smooth the top and ensure an even layer.
Step 5: Add the Strawberry Layer and Topping
- In a separate bowl, combine the sliced strawberries and strawberry jam. Gently mix until the strawberries are well coated with the jam. The jam adds sweetness and helps the strawberries adhere together.
- Spoon the strawberry mixture evenly over the cheesecake filling. Be careful not to press down too hard, as this could mix the layers.
- Sprinkle extra crushed graham crackers over the top of the strawberry layer. This adds a delightful crunch and visual appeal.
- Garnish with whole strawberries for an elegant presentation.
Step 6: Chill and Serve
- Cover the cheesecake with plastic wrap and chill in the refrigerator for at least 4 hours, or preferably overnight, to allow it to fully set. This is crucial for the cheesecake to hold its shape when sliced.
- Before serving, carefully remove the sides of the springform pan.
- Slice the cheesecake with a sharp knife and serve cold.
Why You Will Love This Recipe
This Berrylicious Strawberry Crunch Cheesecake is a guaranteed crowd-pleaser for several reasons:
- No-Bake Simplicity: No oven required! This recipe is perfect for hot summer days or when you simply don’t want to deal with baking.
- Delicious Layers: The combination of the crunchy graham cracker crust, creamy cheesecake filling, and sweet strawberry layer creates a delightful symphony of textures and flavors.
- Visually Stunning: The vibrant colors and layered presentation make this cheesecake a show-stopping dessert that’s perfect for any occasion.
- Easy to Customize: You can easily adapt this recipe to your liking by using different fruits, jams, or toppings.
- Perfect for Any Occasion: From summer barbecues to birthday celebrations, this cheesecake is a versatile dessert that’s sure to impress.
- Kid-Friendly: The sweet strawberry flavor and crunchy topping make this cheesecake a hit with kids and adults alike.
COOKING Rating Beginner
Serving Suggestions:
- Serve chilled directly from the refrigerator.
- Garnish with additional fresh strawberries, a dollop of whipped cream, or a drizzle of chocolate syrup.
- Pair with a glass of sparkling wine or a refreshing iced tea.
- For a more decadent treat, serve with a scoop of vanilla ice cream.
Tips:
- Use a springform pan for easy release: This is essential for removing the cheesecake without damaging it.
- Soften the cream cheese completely: This will ensure a smooth and creamy filling.
- Don’t overwhip the whipped cream: Overwhipped cream can become grainy.
- Pat strawberries dry before layering to avoid excess moisture: This will prevent the crust from becoming soggy.
- Chill the cheesecake for at least 4 hours: This is crucial for the cheesecake to set properly.
- For a cleaner cut, dip your knife in warm water before slicing.
- Get creative with toppings! Add a drizzle of melted white chocolate, sprinkle with chopped nuts, or create a decorative pattern with fresh fruit.
- For a richer flavor, use full-fat cream cheese.
- If you don’t have fresh strawberries, you can use frozen strawberries that have been thawed and drained.
Prep Time: 20 minutes
Cook Time: 0 minutes (no-bake)
Chill Time: 4 hours (minimum)
Total Time: 4 hours 20 minutes
Nutritional Information: (Approximate values per slice, based on estimations and may vary depending on ingredient brands and specific measurements)
- Calories: 320 kcal
- Protein: 4 g
- Sodium: 150 mg
Conclusion
This Berrylicious Strawberry Crunch Cheesecake is more than just a dessert; it’s an experience. It’s a celebration of summer flavors, a testament to simple elegance, and a guaranteed way to bring smiles to faces. Its no-bake nature makes it accessible to cooks of all skill levels, and its customizable layers allow you to create a dessert that perfectly suits your taste. Whether you’re hosting a summer gathering or simply craving a sweet treat, this cheesecake is a must-try. So gather your ingredients, prepare to indulge, and create a Berrylicious masterpiece that everyone will adore. Enjoy!
Questions and Answers about the Recipe:
Q1: Can I use a different type of fruit instead of strawberries?
A: Absolutely! One of the best things about this recipe is its versatility. While strawberries are the classic choice, you can easily substitute other berries like raspberries, blueberries, or blackberries. You can even use a combination of berries for a mixed berry cheesecake. Consider matching the jam flavor to your fruit choice (e.g., raspberry jam with raspberries). Just make sure to pat the fruit dry before layering to prevent excess moisture.
Q2: I don’t have a springform pan. Can I use a regular pie dish?
A: While a springform pan is ideal for easy removal and clean presentation, you can use a 9-inch pie dish in a pinch. However, removing the cheesecake will be more challenging. Line the pie dish with parchment paper, leaving an overhang on the sides. This will allow you to lift the cheesecake out of the dish after it has set. Be extra careful when removing it to avoid breaking the crust or filling.
Q3: Can I make this cheesecake ahead of time?
A: Yes, definitely! In fact, this cheesecake is best made at least a day in advance to allow it to fully set. You can prepare it up to two days ahead of time and store it covered in the refrigerator. This makes it a perfect dessert for entertaining, as you can take care of it well in advance.
Q4: My cheesecake filling is too runny. What did I do wrong?
A: There are a few reasons why your cheesecake filling might be too runny. The most common cause is using cream cheese that wasn’t softened enough. Make sure to bring the cream cheese to room temperature before beating it. Another reason could be overwhipping the whipped cream. Overwhipped cream can lose its structure and become watery. Also, make sure you are using heavy whipping cream, not a lighter alternative, as the fat content is essential for achieving stiff peaks. Finally, ensure the strawberries are patted dry to prevent them from adding excess moisture to the filling.
Q5: Can I freeze this cheesecake?
A: Yes, you can freeze this cheesecake, but the texture may change slightly upon thawing. To freeze it properly, chill the cheesecake completely, then wrap it tightly in plastic wrap, followed by a layer of aluminum foil. Freeze for up to 2-3 months. When ready to serve, thaw the cheesecake in the refrigerator overnight. Be aware that the crust may become slightly softer after thawing.