Description: Indulge in the taste of summer with our Cherry Pie Iced Tea! This refreshing beverage combines the tartness of fresh cherries with the comforting flavors of a homemade cherry pie, all perfectly blended into a cool, invigorating iced tea. It’s the ideal drink for hot days, backyard barbecues, or simply when you crave a little slice of cherry pie bliss in a glass. 🍒☀️
Ingredients:
- 1 cup frozen pitted cherries
- 1/3 cup granulated sugar
- 1/4 cup water
- Pinch of salt
- 1 teaspoon lemon juice
- 1 teaspoon vanilla extract
- 1 teaspoon butter extract
- 1/2 teaspoon cake batter extract (optional, but highly recommended!)
- 2 cups Gold Peak Unsweetened Black Tea (or your favorite unsweetened black tea)
- 4 tablespoons cherry pie syrup (from the recipe below)
- Fresh cherries for garnish (optional, but adds a beautiful touch)
Preparation:
Step 1: Prepare the Cherry Syrup Base
Begin by gathering your ingredients for the cherry syrup. It’s crucial to start with high-quality cherries – frozen pitted cherries work wonderfully because they’re readily available year-round and are typically picked at peak ripeness. Measure out one cup of these frozen jewels. Grab your granulated sugar, water, and a small pinch of salt. The salt might seem like an odd addition, but it expertly balances the sweetness and enhances the cherry flavor, so don’t skip it!
Step 2: Cook the Cherry Mixture
Find a medium-sized saucepan and place it on your stovetop. Pour in the frozen cherries, followed by the granulated sugar, water, and the pinch of salt. Turn the heat to medium and let the mixture begin to simmer. As the cherries thaw and the sugar dissolves, take a spoon or a potato masher and start gently mashing the cherries. The goal is to release their juices and create a pulp. Continue cooking, stirring occasionally and mashing the cherries periodically, until the mixture starts to thicken. This process usually takes about 10-15 minutes. Remember, the syrup will continue to thicken as it cools, so don’t overcook it. You’re looking for a consistency that is slightly thicker than water but not quite as thick as jam.
Step 3: Strain the Cherry Syrup
Once the cherry mixture has thickened to your liking, it’s time to strain it. Place a fine-mesh strainer over a heat-safe bowl or a large measuring cup. Carefully pour the cooked cherry mixture into the strainer. Using a spoon or a spatula, gently press down on the solids in the strainer to extract every last drop of that intensely flavored cherry syrup. You want to squeeze out as much juice as possible, leaving behind only the cherry pulp and any remaining solids. Discard the spent cherry pulp – you’ve extracted all the goodness from it!
Step 4: Infuse the Syrup with Flavor
Now comes the fun part – adding the flavor extracts that will transform this syrup into something truly special. Into the strained cherry syrup, stir in the lemon juice, vanilla extract, butter extract, and the optional but highly recommended cake batter extract. The lemon juice adds a touch of brightness that cuts through the sweetness and enhances the cherry flavor. The vanilla extract provides a warm, comforting aroma. The butter extract mimics the richness of a classic cherry pie filling. And the cake batter extract? That’s the secret ingredient that takes this syrup to the next level, giving it that unmistakable cherry pie flavor. Stir everything together until well combined.
Step 5: Cool and Store the Syrup
Allow the cherry pie syrup to cool completely at room temperature. This will help the flavors meld together and intensify. Once cooled, transfer the syrup to an airtight container and store it in the refrigerator. Properly stored, the syrup will keep for up to 2 weeks.
Step 6: Assemble the Cherry Pie Iced Tea
Now that your cherry pie syrup is ready, it’s time to make the iced tea! Fill a glass with ice. Pour in 2 cups of Gold Peak Unsweetened Black Tea (or your favorite unsweetened black tea). Add 4 tablespoons of the cherry pie syrup. Stir well to combine. Taste and adjust the amount of syrup to your preference. If you prefer a sweeter tea, add a little more syrup. If you prefer a more tart tea, use a little less.
Step 7: Garnish and Serve
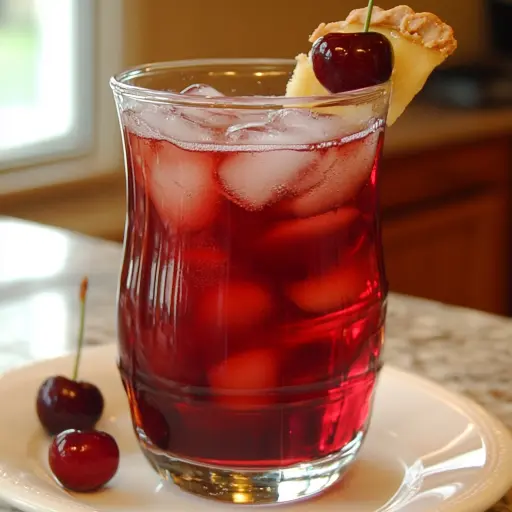
For an extra touch of elegance and visual appeal, garnish your Cherry Pie Iced Tea with a few fresh cherries. Serve immediately and enjoy!
Why You Will Love This Recipe
This Cherry Pie Iced Tea recipe is a delightful twist on classic iced tea that will have you craving more with every sip. The homemade cherry syrup is the star of the show, bursting with the authentic flavors of a freshly baked cherry pie. It’s so easy to make, using simple ingredients that you probably already have in your pantry. This iced tea is incredibly refreshing, perfect for quenching your thirst on a hot summer day. It’s also easily customizable – adjust the sweetness level to your liking, and experiment with different types of tea to find your perfect combination. The addition of butter and cake batter extracts truly elevates this beverage, giving it a unique and irresistible flavor profile. Plus, it’s a crowd-pleaser that’s sure to impress your friends and family at your next gathering!
Cooking Rating:
Easy
Serving Suggestions:
- Serve chilled in tall glasses filled with ice.
- Garnish with fresh cherries or a slice of lemon for added visual appeal.
- Pair with light snacks such as crackers and cheese, fruit salad, or a slice of actual cherry pie for the ultimate treat.
- Perfect for picnics, barbecues, summer parties, or simply relaxing on the porch.
Tips:
- Use high-quality cherries for the best flavor. Frozen pitted cherries work well and are readily available.
- Adjust the amount of syrup to your personal preference for sweetness.
- For a richer flavor, use a flavored black tea such as cherry or vanilla.
- Experiment with different extracts to create unique variations. Almond extract or a hint of cinnamon could also be delicious additions.
- Make a large batch of the cherry syrup ahead of time and store it in the refrigerator for easy access whenever you crave a refreshing glass of Cherry Pie Iced Tea.
- For a sparkling version, top the iced tea with a splash of club soda or sparkling water.
- To make a boozy version, add a shot of cherry liqueur or bourbon.
Prep Time: 10 minutes
Cook Time: 15 minutes
Total Time: 25 minutes
Nutritional Information (Per Serving, estimated):
- Calories: Approximately 100-120
- Protein: Less than 1 gram
- Sodium: 5-10mg
Conclusion:
The Cherry Pie Iced Tea is a simple yet extraordinary beverage that combines the best of both worlds – the refreshing coolness of iced tea and the comforting flavors of a homemade cherry pie. The homemade cherry syrup is easy to make and packed with flavor, making this drink a delightful treat any time of year. Whether you’re hosting a summer party or simply relaxing on a hot day, this iced tea is sure to become a new favorite. So, grab your ingredients, mix up a batch, and enjoy the taste of summer in every sip!
Questions and Answers:
- Can I use fresh cherries instead of frozen?
- Absolutely! Fresh cherries will work beautifully in this recipe. Be sure to pit them before using them. You might need to adjust the cooking time slightly, as fresh cherries may release more moisture than frozen.
- Can I use a different type of tea?
- Yes, you can experiment with different types of tea. Black tea is traditionally used in iced tea and pairs well with cherry flavor, but green tea or white tea could also be interesting alternatives.
- How long will the cherry syrup last in the refrigerator?
- Properly stored in an airtight container, the cherry syrup will last for up to 2 weeks in the refrigerator.
- Can I make this recipe ahead of time?
- Yes, you can make the cherry syrup ahead of time and store it in the refrigerator. When you’re ready to make the iced tea, simply mix the syrup with the tea and ice.
- Is there a sugar-free version of this recipe?
- Yes, you can substitute the granulated sugar with a sugar-free sweetener like stevia or erythritol. Adjust the amount to your taste, as sugar-free sweeteners can be more concentrated than sugar.