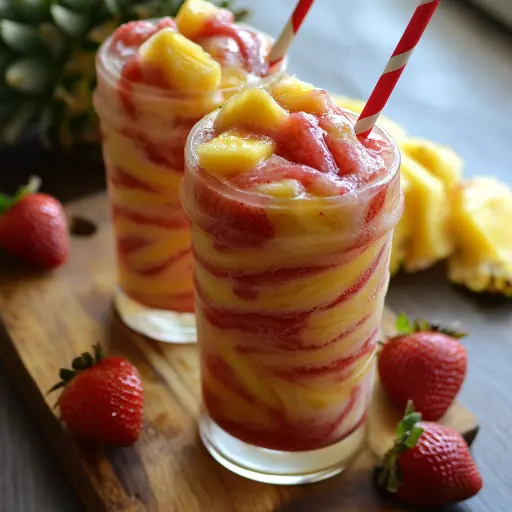
Description: A refreshing and vibrant homemade slushie that blends the tropical sweetness of pineapple with the classic fruity tang of strawberries. This delightful concoction is quick to make, customizable to your taste, and perfect for cooling down on a warm day. The swirling layers of vibrant colors make it a visually appealing treat as well!
Ingredients:
- 1 cup frozen pineapple chunks
- 1 cup frozen strawberries
- 1 cup cold water (or coconut water for extra flavor)
- 2 tablespoons honey or sweetener of choice (agave, maple syrup, stevia)
- 1 tablespoon fresh lime juice
- Ice cubes (optional, for a thicker texture)
- Fresh mint leaves or extra fruit (strawberries, pineapple wedges) for garnish (optional)
Preparation:
Step 1: Gather all your ingredients and prepare your blending station. Make sure your blender is clean and ready to go. Consider chilling your glasses in the freezer for a few minutes to keep your slushies colder for longer.
Step 2: Prepare the Pineapple Layer. Add the frozen pineapple chunks, ½ cup of cold water (or coconut water), 1 tablespoon of honey (or sweetener), and a squeeze of fresh lime juice into a blender.
Step 3: Blend the Pineapple Layer. Blend the ingredients until smooth and slushy. If the mixture is too thick and the blender is struggling, add a little more water (one tablespoon at a time) until it reaches the desired consistency. Be careful not to add too much water, as this will make the slushie too liquidy. The consistency should be thick enough to hold its shape slightly. If it blends too thin add more frozen pineapple.
Step 4: Prepare the Strawberry Layer. In a separate blender container (or after rinsing the first one), add the frozen strawberries, the remaining ½ cup of cold water (or coconut water), the remaining 1 tablespoon of honey (or sweetener), and another squeeze of fresh lime juice.
Step 5: Blend the Strawberry Layer. Blend these ingredients until smooth and slushy, just like the pineapple layer. Again, add a little more water if necessary to achieve the right consistency. As before be careful of the slush being too liquid like, and add more frozen strawberries if this happens.
Step 6: Assemble the Slushies. In a tall glass or serving cup, carefully pour or spoon in the pineapple slush, filling the glass about halfway. You can tilt the glass slightly as you pour to help create a more even layer.
Step 7: Create the Swirl Effect. Gently spoon the strawberry slush on top of the pineapple layer, creating a swirled effect as the colors blend together. Don’t overmix – the goal is to maintain distinct layers with a beautiful gradient of color. If you want a more defined swirl, use a spoon or straw to gently swirl the two layers together.
Step 8: Serve and Garnish. Top the slushies with a sprig of fresh mint or a few extra fruit slices (strawberries, pineapple wedges) for added flair. A small paper umbrella or colorful straw can also add a fun touch.
Step 9: Enjoy! Sip and enjoy the delicious, homemade pineapple strawberry swirl slushie with its perfect blend of tropical sweetness and refreshing fruitiness.
Why you will love this recipe
- It’s incredibly easy and quick: This recipe requires minimal ingredients and steps, making it perfect for a quick refreshment anytime.
- Customizable: You can easily adjust the sweetness, tartness, and consistency to your liking. Use different sweeteners, add more or less lime juice, or adjust the amount of water for a thicker or thinner slushie.
- Naturally delicious: It uses fresh or frozen fruit, providing natural sweetness and vitamins. You can feel good about serving this to kids and adults alike.
- Visually appealing: The swirling layers of vibrant colors make this slushie a treat for the eyes as well as the taste buds.
- Versatile: It can be enjoyed as a refreshing snack, dessert, or even a fun cocktail (with the addition of alcohol).
- A healthy alternative: Compared to store-bought slushies, this homemade version is free of artificial colors, flavors, and preservatives.
- Perfect for any occasion: Whether you’re relaxing by the pool, hosting a summer gathering, or simply craving a fruity treat, this slushie is the perfect choice.
- Kid-friendly: Children love the bright colors, fruity flavors, and fun presentation of this slushie.
- Dairy-Free and Vegan: Using water and a non-honey sweetener option, this recipe can easily be made vegan and dairy-free.
- Minimal Cleanup: With only a few ingredients and minimal equipment, cleanup is a breeze.
Serving Suggestions:
- Serve in chilled glasses for a more refreshing experience.
- Garnish with fresh mint leaves, extra fruit slices (strawberries, pineapple wedges), or a small paper umbrella.
- Serve with a straw or spoon for easy sipping.
- Pair with light snacks like fruit salad, crackers and cheese, or mini sandwiches.
- Serve as a palate cleanser between courses at a summer barbecue.
- Make it a party: Set up a “slushie bar” with different fruits, sweeteners, and garnishes, and let your guests create their own custom slushies.
- Serve immediately to prevent the slushie from melting.
Tips:
- For a thicker slushie, use more frozen fruit and less water.
- For a thinner slushie, use more water and less frozen fruit.
- To prevent the slushie from melting too quickly, store the glasses in the freezer before serving.
- If you don’t have fresh lime juice, you can use bottled lime juice, but fresh lime juice is preferred for its brighter flavor.
- If you want to make the slushie ahead of time, blend the fruit with just enough water to get the blender started, then freeze the mixture in a freezer-safe container. When you’re ready to serve, thaw the mixture slightly and blend until slushy.
- Adjust the amount of sweetener to your liking. Taste as you go and add more if needed.
- Get creative with your garnishes. Consider using edible flowers, colorful sprinkles, or even a drizzle of chocolate syrup.
- For extra creaminess: Add a splash of coconut milk or yogurt to either of the layers.
- Make it a cocktail: For an adult version, add a splash of rum or vodka to either layer before blending.
- If your blender struggles with frozen fruit, try adding the water first to help it blend more easily.
- To make this recipe even healthier, consider adding a handful of spinach or kale to either layer for a boost of nutrients. The fruit will mask the flavor of the greens.
Prep Time: 5 minutes
Cook Time: 0 minutes (no cooking required)
Total Time: 5 minutes
Nutritional Information:
(Note: This is an estimate and will vary depending on the specific ingredients and quantities used.)
- Calories: Approximately 150-200 per serving
- Protein: 1-2 grams
- Sodium: Very low
Conclusion
This Pineapple Strawberry Swirl Slushie is a delightful treat that’s easy to make, customizable, and perfect for any occasion. With its vibrant colors, refreshing flavors, and wholesome ingredients, it’s sure to become a new favorite in your household. So grab your blender, gather your ingredients, and get ready to enjoy a taste of summer in every swirl!
Questions and Answers about this recipe:
- Question 1: Can I use fresh fruit instead of frozen fruit?
- Answer: While frozen fruit is recommended for its ability to create a slushy texture, you can certainly use fresh fruit. If using fresh fruit, add plenty of ice cubes to the blender to achieve the desired slushy consistency. You might also need to adjust the amount of water or sweetener depending on the ripeness of the fresh fruit. Remember that fresh fruit will make the slushie melt faster than frozen fruit.
- Question 2: Can I make this recipe without a blender?
- Answer: A blender is essential for achieving the smooth, slushy texture of this recipe. Without a blender, it would be difficult to break down the frozen fruit and create the desired consistency. If you don’t have a blender, you might consider using a food processor, but be aware that the texture may not be as smooth.
- Question 3: How can I make this slushie less sweet?
- Answer: To reduce the sweetness, start by using less honey or sweetener. You can also add more lime juice to balance the sweetness with tartness. Alternatively, you can experiment with other natural sweeteners that have a lower glycemic index, such as stevia or monk fruit. You can also add unsweetened yogurt to give it more creaminess.
- Question 4: Can I use different fruits for this recipe?
- Answer: Absolutely! One of the great things about this recipe is its versatility. Feel free to experiment with other fruits that you enjoy, such as mango, raspberry, blueberry, peach, or kiwi. Just keep in mind that the flavor and color of the slushie will change depending on the fruits you use.
- Question 5: How long will this slushie keep in the freezer?
- Answer: While it’s best to enjoy this slushie immediately, you can store leftovers in a freezer-safe container for up to a few hours. However, keep in mind that the texture may change and become more solid as it freezes. When you’re ready to enjoy it, you may need to let it thaw slightly and then blend it again to restore the slushy consistency. It’s generally not recommended to store it for longer periods, as the flavors may degrade and the texture may become icy.