Description
This recipe provides a comprehensive guide to baking your own sourdough bread at home, even if you’ve never baked bread before. It covers everything from creating your own sourdough starter to shaping, proofing, and baking a beautiful and delicious loaf with a crisp crust and tangy flavor. Sourdough bread is more than just a recipe; it’s a journey. It requires patience, observation, and a connection with the natural process of fermentation. But the rewards—a deeply flavorful, satisfyingly chewy loaf of bread—are well worth the effort. Let’s embark on this baking adventure together!
Ingredients:
For the Sourdough Starter:
- 50g Whole Wheat Flour (or Rye Flour)
- 50g Unchlorinated Water (room temperature)
For the Dough:
- 150g Active Sourdough Starter (fed and bubbly)
- 350g Unbleached Bread Flour
- 250g Unchlorinated Water (lukewarm)
- 10g Sea Salt
Preparation:
Creating the Sourdough Starter (Days 1-7+):
This process takes about a week or more to establish a healthy, active starter.
Day 1: The Beginning
- Step 1: In a clean jar, mix 50g of whole wheat flour with 50g of unchlorinated water. Stir well until there are no dry clumps.
- Step 2: Cover the jar loosely with a lid or cheesecloth secured with a rubber band. This allows airflow while protecting the mixture from contaminants.
- Step 3: Store the jar in a warm place (ideally 70-75°F or 21-24°C).
Day 2:
- Step 1: Observe the mixture. You may see some bubbles forming, or nothing at all. Either way, proceed to Day 3.
Day 3: The First Feeding
- Step 1: Discard half of the starter (50g). This is important to prevent the starter from becoming too acidic and weak.
- Step 2: Add 50g of unbleached all-purpose or bread flour and 50g of unchlorinated water to the remaining starter.
- Step 3: Mix well and cover.
Days 4-7:
- Step 1: Repeat the feeding process (discard half, add 50g flour and 50g water) every 24 hours.
- Step 2: Observe the starter. You should start to see consistent bubbling and a noticeable rise in volume after each feeding. It should also have a slightly sour, pleasant smell.
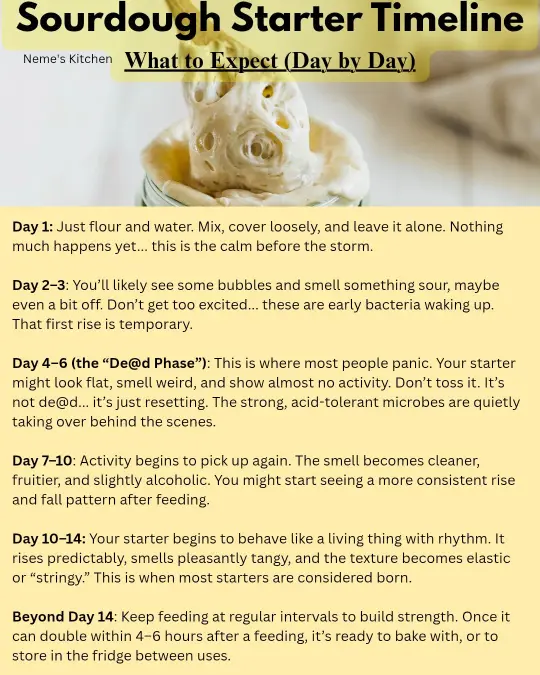
Day 7 and Beyond:
- Step 1: Once the starter consistently doubles in size within 4-8 hours after feeding, it is ready to use for baking. Continue to feed it daily if you plan to bake frequently, or store it in the refrigerator and feed it once a week.
Making the Sourdough Bread:
Step 1: Autolyse (30 minutes)
- In a large bowl, combine 350g of bread flour and 250g of lukewarm water. Mix until just combined, with no dry flour remaining.
- Cover the bowl and let it rest for 30 minutes. This process, called autolyse, allows the flour to fully hydrate, resulting in a more extensible dough.
Step 2: Mixing and Bulk Fermentation (4-6 hours)
- Add 150g of active sourdough starter and 10g of sea salt to the autolysed dough.
- Mix thoroughly by hand or with a stand mixer until the starter and salt are fully incorporated. The dough will be shaggy and somewhat sticky.
- Cover the bowl and let the dough rest for 30 minutes.
- Perform a series of stretch and folds every 30 minutes for the next 2 hours. To do this, gently stretch a portion of the dough upwards and fold it over onto itself. Rotate the bowl and repeat this process 4-5 times. This develops the dough’s strength and structure.
- After the stretch and folds, let the dough bulk ferment for another 2-4 hours, or until it has increased in volume by about 50-75%. The exact time will depend on the temperature of your kitchen.
Step 3: Shaping (20 minutes)
- Gently turn the dough out onto a lightly floured surface.
- Shape the dough into a round (boule) or oblong (batard) loaf. Be careful not to degas the dough too much.
- Place the shaped loaf in a well-floured banneton basket or a bowl lined with a floured cloth.
Step 4: Proofing (12-16 hours)
- Cover the loaf and place it in the refrigerator to proof overnight (12-16 hours). This slow, cold proofing develops the complex flavors of the sourdough.
Step 5: Baking (50-60 minutes)
- Preheat your oven to 450°F (232°C) with a Dutch oven inside. The Dutch oven helps to create a steamy environment, which is essential for a good crust.
- Carefully remove the hot Dutch oven from the oven.
- Gently invert the loaf from the banneton basket into the Dutch oven.
- Score the top of the loaf with a sharp knife or lame. This controls how the bread expands during baking.
- Cover the Dutch oven and bake for 20 minutes.
- Remove the lid and continue baking for another 30-40 minutes, or until the crust is deeply golden brown and the internal temperature reaches 205-210°F (96-99°C).
- Carefully remove the bread from the Dutch oven and let it cool completely on a wire rack before slicing and serving.
Why You’ll Love This Recipe
- Authentic Sourdough Flavor: The long fermentation process develops a complex, tangy flavor that is unmatched by commercial breads.
- Beautiful Crust: Baking in a Dutch oven creates a perfectly crisp, crackly crust.
- Wholesome Ingredients: Made with just flour, water, and salt, this bread is free of artificial additives and preservatives.
- Satisfying Process: Baking sourdough bread is a rewarding and meditative experience.
Serving Suggestions:
- Enjoy it plain with butter or olive oil.
- Use it for sandwiches, toast, or bruschetta.
- Serve it with soups, salads, or cheese boards.
Tips:
- Water Quality: Use unchlorinated water for your starter and dough, as chlorine can inhibit fermentation.
- Temperature Control: Maintaining a consistent temperature is crucial for sourdough baking. Use a thermometer to monitor the temperature of your starter and dough.
- Patience is Key: Don’t rush the process. Sourdough baking takes time and patience.
- Experiment: Once you’re comfortable with the basic recipe, experiment with different types of flour, hydration levels, and add-ins.
Preparation Time:
- Starter: 7+ days
- Dough: 2 hours (including autolyse and mixing)
- Bulk Fermentation: 4-6 hours
- Proofing: 12-16 hours
- Baking: 50-60 minutes
- Total Time: Varies (See above)
Nutrition Information (per slice, approximate):
- Calories: 150
- Protein: 5g
- Sodium: 200mg
Note: Nutritional information is an estimate and may vary based on specific ingredients and portion sizes.
Conclusion
Baking sourdough bread is a journey, not a race. Enjoy the process, embrace the challenges, and savor the rewards of homemade, artisan bread. With a little patience and practice, you’ll be baking beautiful and delicious loaves in no time. Happy Baking!
Questions and Answers About This Recipe:
Q1: My starter isn’t bubbling after a few days. What should I do?
A: Don’t worry! It can take a week or more for a starter to become active. Make sure you are using whole wheat or rye flour to start, as they contain more nutrients for the yeast and bacteria. Also, ensure that your water is unchlorinated. Keep feeding it regularly, and be patient. Temperature also plays a big role, so try to keep your starter in a warm place (70-75°F or 21-24°C).
Q2: My dough is too sticky to handle. What am I doing wrong?
A: Sourdough dough is naturally sticky, especially with higher hydration levels. Make sure you are using enough flour on your work surface and hands when shaping the dough. The stretch and folds during bulk fermentation will also help to develop the dough’s strength and make it easier to handle. If it’s still too sticky, you can reduce the hydration slightly in your next batch.
Q3: Why do I need a Dutch oven for baking sourdough?
A: A Dutch oven creates a steamy environment inside, which is crucial for a good crust. The steam prevents the surface of the bread from drying out too quickly, allowing it to expand fully in the oven. This results in a crisp, crackly crust and a light, airy crumb. If you don’t have a Dutch oven, you can try baking the bread on a baking stone with a pan of water on the bottom rack of the oven to create steam.
Q4: My bread is dense and gummy. What went wrong?
A: There are several reasons why your bread might be dense. It could be that your starter wasn’t active enough, or that the dough was under-proofed. Make sure your starter is doubling in size within 4-8 hours after feeding before using it for baking. Also, ensure that the dough has increased in volume by about 50-75% during bulk fermentation. Over-proofing can also cause a dense loaf, so watch the dough carefully.
Q5: Can I use different types of flour for this recipe?
A: Yes, you can experiment with different types of flour. Bread flour is recommended for its high protein content, which helps to create a strong gluten network. However, you can also use a combination of bread flour, whole wheat flour, and even rye flour for added flavor and texture. Just be aware that different flours will absorb water differently, so you may need to adjust the hydration level accordingly.