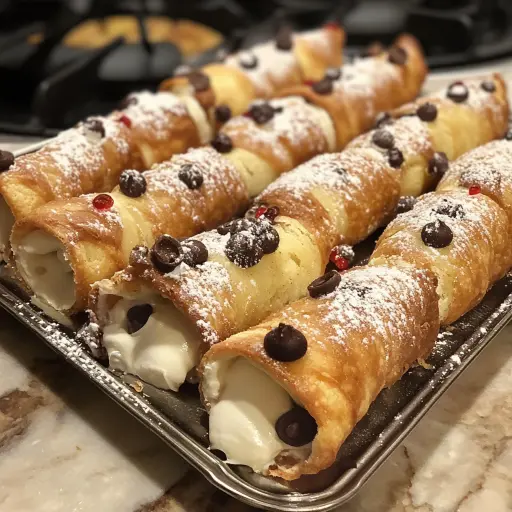
Description: Indulge in the sweet and crispy delight of homemade Italian Cannoli. This recipe walks you through creating perfectly crisp shells filled with a creamy, sweet ricotta filling dotted with mini chocolate chips. A traditional Italian dessert that’s easier to make than you think!
Ingredients:
For the Shells:
2 cups all-purpose flour: The foundation of our crispy shell, providing structure and texture. Ensure it’s fresh for the best results. 2 tablespoons granulated sugar: A touch of sweetness to balance the slight bitterness of the cocoa powder and contribute to browning during frying. 1 teaspoon unsweetened cocoa powder: Adds depth of flavor and a characteristic dark color to the cannoli shells. 1/2 teaspoon ground cinnamon: A warm spice that complements the cocoa and adds a hint of complexity. 1/4 teaspoon salt: Enhances the other flavors and balances the sweetness. 3 tablespoons unsalted butter, cut into small pieces: Adds richness and flakiness to the dough. Ensure it’s cold for the best results. 1 large egg yolk: Provides richness, binds the dough, and contributes to the shell’s golden color when fried. 1/2 cup sweet Marsala wine or grape juice: The traditional liquid component of the dough. Marsala wine imparts a unique flavor, while grape juice is a great non-alcoholic substitute. Vegetable oil, for frying: Choose a neutral-flavored oil with a high smoke point, such as canola or vegetable oil, for optimal frying.
For the Filling:
2 cups ricotta cheese, well-drained: The star of the filling! Use high-quality, full-fat ricotta cheese and drain it thoroughly for a smooth, creamy, and non-runny filling. Draining overnight in the refrigerator is highly recommended. 3/4 cup powdered sugar: Provides sweetness and dissolves easily for a smooth filling. Adjust the amount to your preference. 1/2 teaspoon vanilla extract: Enhances the flavor of the ricotta and adds a touch of warmth. 1/2 teaspoon ground cinnamon: Complements the cinnamon in the shells and adds a warm, comforting note to the filling. 1/2 cup mini chocolate chips: Adds a delightful chocolatey crunch to the creamy filling. You can use regular chocolate chips, but mini chips distribute better.
Optional Toppings:
Powdered sugar (for dusting): Adds a touch of elegance and visual appeal. Chopped pistachios: Adds a nutty crunch and a pop of color. More chocolate chips: Because you can never have too much chocolate!
Preparation:
Step 1: Prepare the Dough:
In a large mixing bowl, whisk together the all-purpose flour, granulated sugar, unsweetened cocoa powder, ground cinnamon, and salt. Add the cold unsalted butter pieces to the dry ingredients. Using a pastry blender or your fingertips, cut the butter into the flour mixture until it resembles coarse crumbs. This process is crucial for creating flaky shells. In a separate small bowl, whisk the egg yolk and sweet Marsala wine (or grape juice) together. Gradually add the wet ingredients to the dry ingredients, mixing with a fork or your hands until a dough begins to form. Turn the dough out onto a lightly floured surface and knead it for 5-7 minutes, or until it becomes smooth and elastic. If the dough is too dry, add a teaspoon of Marsala wine or water at a time until it comes together. If it’s too sticky, add a tablespoon of flour at a time. Form the dough into a disc, wrap it tightly in plastic wrap, and refrigerate for at least 30 minutes. This allows the gluten to relax, making the dough easier to roll out.
Step 2: Shape the Cannoli Shells:
Remove the dough from the refrigerator and let it sit at room temperature for about 10 minutes to soften slightly. On a lightly floured surface, roll the dough out as thinly as possible, about 1/8 inch thick. The thinner the dough, the crispier the shells. Using a 4-inch round cookie cutter or a knife, cut out circles from the rolled-out dough. Lightly brush each circle with water. This will help the edges seal properly during frying. Wrap each dough circle around a metal cannoli tube, overlapping the edges slightly. Press the overlapping edges together firmly to seal them. The water helps create a strong seal that will prevent the shells from opening during frying.
Step 3: Fry the Cannoli Shells:
Pour vegetable oil into a deep pot or deep fryer until it is at least 3 inches deep. Heat the oil over medium heat to 350°F (175°C). Use a candy thermometer to monitor the temperature. It’s crucial to maintain a consistent temperature for even cooking. Carefully lower a few cannoli shells into the hot oil at a time, being careful not to overcrowd the pot. Overcrowding can lower the oil temperature and result in greasy shells. Fry the cannoli shells for 2-3 minutes per side, or until they are golden brown and crispy. Use a slotted spoon to remove the fried cannoli shells from the oil and transfer them to a wire rack lined with paper towels to drain excess oil.
Step 4: Cool and Remove the Shells from the Molds:
Allow the fried cannoli shells to cool completely on the wire rack before attempting to remove them from the metal tubes. This prevents the shells from breaking. Once the shells are cool enough to handle, gently twist and slide them off the metal tubes. If they are sticking, you can gently tap the tube on a counter to loosen the shell.
Step 5: Prepare the Ricotta Filling:
In a large mixing bowl, combine the well-drained ricotta cheese, powdered sugar, vanilla extract, and ground cinnamon. Using an electric mixer or a whisk, beat the ingredients together until the filling is smooth and creamy. Gently fold in the mini chocolate chips. Transfer the ricotta filling to a piping bag fitted with a large round tip. If you don’t have a piping bag, you can use a resealable plastic bag with a corner snipped off.
Step 6: Fill and Decorate the Cannoli:
Just before serving, pipe the ricotta filling into both ends of each cannoli shell, filling them generously. Filling the cannoli right before serving prevents the shells from becoming soggy. Dust the filled cannoli with powdered sugar. If desired, dip the ends of the cannoli in chopped pistachios or more chocolate chips for added flavor and visual appeal. Serve immediately and enjoy!
Why You Will Love This Recipe:
Authentic Taste: This recipe captures the traditional flavors and textures of authentic Italian cannoli, transporting you to Italy with every bite. Homemade Goodness: Making your own cannoli allows you to control the ingredients and freshness, resulting in a superior dessert compared to store-bought options. Customizable: The recipe is easily adaptable to your preferences. You can experiment with different flavors for the filling, such as citrus zest or liqueurs, and customize the toppings to your liking. Impressive Dessert: Cannoli are a show-stopping dessert that is perfect for special occasions or simply indulging in a delicious treat. Fun to Make: The process of making cannoli is enjoyable and rewarding, especially when you get to savor the fruits of your labor.
Serving Suggestions:
Serve cannoli as a dessert after an Italian meal, such as pasta or pizza. Offer cannoli as part of a dessert platter alongside other Italian treats, such as biscotti or tiramisu. Pair cannoli with a cup of espresso or a glass of sweet dessert wine for the ultimate indulgence. Garnish cannoli with fresh berries for a burst of color and flavor. Serve cannoli at parties or gatherings for a guaranteed crowd-pleaser.
Tips:
Drain the ricotta cheese thoroughly: This is the most important step for preventing a runny filling. Place the ricotta cheese in a cheesecloth-lined sieve set over a bowl and refrigerate it overnight or for at least several hours. Use cold butter for the dough: Cold butter will create flaky layers in the shells. Roll the dough thinly: Thin dough results in crispier shells. Fry the shells at the correct temperature: Maintaining a consistent oil temperature of 350°F (175°C) is crucial for even cooking and preventing greasy shells. Fill the cannoli just before serving: This prevents the shells from becoming soggy. Don’t overcrowd the pot when frying: Frying too many shells at once will lower the oil temperature and result in greasy shells. Use a neutral-flavored oil for frying: This will prevent the oil from imparting an unwanted flavor to the shells. Store unfilled shells in an airtight container at room temperature: This will keep them crisp.
Prep Time: 30 minutes Cook Time: 15 minutes Chill Time: 30 minutes Total Time: 1 hour 15 minutes
Nutritional Information: (Approximate, per cannoli)
Calories: 265 kcal Protein: 8g Sodium: 50mg
Conclusion: Making your own authentic Italian cannoli is a rewarding experience that results in a truly delicious and impressive dessert. With a little patience and attention to detail, you can create perfectly crisp shells filled with a creamy, sweet ricotta filling that will transport you to Italy with every bite. So, gather your ingredients, follow this recipe, and enjoy the taste of homemade cannoli!
Question and Answer Section:
Q1: Can I use a different type of cheese for the filling? A: While ricotta cheese is traditional, you can experiment with mascarpone cheese for an even richer and creamier filling. However, be sure to drain it well, just like ricotta.
Q2: Can I bake the cannoli shells instead of frying them? A: While frying is the traditional method, you can bake the shells at 350°F (175°C) for about 10-12 minutes, or until golden brown. However, the baked shells will not be as crispy as the fried ones. Lightly brush them with oil before baking for a crispier result.
Q3: Can I make the cannoli shells ahead of time? A: Yes! You can fry the cannoli shells ahead of time and store them in an airtight container at room temperature for up to 2 days. This will help you save time on the day you plan to serve them. Just be sure to fill them right before serving to prevent them from becoming soggy.
Q4: Can I freeze the filled cannoli? A: Freezing filled cannoli is not recommended, as the filling can become watery and the shells can lose their crispness. It is best to fill the cannoli just before serving for the best texture and flavor. However, you can freeze the unfilled shells in an airtight container for up to 1 month.
Q5: What can I use instead of Marsala wine? A: If you don’t have Marsala wine, you can use a sweet grape juice, such as white grape juice or apple cider. You can also use a combination of dry white wine and a teaspoon of brandy or rum extract for a similar flavor profile.