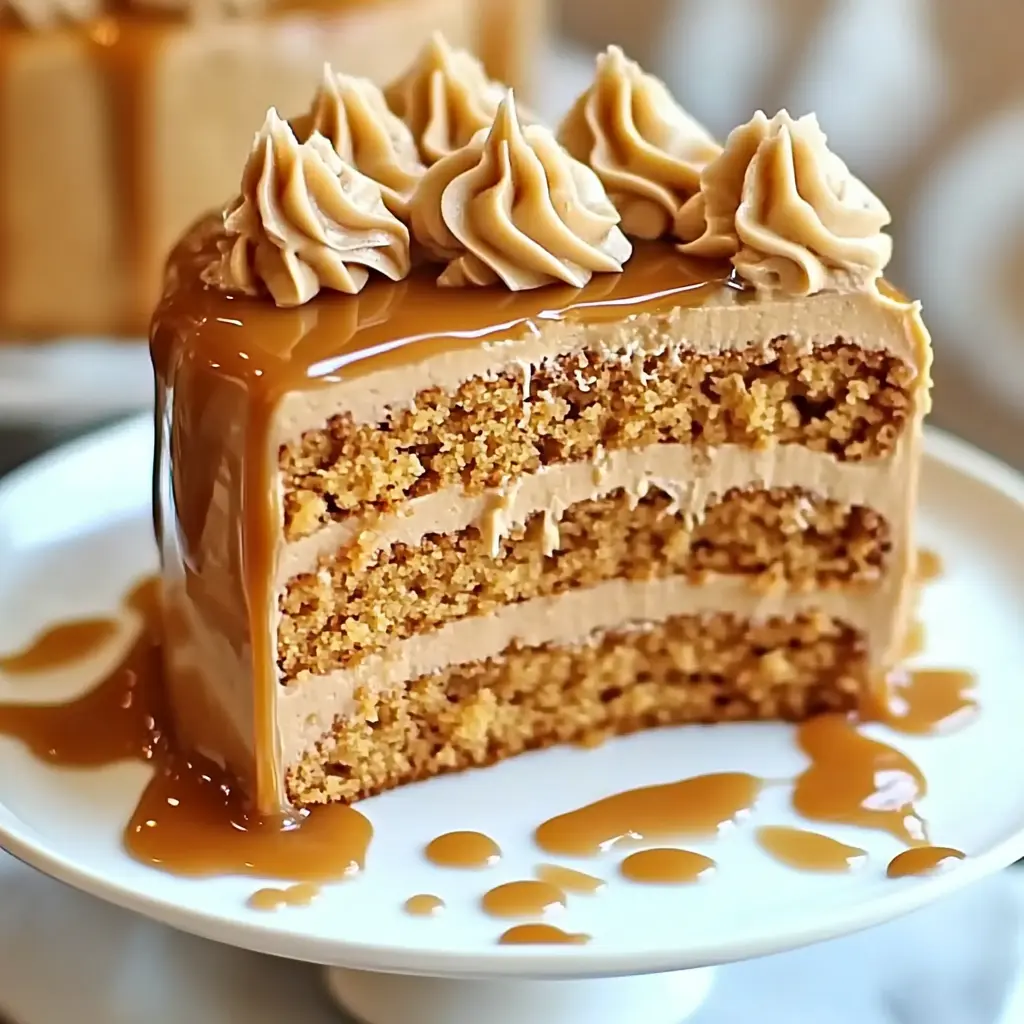
Description: This Butterscotch Cake is a symphony of rich, warm flavors that evoke feelings of comfort and nostalgia. The moist, brown sugar-infused cake layers are perfectly complemented by a luscious, homemade caramel icing that’s both sweet and slightly salty. Every bite is a delightful explosion of butterscotch goodness.
Why You Will Love This Recipe:
- Intense Butterscotch Flavor: From the brown sugar in the cake to the caramel in the icing, butterscotch is the star of the show. This cake doesn’t just hint at butterscotch; it embraces it wholeheartedly.
- Incredibly Moist Cake: The combination of buttermilk and the creaming method ensures a tender, moist crumb that stays delicious for days. No dry cake here!
- Homemade Caramel Icing: Forget store-bought frosting! This homemade caramel icing is incredibly easy to make and has a depth of flavor you simply can’t replicate. The slight saltiness from the butter perfectly balances the sweetness.
- Impressive Yet Approachable: While the cake looks and tastes decadent, the recipe is straightforward and easy to follow. It’s perfect for both novice and experienced bakers.
- Perfect for Any Occasion: Whether it’s a birthday celebration, a holiday gathering, or simply a weekend treat, this Butterscotch Cake is sure to impress.
Introduction
Butterscotch is one of those flavors that instantly takes you back. Maybe it’s the memory of grandma’s hard candies or the taste of a warm butterscotch pudding on a chilly evening. This Butterscotch Cake aims to capture that same sense of cozy nostalgia in every slice. The foundation is a tender, brown sugar-infused cake that’s moist and flavorful on its own. But the real magic happens with the homemade caramel icing. The icing is a blend of rich brown sugar, butter, and milk, cooked down to a thick, glossy perfection. It’s sweet, slightly salty, and intensely butterscotch-y. This isn’t just a cake; it’s a sweet escape to simpler times. This cake is a labour of love, but every step is worth it for the end result.
Ingredients:
For the Cake:
- 2 cups packed light brown sugar
- 1/2 cup (1 stick) unsalted butter, softened
- 1 teaspoon pure vanilla extract
- 2 large eggs, at room temperature
- 2 cups all-purpose flour
- 1 teaspoon baking soda
- 1 teaspoon baking powder
- 1/2 teaspoon fine sea salt
- 1 cup buttermilk, at room temperature
For the Caramel Icing:
- 1 1/2 cups packed light brown sugar
- 1 tablespoon all-purpose flour
- 1/4 cup (1/2 stick) unsalted butter, cut into pieces, plus 2 tablespoons unsalted butter
- 1/4 cup whole milk
- 1 teaspoon pure vanilla extract
Preparation:
Step 1: Preheat and Prepare Pans:
Preheat your oven to 350°F (175°C). This is crucial to ensure the cake bakes evenly and doesn’t become dry. Grease two 9-inch round cake pans or three 6-inch round cake pans with butter or cooking spray. Then, lightly flour the pans to prevent the cake from sticking. Alternatively, you can line the bottoms of the pans with parchment paper rounds. This is an extra precaution that makes removing the cakes a breeze. Grease and flour the parchment paper as well for the best results.
Step 2: Cream Butter and Brown Sugar:
In a large mixing bowl, cream together the softened butter and packed light brown sugar using an electric mixer on medium speed until the mixture is light and fluffy. This process typically takes 3-5 minutes. Creaming incorporates air into the butter and sugar, which is essential for creating a tender cake crumb. Don’t rush this step! Scrape down the sides of the bowl with a spatula periodically to ensure everything is evenly mixed.
Step 3: Incorporate Vanilla and Eggs:
Add the vanilla extract to the creamed butter and sugar mixture and mix until combined. Then, add the eggs one at a time, mixing well after each addition. It’s important to add the eggs one at a time to allow them to fully emulsify into the batter. This helps create a smooth and stable emulsion, preventing the batter from curdling. If the batter does appear slightly curdled, don’t worry; it will come together when you add the dry ingredients.
Step 4: Combine Dry Ingredients:
In a separate medium-sized bowl, whisk together the all-purpose flour, baking soda, baking powder, and salt. Whisking ensures that the dry ingredients are evenly distributed, preventing clumps and ensuring that the baking powder and baking soda work effectively to leaven the cake. This is especially important for the baking soda and baking powder as they need to be evenly dispersed to allow the cake to rise and create air pockets.
Step 5: Alternately Add Dry and Wet Ingredients:
Gradually add the dry ingredients to the wet ingredients, alternating with the buttermilk, beginning and ending with the dry ingredients. Start by adding about one-third of the dry ingredients to the butter mixture and mix on low speed until just combined. Then, add half of the buttermilk and mix until just combined. Repeat with another third of the dry ingredients, followed by the remaining buttermilk, and then finish with the remaining dry ingredients. Mix until just combined. Be careful not to overmix the batter, as this can develop the gluten in the flour and result in a tough cake. Overmixing can make the butterscotch cake lose its delicious flavour.
Step 6: Bake the Cake Layers:
Pour the cake batter evenly into the prepared cake pans. Bake in the preheated oven for 25-30 minutes, or until a wooden skewer inserted into the center of the cake comes out clean. Start checking for doneness around the 25-minute mark, as baking times can vary depending on your oven. If the cakes are browning too quickly, you can tent them with aluminum foil to prevent them from burning.
Step 7: Cool the Cake Layers:
Let the cake layers cool in the pans for 10-15 minutes before inverting them onto a wire rack to cool completely. This allows the cakes to firm up slightly, making them easier to handle. Cooling them completely is crucial before frosting, as warm cakes can melt the icing.
Step 8: Make the Caramel Icing:
In a medium saucepan, combine the brown sugar, flour, 1/4 cup (1/2 stick) of butter, and milk. Cook over medium heat, stirring constantly, until the mixture comes to a boil and the sugar is completely dissolved.
Step 9: Simmer and Thicken the Icing:
Once the mixture boils, reduce the heat to low and simmer for 3-5 minutes, stirring occasionally, until the icing thickens slightly. Be careful not to overcook the icing, as it can become too thick and difficult to spread.
Step 10: Finish the Icing:
Remove the saucepan from the heat and stir in the vanilla extract and remaining 2 tablespoons of butter until the butter is melted and the icing is smooth and glossy.
Step 11: Cool the Icing:
Let the caramel icing cool for about 10-15 minutes, or until it has thickened enough to spread but is still pourable. It should have a consistency similar to thick honey.
Step 12: Frost the Cake:
Place one cake layer on a serving plate or cake stand. Spread a generous amount of the caramel icing evenly over the top. Place the second cake layer on top of the icing and repeat with the remaining icing. If you’re using three layers, stack them accordingly. Ensure you spread the icing completely to achieve the best flavour.
Step 13: Let the Icing Set:
Allow the icing to set for at least 30 minutes before slicing and serving. This allows the icing to firm up slightly, making the cake easier to cut and preventing the icing from running.
COOKING Rating:
Difficulty: Intermediate
Prep Time: 30 minutes Cook Time: 45 minutes Total Time: 1 hour 15 minutes
Serving Suggestions:
- Serve slices of the Butterscotch Cake with a scoop of vanilla ice cream or a dollop of whipped cream.
- Garnish with chopped pecans or walnuts for added crunch and flavor.
- Drizzle with extra caramel sauce for an extra indulgent treat.
- Serve with a cup of coffee or tea for a comforting dessert.
- This cake is also delicious served chilled.
Tips:
- Use high-quality butter and brown sugar for the best flavor. The butterscotch taste is highly dependent on the right butter!
- Make sure your butter and eggs are at room temperature for optimal mixing.
- Don’t overmix the cake batter, as this can result in a tough cake.
- Cool the cake layers completely before frosting to prevent the icing from melting.
- Adjust the cooking time based on your oven and the size of your cake pans.
- If the icing becomes too thick, you can add a tablespoon of milk to thin it out.
- Store leftover cake in an airtight container at room temperature for up to 3 days.
- For a deeper caramel flavor, try using dark brown sugar in both the cake and the icing.
- Adding a pinch of sea salt to the caramel icing will enhance the sweetness and add a touch of complexity.
Nutritional Information:
(Approximate values per serving)
Calories: 450 Protein: 5g Sodium: 250mg
Conclusion
This Butterscotch Cake with Caramel Icing is a show-stopping dessert that’s sure to impress your friends and family. It is delicious and easy to make! With its moist cake layers and luscious caramel icing, this cake is the perfect way to indulge your sweet tooth and create lasting memories. So gather your ingredients, preheat your oven, and get ready to experience a slice of butterscotch bliss!
Questions and Answers:
Q1: Can I use a different type of sugar in this recipe?
A: While the recipe calls for light brown sugar, you can experiment with dark brown sugar for a more intense molasses flavor. However, avoid using granulated sugar as it will significantly alter the flavor and texture of the cake. The brown sugar is responsible for the signature butterscotch taste and the cake’s moistness.
Q2: My caramel icing is too thick. What can I do?
A: If your caramel icing becomes too thick, you can add a tablespoon or two of milk to thin it out. Gently stir the milk into the icing until you reach the desired consistency. Be careful not to add too much milk, as this can make the icing too runny.
Q3: Can I make this cake ahead of time?
A: Absolutely! You can bake the cake layers a day or two in advance and store them tightly wrapped at room temperature. Make the caramel icing on the day you plan to assemble the cake for the best flavor and texture. This can save you time and stress on the day of serving.
Q4: Can I add nuts to this cake?
A: Yes, you can definitely add nuts to this cake! Chopped pecans or walnuts would be a delicious addition. You can sprinkle them on top of the iced cake or even mix them into the cake batter for a more subtle nutty flavor. To toast the nuts beforehand, spread them in a single layer on a baking sheet and bake at 350°F (175°C) for 5-7 minutes, or until fragrant.
Q5: What if I don’t have buttermilk?
A: If you don’t have buttermilk on hand, you can easily make a substitute. Simply add 1 tablespoon of white vinegar or lemon juice to a liquid measuring cup, then fill the cup with milk until it reaches 1 cup. Stir and let it sit for 5 minutes before using in the recipe. This will create a slightly acidic milk that mimics the properties of buttermilk. Plain yogurt, thinned with a little milk, can also work as a substitute.