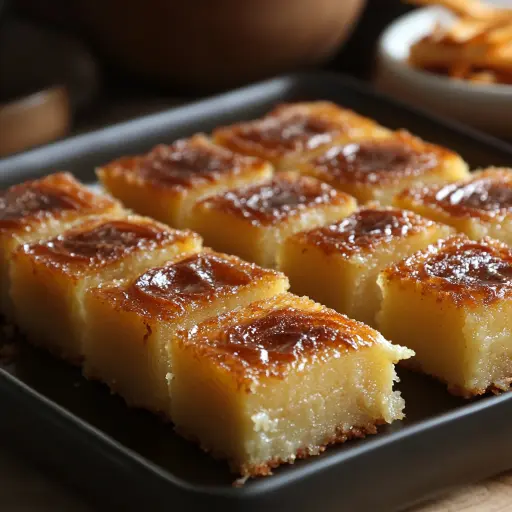
Description: This Cassava Cake with Macapuno is a delightful Filipino dessert that combines the earthy flavor of cassava with the rich, creamy sweetness of coconut. The addition of macapuno, a uniquely textured sweetened coconut, elevates this cake to a truly special treat. It’s moist, tender, and perfect for sharing with family and friends, whether for a casual get-together or a festive occasion. The combination of simple ingredients yields a complex and satisfying flavor profile that’s sure to become a new favorite. This recipe is relatively easy to follow, making it accessible for both novice and experienced bakers alike. Enjoy the taste of the Philippines with every slice of this decadent cake!
Ingredients:
For the Cake:
- 2 cups grated cassava (fresh or frozen, thawed if frozen)
- 1 cup coconut milk (full-fat is recommended for richness)
- 1 cup evaporated milk
- 1 cup condensed milk
- 3/4 cup granulated sugar
- 1/4 cup melted unsalted butter
- 2 large eggs, lightly beaten
- 1/2 cup macapuno (sweetened coconut strings), drained if necessary
For the Topping:
- 1/2 cup condensed milk
- 1/2 cup coconut milk (full-fat is recommended)
- 1/2 cup macapuno (sweetened coconut strings), drained if necessary
Preparation:
Step 1: Preheat and Prepare
Preheat your oven to 350°F (175°C). This ensures the cake bakes evenly and consistently. Grease a 9×9 inch baking dish generously with butter or cooking spray. Alternatively, line the baking dish with parchment paper, leaving an overhang on the sides. This will make it incredibly easy to lift the baked cake out of the pan, preventing any sticking and ensuring a clean presentation. Ensure the parchment paper fits snugly into the corners of the pan. This step is crucial for easy removal and slicing.
Step 2: Make the Batter
In a large mixing bowl, the foundation of your cake begins. Combine the grated cassava, coconut milk, evaporated milk, condensed milk, sugar, melted butter, and lightly beaten eggs. The order of addition isn’t crucial, but ensure the eggs are lightly beaten beforehand to promote even distribution. Mix all ingredients together thoroughly until well incorporated. The batter should be smooth and relatively lump-free, although some slight texture from the grated cassava is perfectly normal. Avoid overmixing, as this can lead to a tough cake. Gently fold in the macapuno strings. The macapuno should be distributed evenly throughout the batter, adding its unique texture and sweetness to every bite. Avoid vigorous mixing at this stage, as you want to preserve the integrity of the delicate macapuno strings.
Step 3: Bake the Cake
Pour the prepared batter into the greased or parchment-lined baking dish, ensuring it is spread evenly to promote uniform baking. Use a spatula to smooth the surface. Bake in the preheated oven for 45 to 50 minutes. The baking time may vary depending on your oven, so keep a close eye on the cake. It’s ready when the top is set, lightly golden brown, and a toothpick inserted into the center comes out clean or with just a few moist crumbs clinging to it. If the top is browning too quickly, you can loosely tent it with foil to prevent burning.
Step 4: Add the Topping
While the cake is baking, prepare the luscious topping. In a separate bowl, combine the coconut milk, condensed milk, and macapuno. Mix well until all ingredients are fully incorporated and the mixture is smooth and creamy. After the initial baking time of 45-50 minutes, carefully remove the cake from the oven. Pour the topping mixture evenly over the partially baked cake, ensuring it covers the entire surface. The topping will create a rich, sweet, and glossy finish.
Step 5: Final Bake
Return the cake to the oven and bake for an additional 15 to 20 minutes. Again, baking times may vary, so monitor the cake closely. The topping is ready when it’s bubbly and golden brown, indicating that it has caramelized beautifully. The edges of the cake should also be slightly golden.
Step 6: Cool and Serve
Allow the cake to cool completely in the pan before slicing. This is crucial because the cake firms up considerably as it cools, making it much easier to cut into neat and presentable squares. Patience is key! Cooling allows the flavors to meld together, enhancing the overall taste experience. Once completely cool, slice into squares and serve.
Why You Will Love This Recipe:
This Cassava Cake with Macapuno is a crowd-pleaser for several reasons. Firstly, it’s incredibly moist and tender, thanks to the combination of coconut milk, evaporated milk, and condensed milk. The cassava provides a subtle, earthy flavor that’s perfectly balanced by the sweetness of the other ingredients. Secondly, the addition of macapuno elevates this cake to something truly special. The sweet coconut strings add a delightful textural contrast and a unique flavor dimension that’s both familiar and exotic. Thirdly, this recipe is relatively straightforward to make, even for novice bakers. The ingredients are readily available, and the instructions are easy to follow. Fourthly, it’s a versatile dessert that can be enjoyed warm or chilled, making it perfect for any time of year. Finally, it’s a wonderful way to experience the flavors of the Philippines and share a delicious cultural treat with family and friends. The combination of creamy, sweet, and slightly chewy textures creates a truly addictive dessert that you’ll want to make again and again.
Serving Suggestions:
- Serve warm or chilled, depending on your preference.
- Pairs wonderfully with a cup of hot coffee or tea, especially in the afternoon.
- A scoop of vanilla ice cream complements the warm cake beautifully, creating a delightful contrast in temperature and texture.
- Dust with a light coating of powdered sugar for an elegant presentation.
- Garnish with a few extra macapuno strings for a visually appealing touch.
- Serve as a dessert for special occasions, potlucks, or family gatherings.
- It can also be enjoyed as a sweet snack anytime of the day.
- Consider pairing it with other Filipino delicacies for a complete cultural experience.
Tips:
- Use high-quality coconut milk for the best flavor and richness. Full-fat coconut milk is highly recommended.
- If using frozen cassava, thaw it completely and squeeze out any excess moisture before grating. This will prevent the cake from becoming soggy.
- Don’t overmix the batter, as this can result in a tough cake. Mix just until the ingredients are combined.
- To prevent the top of the cake from browning too quickly, loosely tent it with foil during the last 15 minutes of baking.
- Allow the cake to cool completely before slicing for cleaner cuts.
- Store leftover cake in an airtight container in the refrigerator for up to 3 days.
- For a richer flavor, consider using brown sugar instead of granulated sugar in the cake batter.
- You can add a teaspoon of vanilla extract to the batter for an extra layer of flavor.
- Experiment with different toppings, such as toasted coconut flakes or chopped nuts.
- If you don’t have macapuno, you can substitute it with sweetened coconut flakes, although the flavor and texture will be slightly different.
Prep Time: 20 minutes
Cook Time: 60-70 minutes
Total Time: 1 hour 20 minutes – 1 hour 30 minutes (including cooling time)
Nutritional Information: (per serving, estimated)
- Calories: 350-400
- Protein: 5-7g
- Sodium: 80-120mg
Conclusion:
This Cassava Cake with Macapuno is a testament to the simple yet exquisite flavors of Filipino cuisine. It’s a comforting and satisfying dessert that’s perfect for any occasion. The combination of earthy cassava, creamy coconut, and sweet macapuno creates a truly unforgettable flavor experience. Whether you’re a seasoned baker or just starting out, this recipe is sure to impress. So, gather your ingredients, preheat your oven, and get ready to enjoy a slice of heaven! It’s a guaranteed crowd-pleaser that will have everyone asking for seconds.
Questions and Answers About This Recipe:
Q1: Can I use pre-grated cassava from the store, or do I need to grate it myself?
A: While you can use pre-grated cassava from the store, especially if it’s fresh, grating it yourself, if possible, will yield the best results. Pre-grated cassava might be drier and less flavorful compared to freshly grated. If using frozen pre-grated cassava, ensure it is completely thawed and squeeze out any excess moisture before adding it to the batter. Freshly grated cassava will contribute to a moister and more flavorful cake. However, if time is a constraint, pre-grated is a perfectly acceptable alternative.
Q2: What if I can’t find macapuno? Is there a suitable substitute?
A: Macapuno is a unique ingredient, but if you can’t find it, you can use sweetened coconut flakes as a substitute. While the texture won’t be exactly the same (macapuno has a softer, almost jelly-like consistency), sweetened coconut flakes will still provide a similar coconut flavor and sweetness. You can also try using sweetened shredded coconut, but be sure to drain any excess syrup before adding it to the cake. The key is to maintain the sweetness and coconut flavor profile that macapuno contributes.
Q3: Can I make this cake ahead of time?
A: Absolutely! Cassava cake is a great make-ahead dessert. In fact, many people find that the flavors meld together even better after it has been refrigerated overnight. Prepare the cake as instructed, allow it to cool completely, and then cover it tightly with plastic wrap or store it in an airtight container. You can refrigerate it for up to 3 days. When you’re ready to serve, simply slice and enjoy. It’s a perfect option for busy hosts who want to prepare ahead for gatherings.
Q4: Is it necessary to use both evaporated milk and coconut milk? Can I substitute one for the other?
A: While you could technically substitute one for the other, using both evaporated milk and coconut milk contributes to the unique flavor and texture of the cassava cake. Coconut milk adds richness and a distinct coconut flavor, while evaporated milk provides a creamy texture and helps to bind the ingredients together. If you had to substitute, I would recommend using more coconut milk to maintain the overall flavor profile, but be aware that the texture might be slightly different. Using a combination of both yields the best results.
Q5: My cake is browning too quickly on top. What should I do?
A: If you notice that the top of your cake is browning too quickly before the center is fully cooked, simply tent it loosely with aluminum foil. This will help to deflect some of the heat and prevent the top from burning while allowing the center to continue baking. Be sure to leave some space between the foil and the cake so that it doesn’t stick. Remove the foil during the last 10-15 minutes of baking to allow the topping to achieve that beautiful golden brown color.