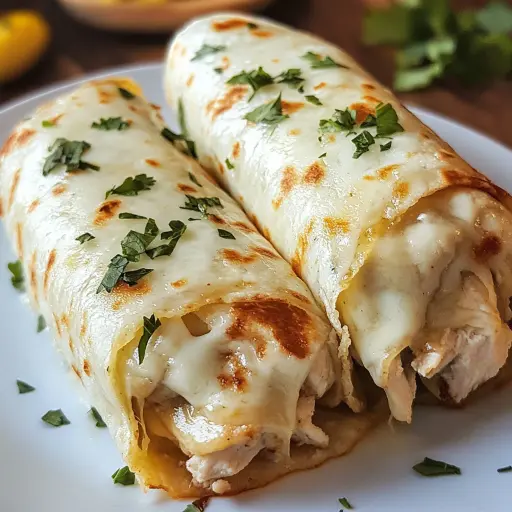
Description: These Cheesy Garlic Chicken Wraps are a quick, easy, and incredibly satisfying meal. Packed with flavorful garlic chicken and a melty cheese blend, all wrapped in a crispy tortilla. Perfect for lunch, dinner, or a tasty snack!
Ingredients:
- 2 cups cooked and shredded chicken
- 1 tablespoon olive oil
- 3 cloves garlic, minced
- ½ teaspoon salt
- ¼ teaspoon black pepper
- ½ teaspoon smoked paprika
- ½ teaspoon dried oregano
- 1 cup shredded mozzarella cheese
- ½ cup shredded cheddar cheese
- ¼ cup cream cheese, softened
- 2 tablespoons unsalted butter, melted
- 4 large flour tortillas
- ¼ cup fresh parsley, chopped (for garnish)
- ½ cup ranch or garlic aioli (for dipping)
Preparation:
Step 1: Prepare the Garlic Chicken Heat olive oil in a large skillet over medium heat. Ensure the skillet is adequately heated before adding the olive oil to prevent sticking.
Step 2: Sauté the Garlic Add the minced garlic to the heated olive oil. Sauté the garlic for about 30 seconds, or until it becomes fragrant. Be careful not to burn the garlic, as this can impart a bitter taste.
Step 3: Combine Chicken and Spices Stir in the cooked and shredded chicken, salt, black pepper, smoked paprika, and dried oregano. Mix well to ensure the chicken is evenly coated with the spices.
Step 4: Cook the Chicken Cook the mixture for 2-3 minutes, stirring occasionally. This allows the spices to meld together and infuse the chicken with flavor. Ensure the chicken is heated through.
Step 5: Make the Cheesy Filling In a mixing bowl, combine the shredded mozzarella cheese, shredded cheddar cheese, and softened cream cheese. Mix until well combined and creamy. The softened cream cheese helps to bind the other cheeses together, creating a smooth and melty texture.
Step 6: Combine Chicken and Cheese Add the warm garlic chicken to the cheese mixture. Mix until the cheese starts to melt and everything is well incorporated. The residual heat from the chicken will help to melt the cheese, making it easier to combine.
Step 7: Assemble the Wraps Lay out the large flour tortillas on a clean surface. Divide the chicken-cheese mixture evenly among the tortillas, spreading it out in the center. Be careful not to overfill the tortillas, as this can make them difficult to roll.
Step 8: Roll the Wraps Roll up the tortillas tightly, tucking in the sides as you go. This will help to keep the filling inside and create a neat, compact wrap.
Step 9: Crisp the Wraps Brush each wrap with melted butter. The melted butter will help the wraps to become golden brown and crispy when cooked.
Step 10: Cook the Wraps Heat a large skillet over medium heat. Place the wraps seam-side down in the skillet. Cook for 2-3 minutes per side, or until golden brown and crispy. Cooking the wraps seam-side down first will help to seal them and prevent them from unraveling.
Step 11: Slice and Garnish Slice the wraps in half and garnish with fresh parsley. This adds a pop of color and a fresh, herby flavor.
Step 12: Serve Serve immediately with ranch or garlic aioli for dipping. These dipping sauces complement the flavors of the wrap and add an extra layer of richness.
Why you will love this recipe
This Cheesy Garlic Chicken Wrap recipe is a winner for numerous reasons. First and foremost, it’s incredibly quick and easy to make, requiring minimal prep time and effort. The combination of savory garlic chicken and gooey, melted cheese is a flavor explosion that appeals to both adults and kids. The use of simple, everyday ingredients ensures that you can whip up this dish without having to make a special trip to the grocery store. Furthermore, it’s a versatile recipe that can be easily customized to suit your personal preferences. Whether you’re looking for a quick lunch, a satisfying dinner, or a crowd-pleasing appetizer, these wraps are sure to hit the spot.
Serving Suggestions:
These Cheesy Garlic Chicken Wraps are delicious on their own, but they also pair well with a variety of sides. Consider serving them with:
- A side salad with a light vinaigrette
- Tortilla chips and salsa
- Guacamole and sour cream
- Sweet potato fries
- Coleslaw
Tips:
- For best results, use high-quality tortillas that are soft and pliable.
- Don’t overfill the tortillas, as this can make them difficult to roll.
- If you don’t have cream cheese on hand, you can substitute with sour cream or Greek yogurt.
- To add a bit of spice, consider adding a pinch of cayenne pepper to the chicken mixture.
- For a healthier option, use whole wheat tortillas and reduced-fat cheese.
Prep Time: 10 minutes Cook Time: 10 minutes Total Time: 20 minutes
Nutritional Information:
- Calories: Approximately 385 kcal per serving (This is an estimate and can vary based on specific ingredients used.)
- Protein: Approximately 30g per serving (This is an estimate and can vary based on specific ingredients used.)
- Sodium: Approximately 700mg per serving (This is an estimate and can vary based on specific ingredients used.)
Conclusion
These Cheesy Garlic Chicken Wraps are a delightful and convenient meal option that combines the comforting flavors of garlic chicken and melted cheese in a crispy tortilla. They’re incredibly easy to make, customizable, and perfect for any occasion, from a quick weeknight dinner to a fun weekend gathering. With simple ingredients and straightforward instructions, this recipe is a guaranteed crowd-pleaser. Enjoy the deliciousness and versatility of these wraps, and feel free to experiment with different variations to make them your own.
Questions and Answers about this recipe
Q1: Can I use pre-cooked rotisserie chicken to save time?
A: Absolutely! Using pre-cooked rotisserie chicken is a great shortcut. Simply shred the chicken and proceed with the recipe as directed. It will save you valuable prep time and still deliver fantastic flavor.
Q2: What if I don’t have smoked paprika? Can I substitute it with something else?
A: Yes, if you don’t have smoked paprika, you can substitute it with regular paprika or a pinch of chili powder for a little extra heat. Smoked paprika adds a unique smoky flavor, but these alternatives will still provide a similar color and depth of flavor to the dish.
Q3: Can I make these wraps ahead of time?
A: You can assemble the wraps ahead of time, but it’s best to cook them just before serving to maintain their crispy texture. If you need to prep in advance, assemble the wraps, wrap them individually in plastic wrap, and store them in the refrigerator for up to 24 hours. When ready to serve, cook them in a skillet as directed.
Q4: What other vegetables can I add to these wraps?
A: Feel free to get creative with your vegetable additions! Some great options include sautéed bell peppers, onions, spinach, or mushrooms. Add them to the chicken and cheese mixture before assembling the wraps for added flavor and nutrition.
Q5: Can I bake these wraps instead of cooking them in a skillet?
A: Yes, you can bake these wraps for a slightly different texture. Preheat your oven to 375°F (190°C). Place the assembled wraps on a baking sheet and brush them with melted butter. Bake for 10-15 minutes, or until golden brown and crispy. Baking provides a more even cooking and can be a healthier option as it requires less butter.