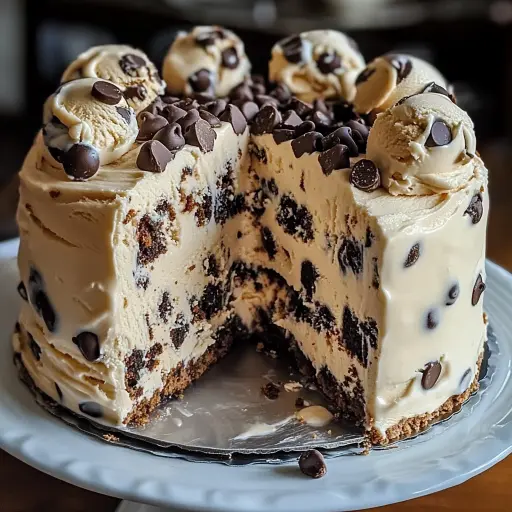
Description: This Chocolate Chip Cookie Dough Ice Cream Cake is everything you love about dessert in one indulgent slice – layers of chewy cookie dough, rich chocolate ganache, creamy vanilla ice cream, and chunks of cookie dough throughout. It’s a no-bake summer showstopper that’s perfect for birthdays, cookouts, or just beating the heat! ☀
Ingredients:
For the Cookie Dough Base:
- 1/2 cup unsalted butter, softened
- 1/2 cup brown sugar
- 1/4 cup granulated sugar
- 2 tbsp milk
- 1 tsp vanilla extract
- 1 cup all-purpose flour (heat-treated)
- 1/2 tsp salt
- 1/2 cup mini chocolate chips
For the Ice Cream Layer:
- 1.5 quarts vanilla ice cream (softened slightly)
- 1 cup chopped edible cookie dough or mini chocolate chips
For the Ganache Topping:
- 1 cup heavy cream
- 8 oz semi-sweet chocolate chips
- Extra cookie dough balls for topping (optional)
Preparation:
Step 1: Prepare the Cookie Dough Base
Begin by lining an 8-inch springform pan with parchment paper. This step is crucial to prevent the cake from sticking and makes for easy removal later on. Ensure the parchment paper covers the bottom and extends up the sides of the pan. This will act as a handle when you need to lift the cake out. Now, in a large mixing bowl (or the bowl of a stand mixer), combine the softened unsalted butter, brown sugar, and granulated sugar. Beat these together until the mixture is light and fluffy. This usually takes about 2-3 minutes. The creaming process incorporates air, which is essential for a tender cookie dough base. Once the butter and sugars are well creamed, add the milk and vanilla extract. Mix until these wet ingredients are fully incorporated, ensuring a smooth and homogenous mixture.
Step 2: Combine Dry and Wet Ingredients
In a separate bowl, whisk together the heat-treated flour and salt. The heat treatment of the flour is crucial to eliminate any potential bacteria, making it safe to consume in its raw form. To heat treat the flour, spread it in a thin layer on a baking sheet and bake at 350°F (175°C) for about 5-7 minutes, or until it reaches an internal temperature of 165°F (74°C). Let it cool completely before using. Gradually add the dry ingredients to the wet ingredients, mixing on low speed until just combined. Be careful not to overmix, as this can result in a tough cookie dough. Once the flour is incorporated, fold in the mini chocolate chips. Ensure they are evenly distributed throughout the dough.
Step 3: Form the Cookie Dough Crust
Press the prepared cookie dough evenly into the bottom of the parchment-lined springform pan. Use your fingers or the back of a spoon to create a smooth, uniform layer. Once the cookie dough is evenly pressed, place the pan in the freezer for at least 15 minutes. This chilling process will firm up the cookie dough, making it easier to spread the ice cream layer on top without the dough melting or crumbling.
Step 4: Prepare the Ice Cream Layer
While the cookie dough base is chilling, soften the vanilla ice cream slightly. You want it to be soft enough to stir but not completely melted. This makes it easier to spread evenly over the cookie dough crust. In a large bowl, combine the softened vanilla ice cream with the chopped edible cookie dough or mini chocolate chips. Gently stir these together until they are evenly distributed throughout the ice cream. This step adds extra chunks of cookie dough goodness to every bite of the cake.
Step 5: Assemble the Cake
Remove the springform pan from the freezer. Spread the ice cream mixture evenly over the chilled cookie dough crust. Smooth the top with a spatula or the back of a spoon to create an even surface. Once the ice cream layer is spread, return the pan to the freezer. Freeze until the ice cream is firm, which typically takes 4-6 hours or overnight. Freezing the cake completely ensures it holds its shape and doesn’t melt when you add the ganache topping.
Step 6: Make the Ganache Topping
In a saucepan, heat the heavy cream over medium heat until it just begins to simmer. Be careful not to boil the cream, as this can affect the texture of the ganache. Remove the saucepan from the heat and pour the hot cream over the semi-sweet chocolate chips in a heat-safe bowl. Let the mixture sit for 1-2 minutes to allow the heat to melt the chocolate chips. Gently stir the chocolate and cream together until the mixture is smooth and glossy. If there are any stubborn chocolate chunks, you can microwave the mixture in 15-second intervals, stirring in between, until the chocolate is completely melted.
Step 7: Add the Final Touches
Allow the ganache to cool slightly before pouring it over the ice cream layer. This prevents the ganache from melting the ice cream excessively. Once the ganache has cooled slightly, remove the springform pan from the freezer. Pour the ganache evenly over the ice cream layer. Spread it with a spatula to ensure the entire surface is covered. If desired, add extra cookie dough balls or mini chocolate chips on top of the ganache for decoration.
Step 8: Freeze Until Set
Return the cake to the freezer and freeze until the ganache is set, which usually takes about 1-2 hours. Once the ganache is firm, the Chocolate Chip Cookie Dough Ice Cream Cake is ready to be served.
Why You Will Love This Recipe:
This Chocolate Chip Cookie Dough Ice Cream Cake is a surefire winner for several reasons:
- No-Bake Convenience: Perfect for hot summer days when you want a decadent dessert without turning on the oven.
- Ultimate Indulgence: Combines the best of both worlds – chewy cookie dough and creamy ice cream, topped with rich chocolate ganache.
- Customizable: You can easily adapt the recipe to suit your preferences. Use different flavors of ice cream, add your favorite candies, or experiment with various cookie dough flavors.
- Impressive Presentation: This cake looks stunning and is guaranteed to impress your guests at any gathering.
- Crowd-Pleaser: Who can resist a combination of cookie dough, ice cream, and chocolate? It’s a guaranteed hit with both kids and adults.
Serving Suggestions:
- Slice and Serve: Remove the cake from the freezer a few minutes before serving to allow it to soften slightly. Use a warm, sharp knife to cut clean slices.
- Accompaniments: Serve the cake with a dollop of whipped cream, a drizzle of chocolate syrup, or a sprinkle of crushed nuts for added flair.
- Pairings: Pair the cake with a cold glass of milk, a scoop of extra ice cream on the side, or a cup of coffee for the ultimate dessert experience.
- Special Occasions: Perfect for birthdays, summer cookouts, family gatherings, or any occasion that calls for a show-stopping dessert.
Tips:
- Heat Treat the Flour: Always heat treat the flour before using it in the cookie dough to eliminate any potential bacteria.
- Soften Ice Cream Properly: Ensure the ice cream is softened enough to spread easily but not completely melted.
- Cool Ganache Slightly: Allow the ganache to cool slightly before pouring it over the ice cream to prevent it from melting the ice cream too much.
- Use a Springform Pan: A springform pan makes it easy to remove the cake without damaging it.
- Patience is Key: Allow the cake to freeze completely between each layer to ensure it holds its shape and doesn’t melt.
- Customize with Flavors: Experiment with different flavors of ice cream and cookie dough to create your own unique version of this cake.
- Make Ahead: This cake can be made several days in advance and stored in the freezer until ready to serve.
Prep Time: 30 minutes
Cook Time: 7 minutes (for heat-treating flour)
Total Time: 6 hours (including freezing time)
Nutritional Information:
- Calories: Approximately 500-600 per serving (depending on portion size and ingredients used)
- Protein: 5-7 grams per serving
- Sodium: 150-200 mg per serving
Conclusion:
The Chocolate Chip Cookie Dough Ice Cream Cake is more than just a dessert; it’s an experience. With its delightful layers of chewy cookie dough, creamy ice cream, and rich chocolate ganache, it’s a dessert that will impress and satisfy. Whether you’re celebrating a special occasion or simply want a sweet treat to beat the heat, this cake is the perfect choice. Enjoy the process of creating this masterpiece, and savor every delicious bite! It’s an absolute must-try for any dessert lover. Get ready to make memories and delight everyone with this ultimate frozen treat!
Frequently Asked Questions:
- Can I use store-bought cookie dough instead of making it from scratch?
- Absolutely! If you’re short on time, you can use store-bought edible cookie dough. Just make sure it’s specifically labeled as “edible” to ensure it’s safe to consume without baking. You can either use it as is or chop it into smaller pieces for the ice cream layer.
- How do I heat-treat the flour properly?
- To heat-treat the flour, preheat your oven to 350°F (175°C). Spread the flour in a thin, even layer on a baking sheet. Bake for about 5-7 minutes, or until the flour reaches an internal temperature of 165°F (74°C). You can use a food thermometer to check the temperature. Let the flour cool completely before using it in the recipe.
- Can I use a different size springform pan?
- While an 8-inch springform pan is ideal, you can use a slightly larger or smaller pan. If you use a larger pan, the layers will be thinner. If you use a smaller pan, the layers will be thicker, and you may need to adjust the freezing time accordingly.
- How do I prevent the ganache from melting the ice cream too much?
- The key is to let the ganache cool slightly before pouring it over the ice cream layer. The cooler the ganache is, the less it will melt the ice cream. However, don’t let it cool too much, or it will become too thick to spread evenly.
- Can I add other toppings to the cake?
- Absolutely! Feel free to get creative and add your favorite toppings. Some great options include chopped nuts, crushed Oreos, sprinkles, chocolate shavings, caramel sauce, or even fresh berries. The possibilities are endless!