Description of this Recipe
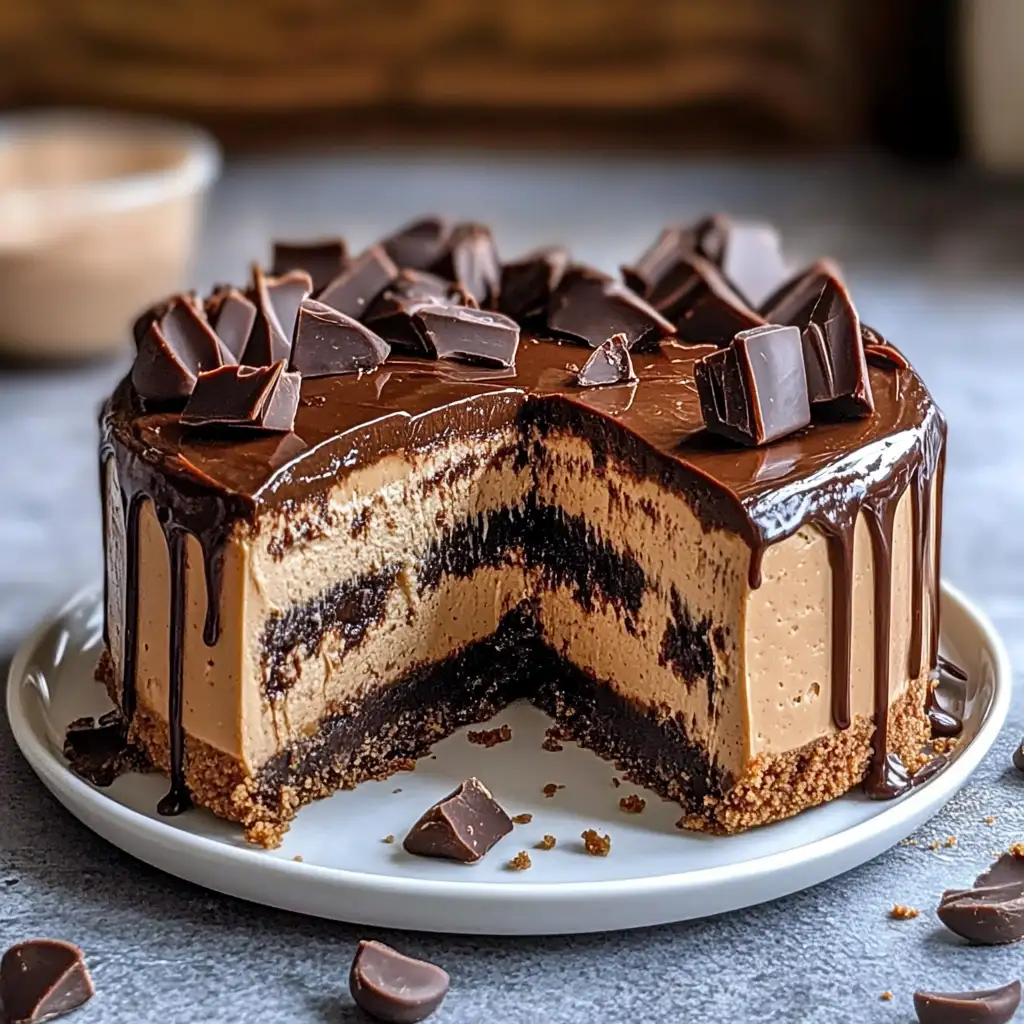
Indulge in the decadent delight of a Chocolate Peanut Butter Cheesecake. This luxurious dessert combines the rich flavors of chocolate and peanut butter in a creamy, dreamy cheesecake that is sure to impress. From the crunchy chocolate cookie crust to the silky smooth peanut butter filling and the luscious chocolate ganache topping, every layer is a symphony of textures and tastes. Perfect for special occasions or when you simply crave an extraordinary treat, this cheesecake is a guaranteed crowd-pleaser.
Why You Will Love This Recipe
This Chocolate Peanut Butter Cheesecake is more than just a dessert; it’s an experience. Here’s why you’ll fall in love with it:
- Perfect Flavor Combination: The marriage of chocolate and peanut butter is a classic for a reason. This cheesecake perfectly balances the sweetness of chocolate with the nutty, savory notes of peanut butter, creating a harmonious blend that is irresistible.
- Luxurious Texture: The creamy, melt-in-your-mouth texture of the cheesecake filling, combined with the crunch of the chocolate cookie crust and the smooth ganache, offers a delightful sensory experience.
- Impressive Presentation: This cheesecake is a showstopper. The rich, glossy ganache, adorned with chopped chocolate bars or peanut butter cups, makes it a visually stunning dessert that’s perfect for entertaining.
- Make-Ahead Convenience: You can prepare this cheesecake a day or two in advance, making it an ideal dessert for busy hosts. Chilling overnight allows the flavors to meld together beautifully, enhancing the overall taste.
- Versatile Garnish Options: Customize your cheesecake with your favorite chocolate bars, peanut butter cups, or a sprinkle of sea salt for an extra touch of sophistication.
Ingredients:
For the Crust:
- 1 1/2 cups chocolate cookie crumbs (e.g., Oreo)
- 1/4 cup granulated sugar
- 1/2 cup (1 stick) unsalted butter, melted
For the Peanut Butter Cheesecake Filling:
- 2 (8-ounce) packages cream cheese, softened
- 1 cup creamy peanut butter
- 1 cup powdered sugar
- 1/2 cup sour cream
- 1 teaspoon vanilla extract
- 3 large eggs
For the Chocolate Ganache Topping:
- 1 cup heavy cream
- 1 cup semi-sweet chocolate chips
For Garnish:
- Chopped chocolate bars or Reese’s Peanut Butter Cups
Preparation:
Step 1: Prepare the Crust
Preheat your oven to 350°F (175°C). In a medium bowl, combine the chocolate cookie crumbs, granulated sugar, and melted butter. Mix thoroughly until all the crumbs are moistened and the mixture resembles wet sand. Press the mixture firmly and evenly into the bottom of a 9-inch springform pan. Ensure the crust is compact and uniform to provide a stable base for the cheesecake. Bake the crust in the preheated oven for 10 minutes. This brief baking period sets the crust, giving it a firmer texture and enhancing its chocolatey flavor. Remove the pan from the oven and let the crust cool completely before adding the filling. Cooling the crust prevents it from softening when the filling is added.
Step 2: Make the Cheesecake Filling
In a large mixing bowl, place the softened cream cheese and creamy peanut butter. It’s crucial that the cream cheese is fully softened to avoid lumps in the filling. Beat the cream cheese and peanut butter together using an electric mixer on medium speed until the mixture is perfectly smooth and creamy. This step is essential for achieving a velvety texture in the final product. Gradually add the powdered sugar to the cream cheese and peanut butter mixture. Continue beating on low speed until the powdered sugar is fully incorporated. Be careful not to overmix at this stage, as it can introduce air into the batter and cause the cheesecake to crack during baking. Add the sour cream and vanilla extract to the bowl. Mix on low speed until just combined, ensuring the sour cream is evenly distributed throughout the mixture. The sour cream adds a subtle tanginess and richness to the cheesecake, while the vanilla extract enhances the overall flavor. Add the large eggs one at a time, beating on low speed after each addition until just incorporated. It’s important not to overmix the batter once the eggs are added. Overmixing can develop gluten in the eggs, resulting in a tough cheesecake. Pour the prepared cheesecake filling over the cooled chocolate cookie crust in the springform pan. Spread the filling evenly to ensure a uniform thickness.
Step 3: Bake the Cheesecake
Preheat your oven to 325°F (160°C). This lower temperature helps the cheesecake bake evenly and prevents it from cracking. Wrap the bottom of the springform pan tightly with aluminum foil to prevent water from seeping in during the water bath. Place the springform pan inside a larger roasting pan. Carefully pour hot water into the roasting pan until it reaches about 1 inch up the sides of the springform pan. The water bath creates a humid environment in the oven, which helps the cheesecake bake evenly and prevents it from drying out or cracking. Gently place the roasting pan with the cheesecake into the preheated oven. Bake for 50-60 minutes, or until the cheesecake is set around the edges but the center still has a slight wobble. The slight wobble indicates that the cheesecake is perfectly baked.
Step 4: Cool and Chill
Once the baking time is complete, turn off the oven but do not open the door. Prop the oven door open slightly using a wooden spoon or a rolled-up towel. Allow the cheesecake to cool slowly inside the oven for about an hour. This gradual cooling process helps prevent the cheesecake from cracking due to sudden temperature changes. After an hour, remove the roasting pan from the oven and carefully lift the springform pan out of the water bath. Place the cheesecake on a wire rack to cool completely at room temperature. Once the cheesecake has cooled to room temperature, cover it tightly with plastic wrap and refrigerate for at least 6 hours, or preferably overnight. Chilling the cheesecake allows the flavors to meld together and the texture to firm up, resulting in a more delicious and satisfying dessert.
Step 5: Make the Ganache and Garnish
When you’re ready to serve the cheesecake, prepare the chocolate ganache. In a small saucepan, heat the heavy cream over medium heat until it just begins to simmer. Be careful not to boil the cream, as it can scald and affect the texture of the ganache. Remove the saucepan from the heat and pour the hot heavy cream over the semi-sweet chocolate chips in a heatproof bowl. Let the mixture sit undisturbed for about 5 minutes to allow the heat from the cream to melt the chocolate. After 5 minutes, whisk the mixture gently until it is smooth, glossy, and completely combined. If the chocolate doesn’t fully melt, you can microwave the mixture in 15-second intervals, stirring after each interval, until it is smooth. Remove the chilled cheesecake from the refrigerator and carefully release it from the springform pan. Place the cheesecake on a serving plate or stand. Pour the prepared chocolate ganache over the top of the cheesecake, allowing it to drip down the sides. The ganache should be thick enough to coat the cheesecake evenly but thin enough to create an elegant drip effect. Garnish the top of the cheesecake with chopped chocolate bars or Reese’s Peanut Butter Cups. You can also add a sprinkle of sea salt for a touch of contrast and complexity.
COOKING Rating:
- Difficulty: Intermediate
- Prep Time: 30 minutes
- Cook Time: 60 minutes
- Cooling Time: 1 hour
- Chilling Time: 6 hours (or overnight)
- Total Time: Approximately 8-9 hours
Serving Suggestions:
- Serve chilled slices of the Chocolate Peanut Butter Cheesecake as a decadent dessert for special occasions or dinner parties.
- Pair it with a scoop of vanilla ice cream or a dollop of whipped cream for an extra touch of indulgence.
- Serve alongside a cup of freshly brewed coffee or a glass of cold milk for the perfect complement.
- Garnish with fresh berries or a drizzle of caramel sauce for added visual appeal and flavor.
Tips:
- Ensure that the cream cheese is fully softened before making the filling to prevent lumps and achieve a smooth, creamy texture.
- Do not overmix the cheesecake batter, as this can cause the cheesecake to crack during baking.
- Use a water bath to help the cheesecake bake evenly and prevent it from drying out or cracking.
- Allow the cheesecake to cool slowly inside the oven to prevent sudden temperature changes that can cause cracking.
- Chill the cheesecake for at least 6 hours, or preferably overnight, to allow the flavors to meld together and the texture to firm up.
- Use high-quality chocolate chips for the ganache to ensure a rich, glossy finish.
- Customize the garnish with your favorite chocolate bars, peanut butter cups, or a sprinkle of sea salt.
Prep Time: 30 minutes
Cook Time: 60 minutes
Total Time: Approximately 8-9 hours (including cooling and chilling)
Nutritional Information:
- (Note: Nutritional information is approximate and may vary based on specific ingredients and portion sizes)
- Calories: Approximately 600-700 per slice
- Protein: Approximately 10-12 grams per slice
- Sodium: Approximately 200-250 mg per slice
Conclusion
The Chocolate Peanut Butter Cheesecake is a symphony of flavors and textures that will leave you and your guests craving more. With its rich, creamy filling, crunchy chocolate cookie crust, and luscious chocolate ganache topping, this dessert is a true indulgence. Whether you’re celebrating a special occasion or simply want to treat yourself to something extraordinary, this cheesecake is a guaranteed winner. Follow this recipe carefully, and you’ll be rewarded with a show-stopping dessert that’s as delicious as it is beautiful.
Questions and Answers About This Recipe
Q1: Can I use a different type of cookie for the crust?
A: Absolutely! While chocolate cookie crumbs (like Oreos) provide a classic flavor pairing, you can experiment with other types of cookies. Graham crackers, vanilla wafers, or even peanut butter cookies would all make delicious crusts. Just be sure to adjust the sugar content accordingly, as some cookies are sweeter than others.
Q2: What can I do if my cheesecake cracks while baking?
A: Cracking can be frustrating, but it doesn’t necessarily mean your cheesecake is ruined. To minimize cracking, ensure that your cream cheese is fully softened and avoid overmixing the batter. Using a water bath can also help prevent cracks by providing a humid environment in the oven. If your cheesecake does crack, you can easily hide it with the chocolate ganache topping.
Q3: Can I make this cheesecake gluten-free?
A: Yes, you can easily make this cheesecake gluten-free by using gluten-free chocolate cookies for the crust. There are many delicious gluten-free chocolate cookie options available in most supermarkets. Simply substitute the regular cookies with the gluten-free version, and follow the rest of the recipe as written.
Q4: How long does this cheesecake last in the refrigerator?
A: Properly stored, this cheesecake will last in the refrigerator for up to 5 days. Be sure to cover it tightly with plastic wrap to prevent it from drying out or absorbing odors from the refrigerator. After a few days, the texture may start to change slightly, but it will still be safe and delicious to eat.
Q5: Can I freeze this cheesecake?
A: Yes, you can freeze this cheesecake for longer storage. To freeze, first, chill the cheesecake completely in the refrigerator. Then, wrap it tightly in several layers of plastic wrap, followed by a layer of aluminum foil. This will help prevent freezer burn. The cheesecake can be stored in the freezer for up to 2-3 months. When you’re ready to serve it, thaw it in the refrigerator overnight. Note that the texture of the cheesecake may change slightly after freezing and thawing, but it will still be delicious. It’s best to add the ganache after thawing.