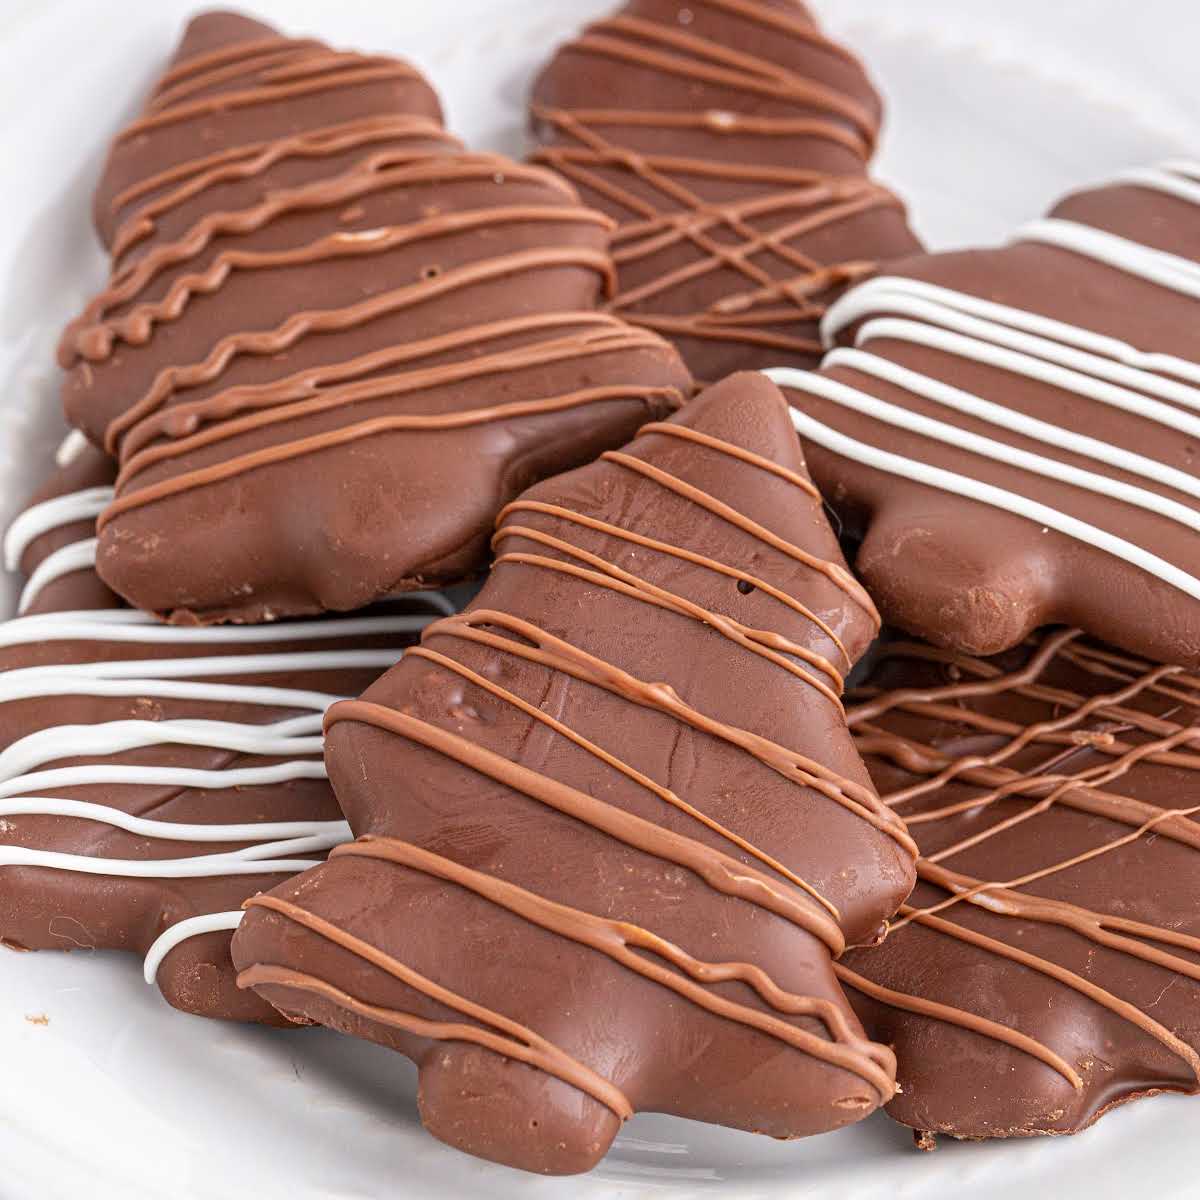
Delight in the festive flavors of the holidays with these charming Chocolate Peanut Butter Christmas Trees. This no-bake treat combines the irresistible combination of peanut butter and chocolate into adorable, edible Christmas trees. They’re not only delicious but also make a delightful addition to any holiday dessert table or a thoughtful homemade gift.
Why You Will Love This Recipe
These Chocolate Peanut Butter Christmas Trees are incredibly easy to make, requiring no oven time and minimal effort. The recipe uses simple ingredients that you likely already have in your pantry. The result is a rich, creamy, and decadent treat that everyone will love. The festive Christmas tree shape adds a touch of holiday cheer, making them perfect for parties, family gatherings, or simply enjoying a sweet treat during the festive season. Plus, they are easily customizable with different types of chocolate and decorative drizzles.
Ingredients:
- ½ cup salted butter, melted and cooled
- 2 cups creamy peanut butter
- ¼ cup granulated sugar
- 1 tablespoon vanilla extract
- 4 cups powdered sugar
- 3 cups semi-sweet chocolate chips (or a combination of semi-sweet and milk chocolate chips)
- 2 tablespoons shortening
Drizzle (Optional):
- ½ cup milk chocolate chips or pieces
- ½ cup white chocolate chips or pieces
- 1 teaspoon shortening, divided in half
Preparation:
Step 1: Prepare Your Pan
Line a jelly roll or half sheet pan with parchment paper. This will prevent the peanut butter mixture from sticking and make it easy to remove later. Set the pan aside.
Step 2: Combine Peanut Butter Ingredients
In a large bowl, use a hand mixer to beat together the melted butter, peanut butter, granulated sugar, and vanilla extract until the mixture is smooth and creamy. Make sure the melted butter has cooled slightly to prevent it from melting the peanut butter.
Step 3: Incorporate Powdered Sugar
Gradually beat in the powdered sugar until fully incorporated. The mixture will become quite thick. If it seems too dry, add a teaspoon of milk or water at a time until it comes together. Be careful not to overmix, as this can make the peanut butter mixture tough.
Step 4: Press into the Pan
Press the peanut butter mixture into the prepared sheet pan, spreading it evenly to about ½-inch thickness. Use your hands or the back of a spoon to smooth the surface.
Step 5: Chill the Mixture
Place the sheet pan in the freezer for 15 minutes. Chilling the mixture helps it firm up, making it easier to cut out the Christmas tree shapes.
Step 6: Cut Out Christmas Tree Shapes
Remove the sheet pan from the freezer. Lift the parchment paper to remove the chilled peanut butter layer from the pan. Place a new sheet of parchment paper on the pan. Use a Christmas tree-shaped cookie cutter to cut out shapes from the chilled peanut butter layer.
Step 7: Freeze Cutouts
Place the cutouts on a parchment-lined sheet pan and freeze for 30 minutes. This will help them maintain their shape when dipped in chocolate.
Step 8: Repress Remaining Mixture
Scoop up the remnant peanut butter mixture, repress to ½-inch thickness, and cut out additional shapes. This ensures you use all the delicious peanut butter mixture.
Step 9: Prepare Chocolate Coating
After the cutouts have chilled for 25 minutes, prepare the chocolate coating. Combine the chocolate chips and shortening in a heatproof bowl. Microwave in 30-second increments, stirring after each increment, until the chocolate is smooth and completely melted. The shortening helps to create a smooth, glossy coating.
Step 10: Dip the Cutouts
Using a fork, lift one peanut butter cutout at a time and coat it completely with the melted chocolate. Tap off any excess chocolate and place the coated tree back onto the parchment-lined cookie sheet. Work in batches if the peanut butter cutouts become soft quickly.
Step 11: Allow Chocolate to Harden
Allow the chocolate to harden completely at room temperature or in the refrigerator. This may take 30 minutes to an hour.
Step 12: Prepare Optional Drizzle
For the optional drizzle, microwave the milk chocolate chips or chopped pieces and shortening (½ teaspoon per ½ cup) in 30-second increments until melted and smooth. Repeat the same process for the white chocolate.
Step 13: Drizzle the Trees
Scoop the melted chocolate into a plastic baggy or piping bag. Snip a tiny corner off the baggy and drizzle the chocolate in a zigzag motion over the chocolate-coated trees. Allow the chocolate to set, about 5 minutes.
COOKING Rating: Easy
Serving Suggestions:
- Serve as a festive dessert at holiday parties.
- Package in decorative boxes or bags as homemade gifts.
- Enjoy with a glass of milk or hot cocoa.
- Add to a dessert platter for a variety of holiday treats.
Tips:
- Use high-quality chocolate for the best flavor.
- Make sure the peanut butter mixture is firm before cutting out shapes.
- Work in batches to prevent the peanut butter from softening too much.
- Store in an airtight container in the refrigerator to maintain freshness.
- For a richer flavor, use dark chocolate for the coating.
- Add sprinkles or edible glitter for extra holiday sparkle.
- If you don’t have cookie cutters, you can cut the peanut butter mixture into squares or rectangles.
Prep Time: 20 minutes
Cook Time: 0 minutes (no-bake)
Total Time: 1 hour (including chilling time)
Nutritional Information (Per Serving): (Note: These values are approximate and will vary based on specific ingredients and serving size.)
Calories: 250 kcal Protein: 5 g Sodium: 100 mg
Conclusion
These Chocolate Peanut Butter Christmas Trees are a delightful and festive treat that’s perfect for the holiday season. Easy to make and incredibly delicious, they are sure to be a hit with family and friends. Whether you’re looking for a simple dessert to bring to a party or a fun activity to do with kids, this recipe is a winner. The combination of creamy peanut butter and rich chocolate, combined with the charming Christmas tree shape, makes these treats a memorable addition to your holiday traditions. Enjoy the process of creating these adorable trees and savor the delicious flavors of the season!
Questions and Answers About This Recipe
1. Can I use a different type of nut butter instead of peanut butter?
Yes, you can substitute other nut butters like almond butter, cashew butter, or sunflower seed butter. Keep in mind that the flavor will change slightly depending on the nut butter you use. Ensure the nut butter is smooth and creamy for the best texture.
2. How long will these Christmas trees last?
When stored in an airtight container in the refrigerator, these Chocolate Peanut Butter Christmas Trees will last for up to a week. Be sure to keep them cool to prevent the chocolate from melting and the peanut butter from softening.
3. Can I make these ahead of time?
Absolutely! These are great to make ahead of time. You can prepare them a few days in advance and store them in the refrigerator until you are ready to serve them. This makes them perfect for holiday parties or as a make-ahead gift.
4. What can I use if I don’t have shortening for the chocolate coating?
If you don’t have shortening, you can use coconut oil or butter as a substitute. These alternatives will provide a similar smooth and glossy finish to the chocolate coating. However, be aware that butter may make the chocolate slightly less stable at room temperature.
5. Can I add any other decorations to the Christmas trees?
Yes, feel free to get creative with your decorations! You can add sprinkles, edible glitter, chopped nuts, or even small candies to the trees before the chocolate sets. Get the kids involved and let them decorate their own trees for a fun and festive activity.