Description: A symphony of textures and flavors, this Chocolate Peanut Butter Dream Pie is a no-bake dessert that marries the rich, comforting taste of peanut butter with the satisfying crunch of an Oreo crust and the airy lightness of whipped topping. Perfect for potlucks, parties, or a simple weeknight treat, this pie is guaranteed to disappear quickly. It’s incredibly easy to make, requiring minimal effort for maximum deliciousness. The contrasting elements of the salty peanut butter, sweet chocolate Oreo crust, and creamy filling make it a dessert that truly hits all the right notes. It’s a crowd-pleaser that is sure to become a family favorite.
Ingredients:
- 24 Oreo cookies (original flavor), crushed into fine crumbs
- 6 tablespoons unsalted butter, melted
- 1 (8 ounce) package cream cheese, softened to room temperature
- 1 cup creamy peanut butter (smooth, not chunky), preferably a no-stir variety
- 1 cup powdered sugar, sifted to remove any lumps
- 1 teaspoon pure vanilla extract
- 1 (12 ounce) tub whipped topping, thawed completely
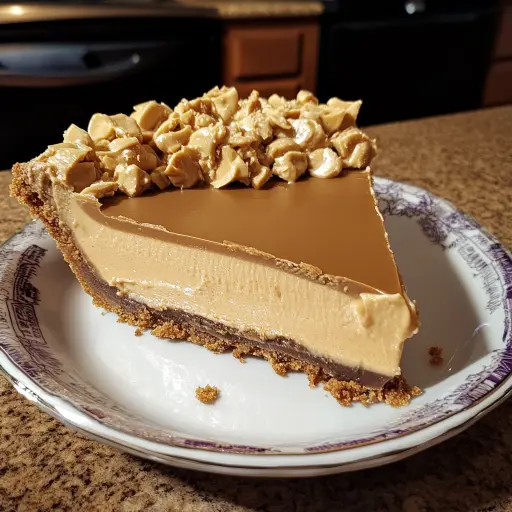
- Optional Garnishes: Chocolate shavings, coarsely chopped peanuts, mini peanut butter cups, drizzle of melted chocolate, peanut butter cups
Preparation:
Step 1: Crust Preparation: Begin by crushing the Oreo cookies. You can use a food processor for a quick and even crush, pulsing until you achieve fine crumbs. Alternatively, place the cookies in a large zip-top bag, seal it tightly, and use a rolling pin to crush them into small pieces. Ensure there are no large chunks remaining for a smoother crust.
Step 2: Combining Crust Ingredients: In a medium-sized bowl, pour the melted butter over the crushed Oreo crumbs. Mix thoroughly until the crumbs are evenly moistened and the mixture resembles wet sand. The butter acts as a binder, holding the crust together and adding a subtle richness.
Step 3: Pressing the Crust: Transfer the Oreo crumb mixture into a 9-inch pie dish. Use the bottom of a measuring cup or your fingers to firmly press the crumbs onto the bottom and up the sides of the pie dish. Ensure the crust is evenly thick and tightly packed to prevent it from crumbling when the pie is sliced. Pay special attention to the edges, reinforcing them for a neat presentation.
Step 4: Chilling the Crust: Place the prepared Oreo crust in the refrigerator to chill for at least 30 minutes. Chilling allows the butter to solidify, firming up the crust and making it more stable for the filling. While the crust chills, you can begin preparing the peanut butter filling.
Step 5: Preparing the Filling: In a large mixing bowl, combine the softened cream cheese and creamy peanut butter. Use an electric mixer (either a stand mixer or a handheld mixer) to beat the ingredients together until smooth and creamy. Make sure the cream cheese is completely softened to avoid lumps in the filling.
Step 6: Adding Powdered Sugar and Vanilla: Gradually add the sifted powdered sugar to the cream cheese and peanut butter mixture. Sifting the powdered sugar is crucial to prevent any clumps from forming. Mix on low speed until the powdered sugar is fully incorporated. Then, add the vanilla extract, which will enhance the overall flavor profile of the filling, adding a touch of warmth and complexity. Mix until well combined.
Step 7: Folding in the Whipped Topping: Gently fold in the thawed whipped topping into the peanut butter mixture. Use a spatula to avoid overmixing, as this can deflate the whipped topping and result in a less airy filling. Fold until the whipped topping is evenly distributed and the mixture is light and fluffy.
Step 8: Assembling the Pie: Remove the chilled Oreo crust from the refrigerator. Pour the peanut butter filling into the crust, spreading it evenly with a spatula. Ensure the filling is smooth and level for an attractive presentation.
Step 9: Chilling the Pie: Cover the pie with plastic wrap, pressing it lightly onto the surface of the filling to prevent a skin from forming. Refrigerate the pie for at least 4 hours, or preferably overnight. This chilling period allows the filling to set completely, ensuring a firm and sliceable pie.
Step 10: Garnishing and Serving: Just before serving, remove the plastic wrap and garnish the pie with your choice of toppings. Chocolate shavings add a touch of elegance, while chopped peanuts provide a satisfying crunch. You can also drizzle melted chocolate or peanut butter over the top for extra decadence. Slice the pie and serve chilled.
Why You Will Love This Recipe:
This Chocolate Peanut Butter Dream Pie is a guaranteed winner for several reasons:
- No-Bake Convenience: The no-bake nature of this recipe makes it incredibly easy and convenient, especially during warmer months when you want to avoid turning on the oven.
- Delicious Flavor Combination: The combination of chocolate and peanut butter is a classic for a reason – it’s simply irresistible. The salty-sweet balance is addictive and satisfying.
- Simple Ingredients: The recipe uses readily available ingredients that you probably already have in your pantry.
- Crowd-Pleasing: This pie is always a hit at parties and gatherings. It’s a dessert that appeals to both kids and adults.
- Customizable: You can easily customize the pie with different toppings and variations to suit your preferences. Try adding a layer of chocolate ganache, using a different flavor of Oreo cookies, or incorporating chopped peanut butter cups into the filling.
- Perfect for Any Occasion: Whether it’s a casual weeknight treat or a special occasion dessert, this pie is always a good choice.
- Make-Ahead Friendly: The pie can be made ahead of time and stored in the refrigerator, making it perfect for busy schedules.
- Kid-Friendly: Kids love helping to make this pie, especially crushing the Oreos and adding the toppings.
Serving Suggestions:
- Serve chilled straight from the refrigerator.
- Pair with a scoop of vanilla ice cream or a dollop of whipped cream.
- Accompany with a glass of cold milk or a cup of hot coffee.
- Offer a selection of toppings for guests to customize their slices.
- Cut into smaller slices for a richer, more decadent experience.
Tips:
- Ensure the cream cheese is completely softened to avoid lumps in the filling.
- Sift the powdered sugar to prevent clumps and ensure a smooth filling.
- Do not overmix the filling after adding the whipped topping, as this can deflate it.
- For a richer flavor, use high-quality chocolate and peanut butter.
- If you’re short on time, you can use a store-bought Oreo crust.
- Store leftover pie in the refrigerator for up to 3 days.
- For an extra layer of flavor, try adding a tablespoon of bourbon or rum to the peanut butter filling.
- If you want a thicker crust, use more Oreo cookies and butter.
- If you want a less sweet pie, reduce the amount of powdered sugar.
Prep Time: 20 minutes Cook Time: 0 minutes (no baking required) Total Time: Minimum 4 hours (including chilling time), ideally overnight
Nutritional Information:
(Note: Nutritional information is an estimate and can vary based on specific ingredients and portion sizes.)
Calories: Approximately 450-550 per slice (1/8 of the pie) Protein: 8-10 grams per slice Sodium: 200-300 mg per slice
Conclusion:
The Chocolate Peanut Butter Dream Pie is more than just a dessert; it’s an experience. Its simplicity, coupled with its irresistible flavor profile, makes it a must-try for any home baker. This recipe is a testament to the fact that sometimes the simplest combinations are the most satisfying. So, gather your ingredients, follow the easy steps, and prepare to indulge in a slice of pure bliss. Whether you’re celebrating a special occasion or simply craving a sweet treat, this pie is guaranteed to bring joy to every bite.
Questions and Answers about this Recipe:
Q1: Can I use a different type of cookie for the crust?
A: Absolutely! While Oreo cookies provide a classic chocolate flavor, you can experiment with other types of cookies for the crust. Consider using chocolate graham crackers, Nutter Butters for an extra peanut butter punch, or even shortbread cookies for a buttery and crumbly texture. Just be sure to adjust the amount of butter used depending on the dryness of the cookie.
Q2: What can I use instead of whipped topping?
A: If you’re not a fan of whipped topping or prefer a homemade option, you can easily substitute it with homemade whipped cream. To make whipped cream, beat 1 cup of heavy cream with 2 tablespoons of powdered sugar and 1/2 teaspoon of vanilla extract until stiff peaks form. Alternatively, you can use a stabilized whipped cream, which will hold its shape for longer. You can also use cool whip.
Q3: Can I freeze this pie?
A: Yes, this Chocolate Peanut Butter Dream Pie freezes well. To freeze, wrap the entire pie tightly in plastic wrap, then wrap it again in aluminum foil. Freeze for up to 2-3 months. When ready to serve, thaw the pie in the refrigerator overnight. Keep in mind that the texture of the whipped topping may change slightly after freezing and thawing.
Q4: How can I make this pie vegan?
A: To make this pie vegan, you’ll need to substitute the dairy ingredients. Use vegan Oreo cookies (many varieties are accidentally vegan), vegan butter for the crust, vegan cream cheese, and vegan whipped topping. Ensure the peanut butter you use is also vegan-friendly (most are). With these substitutions, you can enjoy a delicious and cruelty-free version of this pie.
Q5: What if my filling is too runny?
A: If your filling is too runny, it could be due to several reasons, such as the cream cheese not being softened enough or the whipped topping being overmixed. To fix a runny filling, you can try adding a tablespoon or two of powdered sugar to thicken it. You can also put the filling in the freezer for 20-30 minutes to allow the edges to start to set before adding to the crust. Be sure to chill the pie for longer to ensure it sets properly. Next time, make sure your ingredients are at the correct temperature and avoid overmixing.