Description of this recipe
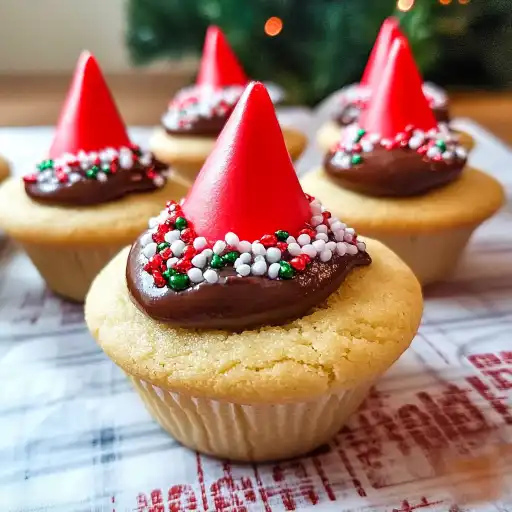
These delightful Christmas Kiss Cookie Cups are a festive and fun treat that’s perfect for holiday gatherings, cookie exchanges, or simply enjoying a sweet moment during the busy Christmas season. They combine the simplicity of sugar cookies with the creamy sweetness of Hershey’s Kisses, all dressed up in holiday sprinkles. Easy to make and visually appealing, these cookie cups are sure to be a hit with both kids and adults.
Why you will love this recipe
You’ll love this recipe for its ease of preparation, festive appearance, and delicious taste! The combination of soft, buttery sugar cookies, creamy frosting, and the classic Hershey’s Kiss creates a delightful explosion of flavors and textures. These cookie cups are incredibly versatile; you can customize the frosting color and sprinkle combinations to match your holiday theme or personal preferences. Plus, they’re a great activity to involve kids in, making baking a fun and memorable experience for the whole family. These Christmas Kiss Cookie Cups are guaranteed to bring a smile to everyone’s face!
Ingredients:
- 16 oz ready-to-bake refrigerated sugar cookie dough (24 count)
- ⅔ cup red frosting
- Red, green, and white nonpareils
- 24 Hershey’s Kiss chocolates, unwrapped
Preparation:
Step 1: Preheat your oven to 350°F (175°C). Prepare a 24-count mini muffin pan by spraying each cavity generously with nonstick cooking spray. This will ensure the cookie cups release easily after baking.
Step 2: Take the ready-to-bake sugar cookie dough and place one piece of dough into each cavity of the prepared mini muffin pan. Gently press the dough to evenly distribute it within the cavity.
Step 3: Bake for approximately 15 minutes, or until the edges of the sugar cookies are lightly golden brown. Keep a close eye on them to prevent burning, as oven temperatures can vary.
Step 4: Remove the muffin pan from the oven and immediately use a muddler (or the back of a small spoon) to gently press down in the center of each cookie, creating a small cavity or indentation. Be careful not to press too hard and crack the cookie. This cavity will hold the frosting and Hershey’s Kiss.
Step 5: Transfer the entire muffin pan to the refrigerator and allow the cookie cups to chill for about 20 minutes. Chilling helps the cookies firm up, making them easier to remove from the pan and prevents the frosting from melting.
Step 6: After chilling, gently twist each cookie cup to release it from the mini muffin pan. If they are sticking, you can use a thin knife or spatula to carefully loosen the edges.
Step 7: Fill a piping bag fitted with a decorative tip (optional) with the red frosting. If you don’t have a piping bag, you can use a resealable plastic bag with a corner snipped off or simply use a spoon.
Step 8: Pipe the red frosting into the center of each cookie cup, filling the cavity you created earlier. If using a spoon, carefully place a dollop of frosting into each cup.
Step 9: Immediately sprinkle the red, green, and white nonpareils over the frosting while it’s still soft. This will help the sprinkles adhere to the frosting.
Step 10: Place one unwrapped Hershey’s Kiss chocolate on top of the frosting in each cookie cup. Gently press the Kiss into the frosting to secure it.
COOKING Rating:
Easy
Serving Suggestions:
- Serve these Christmas Kiss Cookie Cups as a festive dessert at holiday parties.
- Arrange them on a platter for cookie exchanges or potlucks.
- Pack them in decorative boxes as homemade gifts for friends and neighbors.
- Enjoy them with a glass of milk, hot cocoa, or coffee for a sweet treat.
- Add them to a dessert table for a Christmas-themed buffet.
Tips:
- Make sure to use fresh, refrigerated sugar cookie dough for the best texture.
- Don’t overbake the cookie cups, as they will become hard and dry.
- If you don’t have red frosting, you can use any color frosting you prefer, or even melted chocolate.
- Get creative with the sprinkles! Use different colors and shapes to customize your cookie cups.
- For a richer flavor, use chocolate sugar cookie dough instead of plain sugar cookie dough.
- If the Hershey’s Kisses are difficult to unwrap, chill them in the refrigerator for a few minutes before unwrapping.
- Store the cookie cups in an airtight container at room temperature for up to 3 days.
Prep Time:
15 minutes
Cook Time:
15 minutes
Total Time:
50 minutes
Nutritional Information:
(Note: Nutritional information is approximate and will vary depending on the specific ingredients used.)
Calories:
Approximately 120-150 per cookie cup
Protein:
Approximately 1-2 grams per cookie cup
Sodium:
Approximately 50-70 mg per cookie cup
Conclusion
Christmas Kiss Cookie Cups are a delightful and festive treat that’s perfect for spreading holiday cheer. Their simple preparation, combined with their delicious taste and eye-catching appearance, makes them a guaranteed crowd-pleaser. Whether you’re baking for a holiday party, a cookie exchange, or simply to enjoy a sweet treat with your family, these cookie cups are sure to bring joy and smiles to everyone’s faces. So, gather your ingredients, preheat your oven, and get ready to create some Christmas magic with these irresistible Christmas Kiss Cookie Cups! Happy baking!
Q&A
Q1: Can I use homemade sugar cookie dough instead of store-bought?
A: Absolutely! Homemade sugar cookie dough will work perfectly in this recipe. Just make sure to roll it out and cut it into small circles to fit into the mini muffin pan cavities. Keep in mind that baking times may vary slightly depending on your dough recipe, so keep a close eye on them.
Q2: What can I use instead of red frosting?
A: You have several options! You can use any color frosting you prefer, such as green, white, or even chocolate frosting. Alternatively, you could use melted chocolate (milk, dark, or white) or a cream cheese frosting for a tangier flavor. Feel free to get creative and choose a frosting that complements your holiday theme or personal taste.
Q3: Can I make these cookie cups ahead of time?
A: Yes, you can! You can bake the cookie cups and let them cool completely. Store the baked cookie cups in an airtight container at room temperature for up to 2 days. Then, frost and decorate them just before serving. This will prevent the frosting from drying out and the sprinkles from losing their luster.
Q4: My Hershey’s Kisses are melting when I place them on the warm frosting. What can I do?
A: To prevent the Hershey’s Kisses from melting, make sure the cookie cups have cooled completely before frosting them. You can also chill the frosted cookie cups in the refrigerator for a few minutes before adding the Kisses. If the Kisses still seem to be melting, try unwrapping them and placing them in the freezer for a few minutes before using them.
Q5: Can I use different types of chocolate instead of Hershey’s Kisses?
A: Absolutely! You can use any type of small chocolate candy that you like. Mini peanut butter cups, chocolate stars, or even small pieces of your favorite chocolate bar would all be delicious alternatives. Get creative and use whatever you have on hand or whatever your family enjoys most. Just make sure the candies are small enough to fit comfortably on top of the frosting in the cookie cups.


