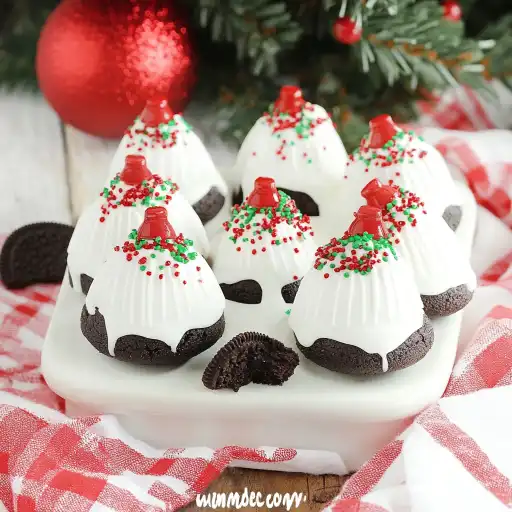
Description of this recipe: These Christmas Oreo Balls are a festive and incredibly easy-to-make treat perfect for holiday gatherings, cookie exchanges, or a simple sweet indulgence. Combining the classic flavor of Oreos with creamy cheese and a decadent white chocolate coating, these bite-sized delights are elevated with mini Reese’s peanut butter cups and festive sprinkles, creating a delightful combination of flavors and textures. They’re no-bake, requiring minimal effort while delivering maximum taste and visual appeal.
Why you will love this recipe:
- Effortless Elegance: These Oreo balls require no baking, making them a stress-free option for busy holiday schedules. They come together quickly, allowing you to focus on other festive preparations.
- Crowd-Pleasing Flavors: The combination of Oreos, cream cheese, white chocolate, and peanut butter is a surefire hit with both kids and adults. The sweet and salty blend is simply irresistible.
- Customizable and Fun: Get creative with your toppings! Use different colored sprinkles, chopped nuts, or even drizzle with melted milk chocolate or dark chocolate for added flair. This recipe is perfect for getting the whole family involved in decorating.
- Perfect Make-Ahead Treat: These Oreo balls can be made days in advance and stored in the refrigerator, making them ideal for holiday planning. This frees you up to tackle other tasks closer to your event.
- Festive Presentation: The red and green sprinkles and the mini Reese’s peanut butter cups add a touch of holiday cheer, making these treats visually appealing and perfect for gifting or displaying on a dessert platter. They are as much a decoration as they are a dessert.
Ingredients:
- 36 Oreo cookies, finely crushed (about 3 cups of crumbs)
- 8 ounces cream cheese, softened to room temperature
- 10 ounces white chocolate chips
- 20 mini Reese’s peanut butter cups
- Red and green sprinkles
Preparation:
Step 1: Crush the Oreos. The easiest way to crush the Oreos is by using a food processor. Pulse them until they are finely ground into crumbs. If you don’t have a food processor, you can place the Oreos in a large zip-top bag and crush them with a rolling pin or meat mallet. Ensure there are no large chunks remaining.
Step 2: Combine Oreo crumbs and cream cheese. In a large mixing bowl, combine the crushed Oreo crumbs and softened cream cheese. Use a hand mixer or a sturdy spoon to mix the ingredients together until they are thoroughly combined. The mixture should be smooth and evenly distributed, forming a dough-like consistency. It’s crucial to ensure the cream cheese is properly softened to avoid lumps in the mixture.
Step 3: Form the Oreo balls. Use a small cookie scoop (about 1 tablespoon) to portion the Oreo-cream cheese mixture. Roll each portion between your palms to form smooth, round balls. Place the formed balls on a baking sheet lined with parchment paper or wax paper. This prevents them from sticking and makes it easier to transfer them later.
Step 4: Chill the Oreo balls. Transfer the baking sheet with the Oreo balls to the refrigerator. Chill them for at least 30 minutes, or ideally for an hour, to allow them to firm up. This chilling process is essential for making the balls easier to dip in the melted white chocolate. If the balls are too soft, they may fall apart during dipping.
Step 5: Melt the white chocolate. Place the white chocolate chips in a microwave-safe bowl. Microwave in 30-second intervals, stirring well after each interval, until the chocolate is completely melted and smooth. Be careful not to overheat the chocolate, as it can seize and become unusable. Alternatively, you can melt the chocolate in a double boiler over simmering water, stirring constantly until melted.
Step 6: Dip the Oreo balls. Remove the chilled Oreo balls from the refrigerator. Using a fork or dipping tools, carefully dip each ball into the melted white chocolate, ensuring it is fully coated. Lift the ball out of the chocolate and gently tap the fork on the edge of the bowl to remove any excess chocolate. This helps create a smoother, more even coating.
Step 7: Decorate the Oreo balls. Immediately after dipping each ball, place it back on the parchment paper or wax paper. Top the ball with a mini Reese’s peanut butter cup, pressing it gently into the white chocolate. Sprinkle red and green sprinkles over the top while the chocolate is still wet. This ensures the sprinkles adhere properly.
Step 8: Allow the chocolate to set. Let the decorated Oreo balls sit at room temperature until the white chocolate has fully hardened. This usually takes about 30-60 minutes. You can speed up the process by placing the balls in the refrigerator for a shorter period, but be sure to monitor them to prevent the chocolate from becoming too cold and potentially cracking.
Step 9: Serve and store. Once the chocolate is set, the Christmas Oreo Balls are ready to serve! Store them in an airtight container in the refrigerator for up to a week. Allow them to come to room temperature slightly before serving for the best flavor and texture.
COOKING Rating: Easy
Serving Suggestions:
- Serve as part of a holiday dessert platter alongside other festive treats like gingerbread cookies, sugar cookies, and peppermint bark.
- Package them in decorative boxes or tins as homemade gifts for friends, family, and neighbors.
- Include them in a cookie exchange party for a fun and delicious contribution.
- Serve with a glass of cold milk, hot chocolate, or a festive holiday cocktail.
- Use them as a topping for ice cream or yogurt for a decadent dessert option.
Tips:
- Ensure the cream cheese is fully softened before mixing with the Oreo crumbs to avoid lumps in the mixture.
- Chill the Oreo balls for a sufficient amount of time to make them easier to handle during dipping.
- Use high-quality white chocolate for the best flavor and smooth melting.
- Melt the white chocolate in short intervals in the microwave, stirring frequently to prevent burning.
- Work quickly when decorating with sprinkles, as the white chocolate sets relatively fast.
- Store the Oreo balls in an airtight container in the refrigerator to maintain their freshness and prevent them from becoming sticky.
Prep Time: 20 minutes
Cook Time: 0 minutes
Total Time: 1 hour (including chilling time)
Nutritional Information: (per Oreo Ball, approximate)
Calories: 150
Protein: 2g
Sodium: 50mg
Conclusion:
These Christmas Oreo Balls are more than just a simple no-bake treat; they are a delightful embodiment of holiday cheer. Their ease of preparation, coupled with their irresistible flavor combination and festive presentation, makes them a perfect addition to any holiday celebration. Whether you’re looking for a quick and easy dessert to impress your guests, a homemade gift to share with loved ones, or a fun activity to enjoy with the family, these Oreo balls are sure to bring smiles and spread joy. So gather your ingredients, put on some holiday music, and get ready to create a batch of these festive and delicious treats that will become a cherished tradition for years to come. The combination of textures and flavors in each bite is a perfect marriage that will make these a holiday staple.
Questions and Answers about this Recipe:
Q1: Can I use a different type of chocolate for dipping?
A: Absolutely! While this recipe calls for white chocolate, you can easily substitute it with milk chocolate, dark chocolate, or even flavored chocolate like peppermint or salted caramel. Just ensure that the chocolate is of good quality and melts smoothly. For a richer flavor, dark chocolate works wonderfully, while milk chocolate offers a sweeter alternative. Experiment with different types to find your favorite combination!
Q2: What if I don’t have Reese’s mini peanut butter cups?
A: No problem at all! You can get creative with alternative toppings. Consider using chopped nuts (such as pecans, walnuts, or almonds), mini marshmallows, chocolate shavings, crushed peppermint candies, or even a drizzle of caramel sauce. The goal is to add a contrasting flavor and texture to complement the Oreo and white chocolate.
Q3: Can I make these Oreo balls ahead of time?
A: Yes, these Oreo balls are perfect for making ahead of time! They can be stored in an airtight container in the refrigerator for up to a week. In fact, chilling them for a day or two can actually enhance their flavor and texture. Just be sure to allow them to come to room temperature slightly before serving for the best taste.
Q4: How do I prevent the white chocolate from seizing when melting it?
A: To prevent white chocolate from seizing, it’s crucial to melt it slowly and gently. Use short intervals in the microwave (30 seconds at a time), stirring well after each interval. Alternatively, melt it in a double boiler over simmering water, stirring constantly. Avoid overheating the chocolate and ensure that no water or steam comes into contact with it, as even a small amount of moisture can cause it to seize.
Q5: Can I freeze these Oreo balls?
A: While you can freeze Oreo balls, it’s not highly recommended as the texture of the cream cheese filling may change slightly upon thawing. However, if you do choose to freeze them, wrap them individually in plastic wrap and then place them in an airtight container or freezer bag. Thaw them in the refrigerator for several hours before serving. Be aware that the white chocolate may become slightly dull after thawing.