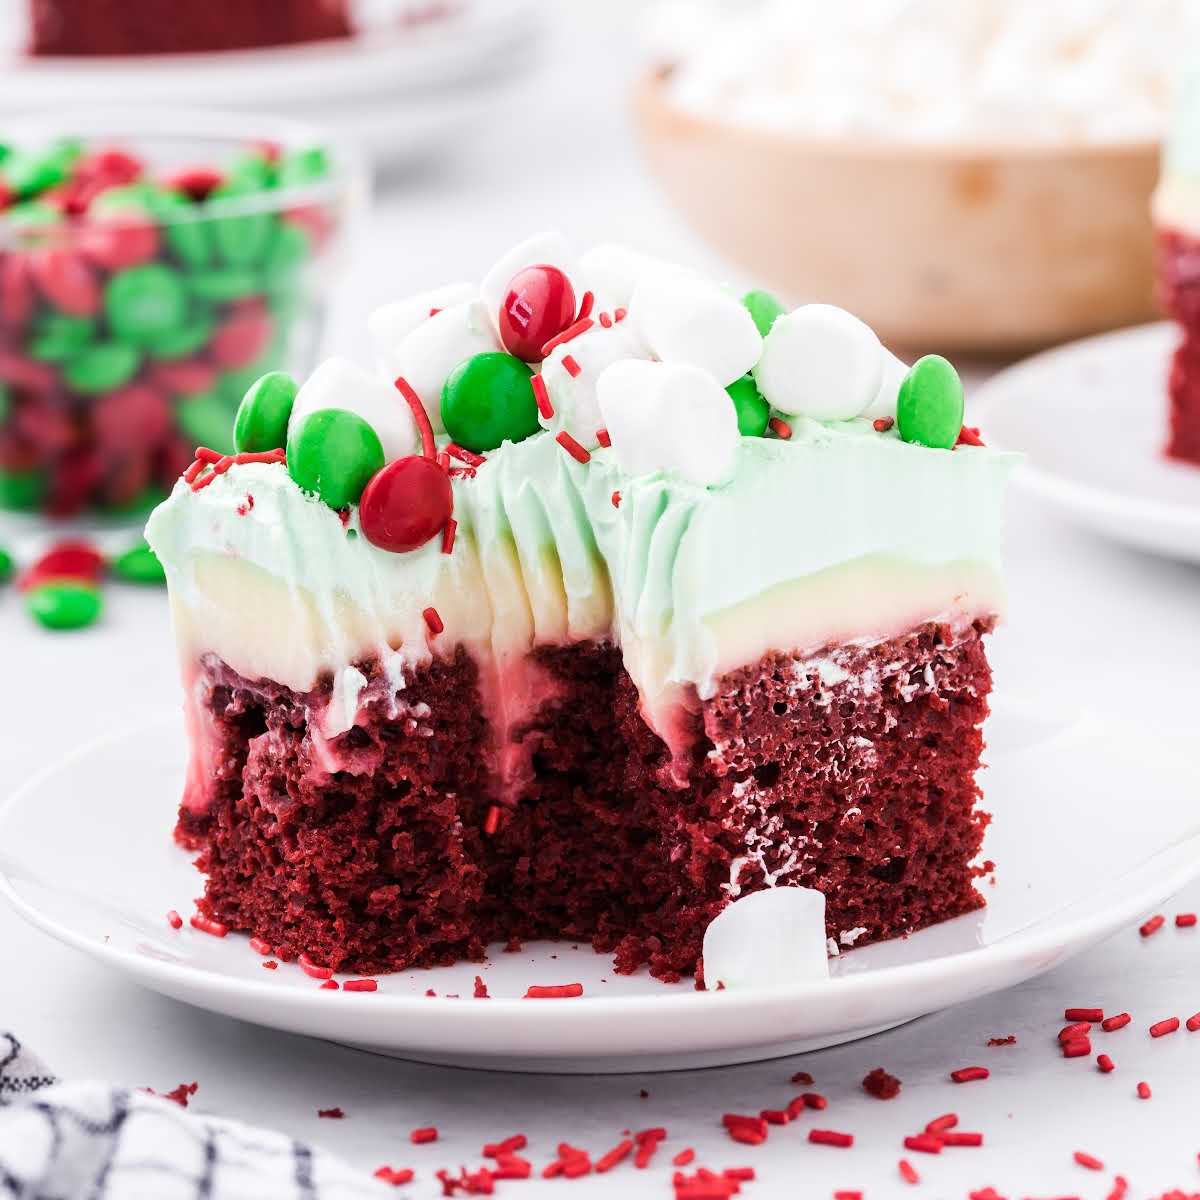
This festive Christmas Red Velvet Poke Cake is a delightful and easy-to-make dessert that’s perfect for holiday gatherings. Imagine a moist, tender red velvet cake infused with a creamy cheesecake pudding, all topped with a fluffy, mint-green whipped topping and decorated with colorful Christmas candies. It’s a guaranteed crowd-pleaser that combines classic flavors with a fun, festive twist.
Why You Will Love This Recipe
This poke cake is incredibly moist and flavorful thanks to the pudding that seeps into the holes, creating a rich and decadent treat. The combination of red velvet cake, cheesecake pudding, and mint-flavored whipped topping provides a delightful balance of textures and tastes. Plus, it’s incredibly easy to make, starting with a boxed cake mix that saves time and effort. The vibrant colors and festive decorations make it a visually stunning dessert that’s sure to impress your guests. This cake can be prepared ahead of time, making it perfect for busy holiday schedules.
Ingredients:
Red Velvet Cake:
- 15.25 ounce box red velvet cake mix
- 1 1/4 cups water
- 1/2 cup vegetable oil
- 3 large eggs
Cheesecake Flavored Instant Pudding Mix:
- 3 3/4 cups cold whole milk
- 6.8 ounces cheesecake flavored instant pudding mix (two 3.4-ounce packets)
Whipped Topping and Decoration:
- 10 to 12 drops green food coloring
- 16 ounces whipped topping, thawed (two 8-ounce tubs)
- 3 cups mini marshmallows
- 1/4 cup red M&M’s
- 1/4 cup green M&M’s
- Red sprinkles
Preparation:
Step 1: Prepare the Red Velvet Cake
Preheat your oven to 350°F (175°C). Generously spray a 9×13-inch baking pan with baker’s spray (such as Baker’s Joy) to prevent sticking. This ensures the cake releases easily after baking. In a medium-sized mixing bowl, combine the red velvet cake mix, water, vegetable oil, and eggs. Use a handheld mixer on medium speed to blend the ingredients until well combined. Make sure there are no lumps and the batter is smooth.
Step 2: Bake the Cake
Pour the cake batter into the prepared 9×13-inch pan, spreading it evenly to ensure uniform baking. Bake in the preheated oven for approximately 25 minutes. To check for doneness, insert a toothpick into the center of the cake. If it comes out clean or with a few moist crumbs, the cake is ready. Avoid overbaking, as this can result in a dry cake.
Step 3: Poke Holes in the Cake
Once the cake is out of the oven, let it cool slightly for about 5-10 minutes. Using the rounded handle of a wooden spoon or a fork, poke holes into the cake about 1/2 inch apart. These holes will allow the cheesecake pudding to seep into the cake, making it incredibly moist and flavorful. Ensure the holes are evenly distributed across the entire surface of the cake.
Step 4: Prepare the Cheesecake Flavored Instant Pudding
In a medium-sized mixing bowl, whisk together the cheesecake flavored instant pudding mix and cold whole milk. Whisk for 1 to 1 1/2 minutes, until the pudding starts to thicken. The mixture should be smooth and creamy. If there are any lumps, continue whisking until they dissolve.
Step 5: Add the Pudding to the Cake
Evenly pour the prepared cheesecake pudding over the cake, making sure it seeps into all the holes. Use a spatula to smooth the pudding over the entire surface of the cake, ensuring an even layer. This step is crucial for infusing the cake with the cheesecake flavor and moisture.
Step 6: Chill the Cake
Tightly cover the cake with plastic wrap to prevent it from drying out and place it in the refrigerator. Chill for at least 4 hours, or preferably overnight. This allows the pudding to fully set and the flavors to meld together, resulting in a more delicious and cohesive dessert.
Step 7: Prepare the Whipped Topping
Once the cake is thoroughly chilled, remove it from the refrigerator. In a small bowl, add the green food coloring to the thawed whipped topping. Stir until the color is uniform, creating a festive mint-green hue. Adjust the amount of food coloring to achieve your desired shade of green.
Step 8: Frost and Decorate the Cake
Evenly spread the tinted whipped topping over the pudding layer, creating a smooth and visually appealing surface. Sprinkle the mini marshmallows evenly over the whipped topping. Add the red and green M&M’s, distributing them evenly for a colorful and festive look. Finally, sprinkle red sprinkles over the cake to add extra sparkle and holiday cheer.
Step 9: Serve and Enjoy
Cut the cake into twelve 3-inch x 3-inch squares. Serve chilled and enjoy the delightful combination of red velvet cake, cheesecake pudding, and minty whipped topping. This cake is perfect for holiday parties, family gatherings, or any special occasion.
COOKING Rating:
Easy
Serving Suggestions:
Serve chilled as a dessert for holiday parties, family gatherings, or any special occasion. Pair with a scoop of vanilla ice cream for an extra indulgent treat. Offer alongside other holiday desserts for a festive dessert table.
Tips:
- To prevent the cake from sticking, make sure to grease the baking pan thoroughly with baker’s spray.
- Use a good quality red velvet cake mix for the best flavor and texture.
- Ensure the pudding is evenly distributed over the cake to maintain consistency in flavor and texture.
- Chilling the cake overnight allows the flavors to meld together, resulting in a richer and more delicious dessert.
- Adjust the amount of green food coloring to achieve your desired shade of green for the whipped topping.
- Get creative with the decorations and use other holiday-themed candies or sprinkles.
- If you don’t have cheesecake flavored pudding mix, you can use vanilla or white chocolate flavored pudding mix instead.
- For a richer flavor, use heavy cream instead of milk when preparing the pudding.
- Store any leftover cake in the refrigerator, covered tightly, for up to 3 days.
Prep Time:
20 minutes
Cook Time:
25 minutes
Total Time:
4 hours 45 minutes (includes chilling time)
Nutritional Information:
(Note: Nutritional information is an estimate and may vary based on specific ingredients and serving sizes.)
Calories: Approximately 450-500 per serving
Protein: 5-7 grams
Sodium: 300-350 mg
Conclusion
The Christmas Red Velvet Poke Cake is a festive and delicious dessert that’s sure to become a holiday favorite. Its ease of preparation, combined with its stunning visual appeal and delightful flavor combination, makes it the perfect treat for any Christmas celebration. Enjoy the joy of baking and sharing this delightful cake with your loved ones!
Questions and Answers About This Recipe:
Q1: Can I make this cake ahead of time?
A: Yes, this cake is perfect for making ahead of time. In fact, chilling it overnight allows the flavors to meld together, resulting in a richer and more delicious dessert. Prepare the cake, add the pudding, and chill for at least 4 hours, or preferably overnight. Add the whipped topping and decorations just before serving.
Q2: What if I don’t have cheesecake flavored pudding mix?
A: If you can’t find cheesecake flavored pudding mix, you can substitute it with vanilla or white chocolate flavored instant pudding mix. The cake will still be delicious, though the flavor profile will be slightly different.
Q3: Can I use a homemade red velvet cake recipe instead of a boxed mix?
A: Absolutely! If you prefer to use a homemade red velvet cake recipe, go for it. Just make sure to bake the cake in a 9×13-inch pan and poke holes in it after baking, as directed in the recipe.
Q4: How should I store leftover cake?
A: Store any leftover cake in the refrigerator, covered tightly with plastic wrap or in an airtight container, for up to 3 days. This will help to keep the cake moist and fresh.
Q5: Can I add other toppings to the cake?
A: Of course! Feel free to get creative with the decorations and add other holiday-themed candies, chocolate shavings, chopped nuts, or a drizzle of melted white chocolate. The possibilities are endless, so personalize the cake to your liking.