Description of this recipe
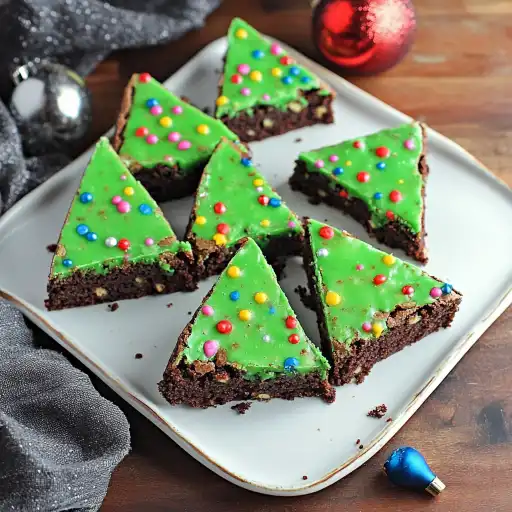
These festive Christmas Tree Cosmic Brownies are a delightful twist on a classic treat, perfect for holiday gatherings or a fun baking project with kids. Imagine biting into a rich, fudgy brownie transformed into a charming Christmas tree, complete with a luscious white chocolate “snow” frosting and colorful candy sprinkles. This recipe combines the ease of a boxed brownie mix with the creative flair of homemade decorations, making it accessible for bakers of all skill levels.
Why you will love this recipe
You’ll absolutely adore these Christmas Tree Cosmic Brownies because they’re not only incredibly delicious but also visually stunning. The combination of the dense, chocolatey brownie with the smooth, sweet white chocolate frosting is a match made in dessert heaven. The candy sprinkles add a playful touch, making these brownies a hit with both children and adults. Beyond the taste, these brownies are incredibly easy to make, perfect for when you need a quick and impressive dessert for a holiday party or a cozy night in. They’re also a fantastic way to get creative in the kitchen and spread some holiday cheer.
Ingredients:
- 13.25 ounces brownie mix (plus ingredients called for on the box, such as eggs, oil, and water)
- 1/3 cup plus 2 tablespoons heavy whipping cream
- 12 ounces white chocolate chips
- Green food coloring
- Candy coated mini chocolate chips
Preparation:
Step 1: Preheat your oven according to the brownie mix package directions, typically around 325-350°F (160-175°C). Precise oven temperature is crucial for ensuring the brownies bake evenly and have the desired fudgy texture. Make sure your oven rack is positioned in the center of the oven for consistent heat distribution.
Step 2: Prepare a 9×13-inch baking pan by lining it with parchment paper. This step is essential to prevent the brownies from sticking to the pan. Leave an overhang of parchment paper on all sides of the pan; this will act as handles, making it easy to lift the entire batch of brownies out of the pan once they’ve cooled. Ensure the parchment paper lies flat against the bottom and sides of the pan to create a smooth surface for the brownies.
Step 3: Prepare the brownie batter according to the instructions on the box. Generally, this involves combining the brownie mix with eggs, oil, and water. Mix the ingredients thoroughly but be careful not to overmix, as this can result in tough brownies. A few lumps in the batter are perfectly fine.
Step 4: Pour the brownie batter into the prepared baking pan and spread it evenly using a spatula. Make sure the batter reaches all corners of the pan for a consistent thickness. This ensures that all brownies bake uniformly, avoiding thin, overcooked edges and a thick, undercooked center.
Step 5: Bake the brownies according to the package directions, typically around 25-35 minutes. The exact baking time will depend on your oven and the specific brownie mix you’re using. To test for doneness, insert a toothpick into the center of the brownies. If it comes out with moist crumbs attached, the brownies are ready. Avoid overbaking, as this can dry out the brownies.
Step 6: Remove the brownies from the oven and let them cool completely in the pan. Cooling the brownies completely is crucial for achieving the right texture and preventing them from crumbling when cut. Allow at least 1-2 hours for the brownies to cool to room temperature. You can expedite this process by placing the pan in the refrigerator.
Step 7: While the brownies are cooling, prepare the white chocolate frosting. Pour the heavy cream into a medium microwave-safe bowl. Heat in the microwave on high for 60-90 seconds until hot but not boiling. Heating the cream to this temperature is essential for properly melting the white chocolate.
Step 8: Add the white chocolate chips to the hot heavy cream. Let the mixture sit for about a minute to allow the heat to soften the chocolate. Stir until the white chocolate is completely melted and the frosting is smooth and glossy. If the chocolate doesn’t melt completely, microwave in additional 10-second intervals, stirring after each interval, until smooth.
Step 9: Mix in green food coloring, a few drops at a time, until you reach your desired shade of green. Start with a small amount of food coloring and gradually add more, stirring well after each addition, to avoid over-coloring the frosting. The color intensity will deepen as the frosting cools, so aim for a slightly lighter shade than you ultimately want.
Step 10: Once the brownies have cooled completely, lift them out of the pan using the parchment paper overhang. Place the sheet of brownies on a cutting board.
Step 11: Pour the green frosting over the brownies and spread it out evenly with a spatula. Ensure the frosting covers the entire surface of the brownies for a uniform appearance.
Step 12: Sprinkle the candy-coated mini chocolate chips all over the top of the frosting. Get creative with your sprinkle placement, using different colors and patterns to resemble ornaments on a Christmas tree. Gently press the sprinkles into the frosting to ensure they adhere well.
Step 13: Place the pan of frosted brownies in the refrigerator to chill until the frosting is completely set, about 1 hour. Chilling the brownies allows the frosting to firm up, making them easier to cut and handle.
Step 14: Once the frosting is set, use a sharp knife to cut the sheet of brownies lengthwise across into three equal strips. Then, cut each strip into triangles to resemble Christmas trees. For best results, use a clean, sharp knife and wipe it clean between each cut to prevent the frosting from smearing.
COOKING Rating:
Easy
Serving Suggestions:
Serve these Christmas Tree Cosmic Brownies as a festive dessert at holiday parties, bake sales, or family gatherings. They pair perfectly with a glass of cold milk or a warm cup of hot chocolate. You can also add a scoop of vanilla ice cream for an extra special treat. Arrange the brownies on a decorative platter or in individual paper cups for an elegant presentation.
Tips:
- For extra fudgy brownies, reduce the baking time by a few minutes.
- To prevent the white chocolate from seizing, make sure the heavy cream is hot but not boiling when you add the chocolate chips.
- If you don’t have candy-coated mini chocolate chips, you can use other festive sprinkles or edible glitter to decorate the brownies.
- For a peppermint twist, add a few drops of peppermint extract to the white chocolate frosting.
Prep Time:
20 minutes
Cook Time:
30 minutes
Total Time:
1 hour 50 minutes (includes cooling and chilling time)
Nutritional Information:
(Note: Nutritional information is an estimate and can vary based on specific ingredients and serving sizes.)
Calories: Approximately 250-300 per brownie Protein: Approximately 3-4 grams per brownie Sodium: Approximately 100-150 mg per brownie
Conclusion
These Christmas Tree Cosmic Brownies are more than just a dessert; they’re a festive experience that brings joy to any occasion. With their rich, chocolatey base, creamy white chocolate frosting, and colorful candy sprinkles, these brownies are sure to be a crowd-pleaser. Whether you’re baking with family, hosting a holiday party, or simply craving a sweet treat, this recipe is a perfect way to spread some holiday cheer. Enjoy the process of creating these delightful Christmas Tree Cosmic Brownies, and savor every delicious bite.
Questions and Answers:
Q1: Can I use a different type of chocolate for the frosting? A: Absolutely! While this recipe calls for white chocolate chips, you can easily substitute milk chocolate, dark chocolate, or even flavored chocolate chips like peppermint or salted caramel. Just be sure to adjust the amount of food coloring accordingly to achieve your desired color. Keep in mind that different types of chocolate will have varying melting points, so monitor the melting process carefully to avoid burning.
Q2: What if I don’t have heavy whipping cream? Can I use something else? A: If you don’t have heavy whipping cream, you can substitute it with half-and-half or whole milk. However, keep in mind that these alternatives have a lower fat content, which may result in a slightly thinner frosting. You can also try using cream cheese for a tangier frosting. Soften the cream cheese before adding it to the melted white chocolate for a smooth consistency.
Q3: Can I make these brownies ahead of time? A: Yes, you can definitely make these brownies ahead of time! The unfrosted brownies can be stored in an airtight container at room temperature for up to 3 days or in the refrigerator for up to a week. You can also freeze the unfrosted brownies for up to 2 months. When you’re ready to serve, thaw the brownies completely and then frost and decorate them as directed. The frosted brownies are best stored in the refrigerator and consumed within 2-3 days.
Q4: How can I prevent the brownies from sticking to the pan if I don’t have parchment paper? A: If you don’t have parchment paper, you can grease and flour the baking pan thoroughly. Start by coating the pan with butter or cooking spray. Then, sprinkle a thin layer of flour over the greased surface, tapping the pan to distribute the flour evenly. Invert the pan and tap out any excess flour. This method will create a non-stick barrier that helps prevent the brownies from sticking to the pan.
Q5: Can I add nuts or other mix-ins to the brownie batter? A: Absolutely! Adding nuts, chocolate chips, or other mix-ins to the brownie batter is a great way to customize this recipe to your liking. You can add about 1/2 cup of chopped nuts (such as walnuts, pecans, or almonds) or chocolate chips to the batter before baking. You can also add other mix-ins like dried fruit, shredded coconut, or even crushed pretzels for a salty-sweet twist. Be sure to distribute the mix-ins evenly throughout the batter for the best results.