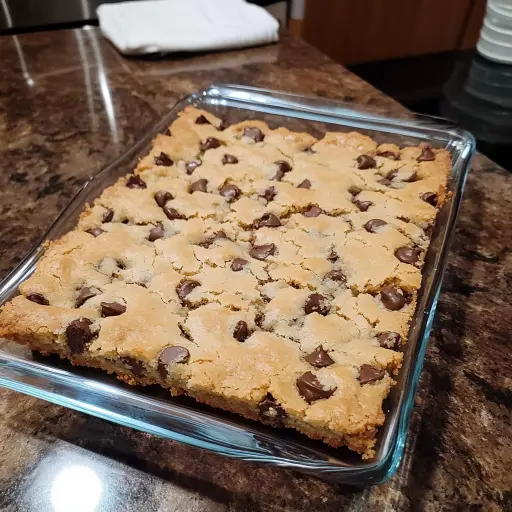
Description: These incredibly easy Cookie Bars are a shortcut to deliciousness! Using a yellow cake mix as the base, they come together in minutes and bake into a chewy, chocolate-studded treat that everyone will love. Perfect for last-minute gatherings, bake sales, or a simple sweet craving, these bars are guaranteed to disappear fast.
Ingredients:
- 1 box (15.25 oz) yellow cake mix
- 1/2 cup (1 stick) unsalted butter, melted
- 2 large eggs
- 1 teaspoon vanilla extract
- 1 bag (12 oz) semi-sweet chocolate chips (or your favorite flavor!)
Preparation:
Step 1: Preheat and Prepare: Begin by preheating your oven to 350°F (175°C). While the oven is heating, prepare your 9×13 inch baking dish. Generously spray the dish with non-stick cooking spray. Alternatively, you can line the dish with parchment paper, leaving an overhang on the sides. This makes removing the baked bars much easier and prevents sticking.
Step 2: Combine Wet Ingredients: In a large mixing bowl, combine the melted butter, eggs, and vanilla extract. It’s important that the butter is melted but not too hot, as this could start to cook the eggs. Whisk the ingredients together until they are well combined and the mixture appears smooth and slightly frothy. This ensures that the base of the bars is consistent and bakes evenly.
Step 3: Add Cake Mix: Pour the entire box of yellow cake mix into the bowl with the wet ingredients. Using a sturdy spatula or a hand mixer, gradually incorporate the cake mix into the wet ingredients. Be careful not to overmix at this stage. Mix until just combined, ensuring that there are no large lumps of dry cake mix remaining. The batter will be quite thick, which is perfectly normal for this recipe.
Step 4: Incorporate Chocolate Chips: Add the bag of chocolate chips to the batter. Use the spatula to gently fold the chocolate chips into the batter, distributing them evenly throughout. You can reserve a small handful of chocolate chips to sprinkle on top of the bars before baking if you want a more visually appealing finish.
Step 5: Spread and Bake: Transfer the thick batter into the prepared 9×13 inch baking dish. Use the spatula or your fingers to spread the batter evenly across the bottom of the dish. It may take a bit of effort to spread it evenly due to the thickness of the batter, but try to create a uniform layer for even baking. If you reserved any chocolate chips, sprinkle them on top of the batter now. Bake in the preheated oven for 20-25 minutes. The bars are done when the edges are golden brown and a toothpick inserted into the center comes out with moist crumbs attached.
COOKING Rating:
- Ease: Super Easy
- Taste: Delicious!
- Time: Quick
Why you will love this recipe
You’ll absolutely adore this Cookie Bar recipe for its incredible simplicity and unbeatable taste. The fact that it starts with a cake mix makes it ridiculously easy to throw together, even when you’re short on time or not a seasoned baker. The yellow cake mix creates a soft, chewy texture that’s reminiscent of a classic cookie but with a more substantial, bar-like feel. Plus, the generous amount of chocolate chips adds a burst of sweetness and melty goodness to every bite.
This recipe is also incredibly versatile! You can easily customize it with different types of chocolate chips (milk chocolate, dark chocolate, white chocolate, peanut butter chips – the possibilities are endless!), add nuts, sprinkles, or even swirl in some caramel or peanut butter for an extra layer of flavor. It’s a fantastic base recipe that you can adapt to suit your own preferences and dietary needs.
Another reason to love these cookie bars is their crowd-pleasing appeal. They’re perfect for parties, bake sales, potlucks, or just a simple weeknight dessert. Kids and adults alike will devour them, and you’ll be amazed at how quickly they disappear. Plus, they’re easy to transport, making them a great option for taking to gatherings.
Finally, these cookie bars are a budget-friendly dessert option. The ingredients are readily available and relatively inexpensive, especially when compared to making cookies from scratch. So, if you’re looking for a quick, easy, delicious, and affordable dessert that everyone will love, these Cookie Bars are the perfect choice!
Serving Suggestions:
- Warm with Ice Cream: Serve the cookie bars warm, topped with a scoop of vanilla ice cream and a drizzle of chocolate sauce for an extra indulgent dessert.
- With Milk: Enjoy a warm cookie bar with a tall glass of cold milk for a classic pairing.
- As a Snack: Cut the bars into smaller squares and pack them as a snack for school lunches or afternoon pick-me-ups.
- Decorated: Frost the cooled bars with your favorite frosting (chocolate, vanilla, cream cheese) and decorate with sprinkles for a festive treat.
- Brownie Sundae Style: Crumble the cookie bar into a bowl, add ice cream, whipped cream, nuts, and cherries to make a cookie bar sundae.
Tips:
- Don’t Overbake: Overbaking will result in dry, hard bars. Keep a close eye on them and remove them from the oven when the edges are golden brown and the center is set.
- Cool Completely Before Cutting: Allow the bars to cool completely in the pan before cutting them into squares. This will prevent them from crumbling and make them easier to handle.
- Variations: Experiment with different mix-ins! Add chopped nuts, dried fruit, or different types of chocolate chips to customize the recipe to your liking.
- Use Parchment Paper: Lining the baking dish with parchment paper makes it incredibly easy to remove the bars and prevents them from sticking.
- Storage: Store leftover cookie bars in an airtight container at room temperature for up to 3 days, or in the refrigerator for up to a week.
Prep Time: 5 minutes Cook Time: 20-25 minutes Total Time: 25-30 minutes
Nutritional Information: (Note: Nutritional information is approximate and will vary based on specific ingredients used.)
- Calories: Approximately 200-250 per bar
- Protein: Approximately 3-4 grams per bar
- Sodium: Approximately 150-200 mg per bar
Conclusion
These Cookie Bars are a testament to the idea that delicious desserts don’t have to be complicated. With just a handful of ingredients and minimal effort, you can create a treat that’s sure to satisfy your sweet tooth and impress your friends and family. Whether you’re a beginner baker or a seasoned pro, this recipe is a guaranteed success. So, go ahead and give it a try – you’ll be amazed at how easy and delicious it is!
Questions and Answers about this Recipe:
- Can I use a different size baking dish?
- Yes, you can use a different size baking dish, but it will affect the thickness of the bars and the baking time. If you use a smaller dish, the bars will be thicker and may require a longer baking time. If you use a larger dish, the bars will be thinner and may bake faster. Keep a close eye on them to prevent overbaking. For example, an 8×8 inch pan will result in thicker bars and may need an extra 5-10 minutes of baking.
- Can I make this recipe gluten-free?
- Yes, you can make this recipe gluten-free by using a gluten-free yellow cake mix. Be sure to check the label of the cake mix to ensure it is certified gluten-free. The rest of the ingredients should naturally be gluten-free.
- Can I freeze these cookie bars?
- Absolutely! These cookie bars freeze beautifully. Allow the bars to cool completely, then cut them into squares. Wrap them individually in plastic wrap or place them in a freezer-safe container. They can be stored in the freezer for up to 2-3 months. When ready to eat, thaw them at room temperature for about 30 minutes.
- Can I use a different type of chocolate chips?
- Definitely! This recipe is very versatile, and you can use any type of chocolate chips you prefer. Milk chocolate, dark chocolate, white chocolate, peanut butter chips, or even a combination of different types would work well. You can also add other mix-ins like chopped nuts, dried fruit, or sprinkles.
- What can I do if the batter is too thick to spread easily?
- If the batter is too thick to spread easily, try pressing it into the baking dish with your fingers or the back of a spoon. You can also lightly grease your hands or the spatula with cooking spray to prevent the batter from sticking. Another trick is to slightly warm the batter in the microwave for about 10-15 seconds to make it more pliable, but be careful not to melt the chocolate chips.