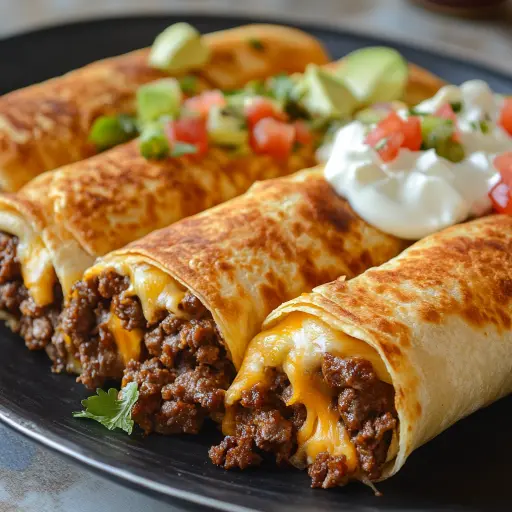
Description: These Crispy Beef and Cheese Chimichangas are a fiesta in every bite! Warm, flavorful ground beef seasoned to perfection is combined with a melty blend of cheddar and Monterey Jack cheese, all snugly wrapped in a large flour tortilla. Baked until golden brown and irresistibly crispy, these chimichangas are a guaranteed crowd-pleaser. Top them with your favorite fixings like sour cream, salsa, and fresh cilantro for a complete and satisfying meal. Perfect for a weeknight dinner, game day gathering, or any occasion that calls for delicious, handheld Tex-Mex goodness.
Ingredients:
- 1 lb ground beef (80/20 blend recommended for flavor)
- 1/2 cup onion, finely chopped (yellow or white onion works well)
- 2 cloves garlic, minced (freshly minced is best for flavor)
- 1 packet (approximately 1 ounce) taco seasoning (store-bought or homemade)
- 1/2 cup water (to help the taco seasoning meld with the beef)
- 1 cup shredded cheddar cheese (sharp cheddar adds a nice bite)
- 1 cup shredded Monterey Jack cheese (melts beautifully and adds creaminess)
- 6 large flour tortillas (10-12 inch diameter is ideal)
- 1/4 cup melted butter or vegetable oil (for brushing, butter adds flavor, oil adds crispness)
- Sour cream, salsa, and chopped cilantro for serving (optional but highly recommended)
Preparation:
Step 1: Preheat the oven to 400°F (200°C). This ensures the chimichangas cook evenly and get beautifully crispy. Line a baking sheet with parchment paper or lightly grease it. Parchment paper prevents sticking and makes cleanup a breeze, while greasing the pan directly also works well.
Step 2: In a large skillet over medium heat, cook the ground beef, onion, and garlic until the beef is browned and no longer pink. Break up the ground beef with a spatula as it cooks. The onion and garlic should become fragrant and translucent, adding a depth of flavor to the beef mixture.
Step 3: Drain any excess grease from the skillet after the beef is cooked. This is important for preventing soggy chimichangas and keeping the dish lighter. You can use a spoon or a grease separator for this step.
Step 4: Stir in the taco seasoning and water. Ensure the taco seasoning is evenly distributed throughout the beef mixture. The water helps the seasoning to meld with the beef and creates a flavorful sauce.
Step 5: Cook, stirring occasionally, for about 2-3 minutes, or until the mixture thickens slightly. This allows the flavors to meld together and the sauce to reduce, resulting in a more concentrated and flavorful filling. Remove from heat and let cool for a few minutes before adding the cheese. If the beef is too hot, it will melt the cheese prematurely.
Step 6: Mix the shredded cheddar and Monterey Jack cheeses into the beef mixture. Make sure the cheese is evenly distributed throughout the beef. This ensures every bite is cheesy and delicious. You can reserve a small amount of cheese to sprinkle on top of the chimichangas before baking for an extra cheesy touch.
Step 7: Warm the tortillas slightly to make them easier to fold. You can warm them in the microwave for a few seconds, in a dry skillet over low heat, or wrapped in a damp paper towel. This will prevent them from cracking when you fold them.
Step 8: Place about 1/2 cup of the beef and cheese mixture in the center of each tortilla. Avoid overfilling the tortillas, as this can make them difficult to fold and prone to bursting during baking.
Step 9: Fold in the sides of the tortilla towards the center, then roll up tightly like a burrito. Make sure the ends are tucked in securely to prevent the filling from escaping.
Step 10: Place the chimichangas seam-side down on the prepared baking sheet. This will help them stay closed during baking and prevent them from unraveling.
Step 11: Brush each chimichanga generously with melted butter or vegetable oil. This is crucial for achieving that golden brown, crispy exterior. Butter adds a richer flavor, while vegetable oil provides a more neutral taste and crispier texture.
Step 12: Bake for 20-25 minutes, turning once halfway through, until golden brown and crispy. Keep a close eye on the chimichangas during baking to prevent burning. The cooking time may vary depending on your oven.
Step 13: Serve hot with sour cream, salsa, and chopped cilantro. These toppings add a refreshing coolness and a burst of flavor that complements the richness of the chimichangas.
Why you will love this recipe:
This recipe is a winner for so many reasons! First and foremost, it’s incredibly easy to make. The straightforward instructions and readily available ingredients mean you can whip up a batch of these chimichangas even on the busiest weeknights.
The flavor is phenomenal. The seasoned ground beef, combined with the creamy blend of cheddar and Monterey Jack cheese, creates a symphony of savory goodness that’s hard to resist. The crispy baked exterior adds the perfect textural contrast, making each bite a delightful experience.
Furthermore, this recipe is highly customizable. You can easily adjust the ingredients to suit your taste preferences. Add some chopped jalapenos for a spicy kick, use different types of cheese, or experiment with different toppings. The possibilities are endless!
It’s also a great way to use up leftover ingredients. If you have some leftover cooked ground beef or shredded cheese, this is the perfect way to turn them into a delicious and satisfying meal.
Finally, these chimichangas are a guaranteed crowd-pleaser. Whether you’re hosting a party or simply feeding your family, everyone will love these crispy, cheesy, and flavorful treats. They’re perfect for game day gatherings, potlucks, or any occasion that calls for a delicious and easy-to-make meal.
Serving Suggestions:
- Serve with a side of Mexican rice and refried beans for a complete and satisfying meal.
- Top with guacamole, pico de gallo, or shredded lettuce for added flavor and texture.
- Offer a variety of hot sauces for those who like a little extra heat.
- Serve with a side of tortilla chips and queso for dipping.
- Make it a chimichanga bar! Set out all the toppings and let everyone customize their own.
- Pair with a refreshing margarita or a cold Mexican beer.
Tips:
- For extra crispy chimichangas, brush them with a mixture of melted butter and a pinch of garlic powder.
- To prevent the tortillas from cracking, warm them in a dry skillet over low heat until pliable.
- If you’re short on time, you can use pre-cooked ground beef.
- For a vegetarian option, substitute the ground beef with black beans or lentils.
- These chimichangas can be made ahead of time and stored in the refrigerator for up to 24 hours. Bake them just before serving.
- Leftovers can be stored in the refrigerator for up to 3 days. Reheat them in the oven or microwave until warmed through.
- Don’t overcrowd the baking sheet. Bake in batches if necessary to ensure even cooking and crisping.
- Consider adding other fillings like cooked rice, beans, or vegetables to add more substance and flavor.
- If the tortillas are tearing while you’re trying to roll them, try wrapping them in a damp paper towel and microwaving for 10-15 seconds to make them more pliable.
Prep Time: 15 minutes
Cook Time: 25 minutes
Total Time: 40 minutes
Nutritional Information: (Approximate values, may vary based on specific ingredients)
- Calories: 490 kcal
- Protein: 25g
- Sodium: 700mg
Conclusion:
These Crispy Beef and Cheese Chimichangas are a testament to the power of simple ingredients and straightforward cooking techniques. They’re a fun, flavorful, and customizable dish that’s sure to become a family favorite. Whether you’re looking for a quick weeknight dinner or a crowd-pleasing appetizer, these chimichangas are the perfect choice. So gather your ingredients, preheat your oven, and get ready to enjoy a taste of Tex-Mex heaven!
Questions and Answers About This Recipe:
Q1: Can I freeze these chimichangas?
A: Yes, you can absolutely freeze these chimichangas! To freeze them, assemble them according to the recipe instructions, but don’t bake them. Instead, place them on a baking sheet lined with parchment paper and freeze until solid. Once frozen, transfer them to a freezer-safe bag or container. When you’re ready to bake them, you can bake them directly from frozen, adding a few extra minutes to the cooking time. Be sure to brush them with melted butter or oil before baking for optimal crispiness.
Q2: What can I substitute for the taco seasoning?
A: If you don’t have taco seasoning on hand, you can easily make your own! A simple blend of chili powder, cumin, paprika, oregano, garlic powder, onion powder, and a pinch of salt and pepper will do the trick. You can adjust the proportions to suit your taste preferences. There are numerous homemade taco seasoning recipes available online if you’re looking for more detailed instructions.
Q3: Can I use different types of cheese?
A: Absolutely! Feel free to experiment with different types of cheese in this recipe. Pepper Jack cheese will add a spicy kick, while Oaxaca cheese will provide a stringy, melty texture. Other good options include Colby Jack, mozzarella, or even a blend of Mexican cheeses. Just be sure to choose cheeses that melt well.
Q4: How can I make these chimichangas healthier?
A: There are several ways to make these chimichangas healthier. You can use lean ground beef, or even substitute it with ground turkey or chicken. You can also reduce the amount of cheese or use a reduced-fat variety. Baking the chimichangas instead of frying them significantly reduces the fat content. Finally, loading up on healthy toppings like salsa, guacamole, and chopped vegetables will add nutrients and fiber.
Q5: What is the best way to reheat leftover chimichangas?
A: The best way to reheat leftover chimichangas is in the oven. Preheat your oven to 350°F (175°C) and place the chimichangas on a baking sheet lined with parchment paper. Bake for about 10-15 minutes, or until heated through and crispy. You can also reheat them in the microwave, but they won’t be as crispy. If you’re using the microwave, wrap them in a damp paper towel to prevent them from drying out. Air frying is another excellent option for reheating them and maintaining their crispy exterior.