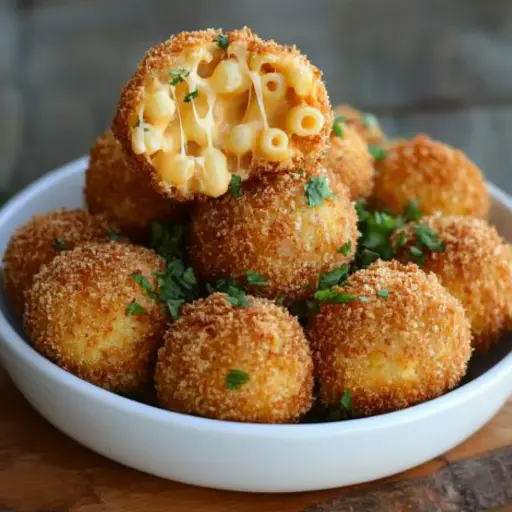
Description: Indulge in the ultimate comfort food with these crispy fried mac and cheese balls. These golden spheres of cheesy goodness are made with a creamy blend of cheddar and mozzarella, seasoned with garlic and paprika, and coated in a crunchy panko breadcrumb crust. Perfect as an appetizer, snack, or side dish, they’re sure to be a crowd-pleaser.
Ingredients:
- 3 cups cooked macaroni (elbow macaroni recommended)
- 2 tablespoons butter
- 2 tablespoons all-purpose flour
- 1 1/2 cups milk (whole milk or 2% milk)
- 2 cups shredded sharp cheddar cheese
- 1/2 cup shredded mozzarella cheese
- 1/2 teaspoon garlic powder
- 1/2 teaspoon paprika
- Salt and pepper to taste
- 1/4 cup grated Parmesan cheese
- 1 egg, beaten
- 1 cup all-purpose flour (for dredging)
- 2 cups breadcrumbs (panko for extra crunch)
- Vegetable oil, for deep frying
Preparation:
Step 1: Cook the Macaroni: Cook the macaroni according to package directions until al dente. Drain well and set aside. It’s essential that the macaroni is not overcooked, as this can make the mac and cheese mixture too soft, making it difficult to form into balls later.
Step 2: Make the Cheese Sauce: In a medium saucepan, melt the butter over medium heat. Once melted, whisk in the all-purpose flour and cook for 1–2 minutes, stirring constantly to form a roux. The roux is the base of the cheese sauce and helps to thicken it. Be careful not to burn the roux, as this will affect the flavor of the sauce.
Step 3: Add the Milk: Slowly pour in the milk, whisking constantly to prevent lumps from forming. Continue whisking until the mixture is smooth. Simmer for 3–4 minutes, stirring occasionally, until the sauce thickens slightly. The sauce should be thick enough to coat the back of a spoon.
Step 4: Melt the Cheese: Reduce the heat to low and stir in the shredded cheddar cheese, shredded mozzarella cheese, garlic powder, paprika, salt, and pepper. Mix until the cheese is fully melted and the sauce is smooth and creamy. Taste and adjust the seasonings as needed. For a richer flavor, you can use a combination of different cheeses, such as Gruyere or Monterey Jack.
Step 5: Combine Macaroni and Cheese Sauce: Add the cooked macaroni and grated Parmesan cheese to the cheese sauce. Mix well to ensure that the macaroni is evenly coated in the sauce. Let the mixture cool slightly, then transfer it to a bowl or container. Cover with plastic wrap, pressing the wrap directly onto the surface of the mac and cheese to prevent a skin from forming. Refrigerate for at least 1–2 hours, or preferably overnight, until the mixture is firm enough to handle.
Step 6: Form the Mac and Cheese Balls: Once the mac and cheese mixture is chilled and firm, scoop it into 1 1/2-inch balls using a spoon or ice cream scoop. Place the balls on a baking sheet lined with parchment paper. Freeze the mac and cheese balls for 30 minutes to make them easier to handle during the dredging process. Freezing helps the balls maintain their shape and prevents them from falling apart.
Step 7: Prepare the Breading Station: Set up a breading station with three shallow dishes. In the first dish, place the all-purpose flour. In the second dish, add the beaten egg. In the third dish, place the panko breadcrumbs.
Step 8: Dredge the Mac and Cheese Balls: Remove the mac and cheese balls from the freezer. Dredge each ball in the flour, shaking off any excess. Then, dip the ball in the beaten egg, allowing the excess to drip off. Finally, coat the ball in the panko breadcrumbs, pressing gently to ensure full coverage. The panko breadcrumbs will give the mac and cheese balls a crispy and golden crust.
Step 9: Fry the Mac and Cheese Balls: Heat vegetable oil in a deep fryer or heavy pot to 350°F (175°C). Carefully lower the mac and cheese balls into the hot oil in batches, being careful not to overcrowd the fryer. Fry for 2–3 minutes per batch, or until the balls are golden brown and crispy. Use a slotted spoon to remove the fried mac and cheese balls from the oil and place them on a plate lined with paper towels to drain excess oil.
Step 10: Serve: Serve the crispy fried mac and cheese balls hot with your favorite dipping sauce, such as marinara sauce, ranch dressing, or spicy ketchup. Garnish with chopped fresh parsley or a sprinkle of Parmesan cheese for an extra touch of flavor.
Why You Will Love This Recipe:
These crispy fried mac and cheese balls are a delightful twist on a classic comfort food. The combination of the creamy, cheesy interior and the crunchy, golden exterior is simply irresistible. They are easy to make, perfect for parties or gatherings, and can be customized with your favorite cheeses and seasonings. Plus, they’re a fun and unique way to enjoy mac and cheese!
Serving Suggestions:
- Serve as an appetizer with a variety of dipping sauces, such as marinara sauce, ranch dressing, spicy ketchup, or a creamy sriracha aioli.
- Serve as a side dish alongside grilled chicken, burgers, or sandwiches.
- Serve as a snack for game day or movie night.
- Arrange the mac and cheese balls on a platter and garnish with chopped fresh parsley or a sprinkle of Parmesan cheese for an elegant presentation.
Tips:
- Use high-quality cheeses for the best flavor. Sharp cheddar and mozzarella are a classic combination, but you can experiment with other cheeses, such as Gruyere, Monterey Jack, or pepper jack.
- Chill the mac and cheese mixture thoroughly before forming the balls. This will make them easier to handle and prevent them from falling apart.
- Freeze the mac and cheese balls for 30 minutes before dredging. This will help them maintain their shape during the frying process.
- Use panko breadcrumbs for the crispiest crust. Panko breadcrumbs are larger and lighter than regular breadcrumbs, resulting in a more satisfying crunch.
- Don’t overcrowd the fryer when frying the mac and cheese balls. Overcrowding will lower the oil temperature and result in greasy, soggy balls.
- Serve the mac and cheese balls immediately for the best flavor and texture.
Prep Time: 25 minutes (+chill time)
Cook Time: 10-15 minutes
Total Time: 35-40 minutes (+chill time)
Nutritional Information:
(Note: Nutritional information is approximate and may vary depending on specific ingredients and portion sizes.)
- Calories: Approximately 250-300 calories per serving (3-4 balls)
- Protein: Approximately 10-12 grams per serving
- Sodium: Approximately 300-400 mg per serving
Conclusion:
Crispy fried mac and cheese balls are a fun and delicious way to elevate a classic comfort food. With their creamy, cheesy interior and crunchy, golden exterior, they are sure to be a hit at any party or gathering. Whether you serve them as an appetizer, snack, or side dish, these irresistible bites will leave you craving more. So go ahead, give this recipe a try and experience the ultimate mac and cheese indulgence!
5 Questions and Answers About This Recipe:
Q1: Can I make these mac and cheese balls ahead of time? A: Yes, you can prepare the mac and cheese mixture and form the balls ahead of time. Store them in the refrigerator for up to 24 hours. You can also freeze the un-fried mac and cheese balls for up to 2-3 months. When ready to serve, thaw them in the refrigerator and proceed with the dredging and frying instructions.
Q2: Can I bake these mac and cheese balls instead of frying them? A: Yes, you can bake them for a healthier option. Preheat your oven to 400°F (200°C). Place the breaded mac and cheese balls on a baking sheet lined with parchment paper. Spray them with cooking spray and bake for 15-20 minutes, or until golden brown and heated through. Keep in mind that the baked version may not be as crispy as the fried version.
Q3: What dipping sauces go well with these mac and cheese balls? A: Marinara sauce, ranch dressing, spicy ketchup, creamy sriracha aioli, honey mustard, or any other dipping sauce you enjoy with mac and cheese.
Q4: Can I add any other ingredients to the mac and cheese mixture? A: Absolutely! You can customize the recipe with your favorite ingredients, such as cooked bacon, chopped jalapeños, sautéed mushrooms, or caramelized onions.
Q5: Can I use gluten-free breadcrumbs for this recipe? A: Yes, you can use gluten-free breadcrumbs as a substitute for panko breadcrumbs. Make sure to choose a gluten-free breadcrumb that is coarse and crunchy for the best texture.