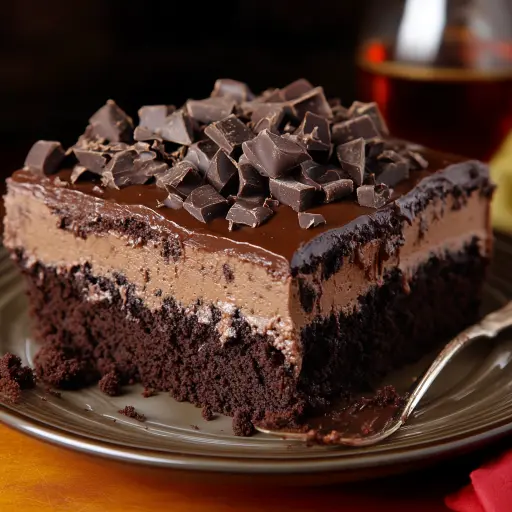
Description: This Death by Chocolate Poke Cake is a decadent and intensely chocolatey dessert that’s surprisingly easy to make. A moist chocolate cake is soaked with sweetened condensed milk and hot fudge, then topped with creamy chocolate pudding and whipped topping, finished with a sprinkle of chocolate shavings. It’s a guaranteed crowd-pleaser and a perfect treat for chocolate lovers of all ages.
Ingredients:
- 1 box chocolate cake mix (and ingredients called for on the box: usually water, eggs, and oil)
- 1 can (14 oz) sweetened condensed milk
- 1 jar (12 oz) hot fudge sauce
- 1 package (3.9 oz) instant chocolate pudding mix
- 2 cups cold milk
- 1 container (8 oz) frozen whipped topping, thawed
- Chocolate shavings or mini chocolate chips for garnish
Preparation:
Step 1: Preheat the oven to the temperature specified on the cake mix box. Usually, this is around 350°F (175°C), but always double-check the box instructions for the most accurate temperature and baking time for your specific cake mix brand. It’s crucial to have the oven at the correct temperature to ensure the cake bakes evenly and rises properly.
Step 2: Grease a 9×13 inch baking dish thoroughly. You can use butter, shortening, or cooking spray. Make sure to get into all the corners and edges of the dish. You can also line the bottom of the dish with parchment paper, leaving an overhang on the sides, which will make it easier to lift the cake out later if desired. This helps prevent the cake from sticking and makes serving much simpler.
Step 3: Prepare the chocolate cake mix according to the package instructions. Generally, this involves combining the cake mix with water, eggs, and oil. Use an electric mixer to beat the ingredients together until well combined and smooth. Be careful not to overmix, as this can lead to a tough cake. Follow the mixing time specified on the box for best results. Ensure there are no lumps and that the batter is evenly distributed.
Step 4: Pour the batter into the prepared baking dish, spreading it evenly. Use a spatula to ensure the batter reaches all corners of the dish. Gently tap the baking dish on the counter a few times to release any trapped air bubbles, which can help create a more uniform cake texture.
Step 5: Bake as directed on the cake mix box, or until a toothpick inserted into the center comes out clean. Baking times can vary depending on your oven, so start checking the cake a few minutes before the recommended baking time. Insert a toothpick into the center of the cake; if it comes out clean or with just a few moist crumbs attached, the cake is done. If the toothpick comes out with wet batter, continue baking for a few more minutes and check again. Avoid opening the oven door too frequently during baking, as this can cause the cake to collapse.
Step 6: Once the cake is baked and still warm (but not hot), use the back of a wooden spoon to poke holes all over the top of the cake. Make the holes about 1 inch apart and go about halfway down into the cake. These holes will allow the sweetened condensed milk and hot fudge to soak into the cake, making it incredibly moist and flavorful. Be generous with the holes; the more holes you create, the more delicious the cake will be.
Step 7: Warm the hot fudge sauce slightly to make it pourable (but not too hot). You can do this in the microwave for short intervals (15-20 seconds) or on the stovetop over low heat. Stir frequently to prevent burning. The goal is to thin the sauce so it’s easier to pour and soak into the cake. Avoid overheating the sauce, as it can become too thin and lose its rich flavor.
Step 8: Pour the warmed hot fudge sauce over the cake, making sure it gets into the holes. Distribute the sauce evenly across the surface of the cake, ensuring that it fills each of the holes you created. The hot fudge sauce will seep into the cake, adding a layer of intense chocolate flavor and moisture.
Step 9: In a bowl, whisk together the instant chocolate pudding mix and cold milk until well combined and smooth. Whisk until the pudding starts to thicken slightly, but before it fully sets. Follow the instructions on the pudding mix packaging for the correct ratio of pudding mix to milk.
Step 10: Before the pudding sets, pour it over the cake and spread evenly, filling the holes. This layer of creamy chocolate pudding adds another dimension of flavor and texture to the cake. Spread the pudding carefully to ensure it fills all the holes and covers the entire surface of the cake.
Step 11: Place the cake in the refrigerator to cool completely and let the pudding set, about 1 hour (or longer). This allows the cake to fully absorb the flavors and for the pudding to set properly, creating a cohesive and delicious dessert. Cooling the cake also makes it easier to spread the whipped topping evenly.
Step 12: Once cooled, spread the thawed whipped topping over the cake, creating a smooth and even layer. Use a spatula or offset spatula to spread the whipped topping evenly across the surface of the cake.
Step 13: Garnish with chocolate shavings or mini chocolate chips. These add a final touch of elegance and enhance the chocolate flavor of the cake. You can use a vegetable peeler to create chocolate shavings from a chocolate bar, or simply sprinkle mini chocolate chips over the top.
Step 14: Keep the cake refrigerated until ready to serve. This will help maintain its texture and prevent the whipped topping from melting.
Why you will love this recipe:
This Death by Chocolate Poke Cake is a chocolate lover’s dream come true! It’s incredibly moist, thanks to the sweetened condensed milk and hot fudge soaking into the cake. The combination of chocolate cake, hot fudge, chocolate pudding, and whipped topping creates a symphony of flavors and textures that will tantalize your taste buds. It’s also surprisingly easy to make, using a boxed cake mix and instant pudding mix, making it a perfect dessert for busy weeknights or special occasions. The poke cake method ensures that every bite is bursting with chocolatey goodness, making it a guaranteed crowd-pleaser. It’s easily customizable with different toppings, and the layered approach creates a beautiful presentation.
Serving Suggestions:
- Serve chilled for the best flavor and texture.
- Cut into squares or slices and serve with a scoop of vanilla ice cream or a dollop of extra whipped cream for an even more decadent treat.
- Pair with a glass of cold milk, hot coffee, or a dessert wine.
- For a more elegant presentation, dust with cocoa powder or add fresh berries as a garnish.
- This cake is also perfect for potlucks, parties, and other gatherings.
Tips:
- For a richer flavor, use a dark chocolate cake mix.
- You can substitute the hot fudge sauce with caramel sauce or butterscotch sauce for a different flavor profile.
- If you don’t have sweetened condensed milk, you can use evaporated milk mixed with sugar.
- To prevent the whipped topping from melting, keep the cake refrigerated until ready to serve.
- You can add chopped nuts, such as pecans or walnuts, for added texture and flavor.
- Consider adding a layer of crushed Oreo cookies between the pudding and whipped topping for an extra indulgent twist.
Prep Time: 20 minutes Cook Time: 30-35 minutes (for the cake) Total Time: 1 hour 50 minutes (including cooling time)
Nutritional Information: (approximate, per serving) This is an estimate and can vary based on specific ingredients and portion size.
- Calories: 450-550
- Protein: 5-7g
- Sodium: 250-350mg
Conclusion:
The Death by Chocolate Poke Cake is a foolproof recipe that delivers maximum chocolate flavor with minimal effort. It’s a delightful dessert that’s perfect for any occasion, from casual family dinners to celebratory gatherings. Its moist texture, rich chocolate flavor, and creamy toppings make it an irresistible treat that everyone will love. So, go ahead and indulge in this ultimate chocolate dream – you won’t be disappointed! The combination of convenience and incredible taste makes it a go-to recipe for anyone looking to impress without spending hours in the kitchen.
Questions and Answers:
- Q: Can I use a different type of cake mix?
- A: Absolutely! While the recipe calls for a chocolate cake mix for the ultimate chocolate experience, you can definitely experiment with other flavors like vanilla, devil’s food, or even red velvet. Just remember that the overall flavor profile will change accordingly. For example, a vanilla cake mix would create a less intensely chocolatey but still delicious dessert, especially if paired with chocolate pudding and fudge.
- Q: Can I make this cake ahead of time?
- A: Yes, this cake is actually better when made ahead of time! The flavors meld together beautifully as it sits in the refrigerator. You can prepare the entire cake, including the whipped topping and garnish, up to 24 hours in advance. Just make sure to store it covered in the refrigerator to prevent it from drying out or absorbing any off-flavors.
- Q: What if I don’t have sweetened condensed milk?
- A: While sweetened condensed milk contributes significantly to the cake’s moistness and sweetness, you can try a substitute in a pinch. One option is to use evaporated milk and add some sugar (about 1/2 cup) to it. Stir well until the sugar is dissolved. However, the texture and flavor might be slightly different. Another alternative is to use a homemade caramel sauce thinned with a bit of milk or cream.
- Q: Can I freeze this poke cake?
- A: While technically you can freeze this poke cake, it’s not highly recommended due to the whipped topping. The whipped topping may become icy or separate upon thawing, affecting the texture. If you do decide to freeze it, do so before adding the whipped topping. Wrap the cake tightly in plastic wrap and then in aluminum foil. When ready to serve, thaw it in the refrigerator and then add the whipped topping and garnish.
- Q: Can I make this recipe gluten-free?
- A: Yes, you can make this recipe gluten-free by using a gluten-free chocolate cake mix and ensuring that the instant chocolate pudding mix is also gluten-free. Many brands offer gluten-free cake mixes and pudding options, so be sure to check the labels carefully. The rest of the ingredients are naturally gluten-free, so with those substitutions, you can enjoy a gluten-free version of this delicious poke cake.