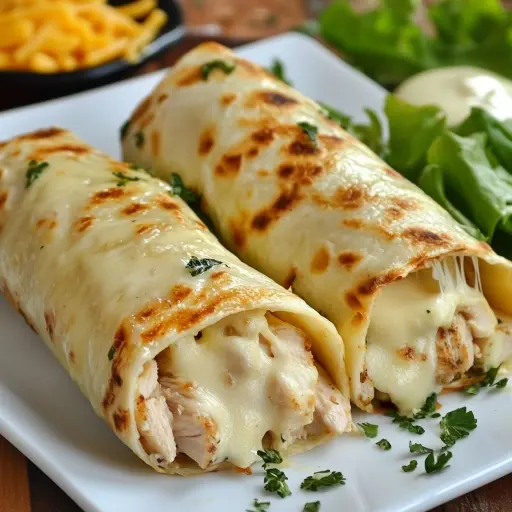
Description: Golden, buttery, and crispy, these cheesy garlic chicken wraps are incredibly flavorful and satisfying. This recipe is perfect for a quick lunch, a satisfying dinner, or even a late-night snack. Combining juicy, seasoned chicken with a blend of melted cheeses and aromatic garlic butter, these wraps are sure to become a family favorite. The recipe is designed to be straightforward and customizable, allowing you to adapt it to your specific tastes and dietary needs. We’ll cover everything from ingredient selection to serving suggestions, ensuring your wraps turn out perfect every time.
Ingredients:
For the Wraps:
- 3.5 cups cooked chicken breast, shredded or diced. Using pre-cooked chicken can save time, or you can cook your own by baking, boiling, or grilling. Opt for boneless, skinless chicken breasts for the easiest preparation.
- 1 cup shredded mozzarella cheese. Mozzarella offers a mild, creamy flavor and melts beautifully, providing a delicious cheese pull.
- 1/2 cup shredded cheddar cheese. Cheddar adds a sharper, more robust flavor that complements the mozzarella and chicken. Feel free to use a mild, medium, or sharp cheddar based on your preference.
- 1/4 cup cream cheese, softened. Softened cream cheese helps bind the filling together, adding a rich and creamy texture. Make sure it is adequately softened to avoid lumps in the mixture.
- 2 tablespoons chopped fresh parsley. Fresh parsley adds a bright, herbaceous note and a pop of color. If fresh parsley isn’t available, you can substitute with 2 teaspoons of dried parsley.
- 1 teaspoon garlic powder. Garlic powder provides a concentrated garlic flavor throughout the filling. You can also use 2-3 cloves of minced fresh garlic if you prefer a stronger garlic taste.
- Salt & black pepper to taste. Seasoning is crucial to bring out the flavors of the ingredients. Adjust the salt and pepper to your liking, tasting the filling before assembling the wraps.
- 4 large flour tortillas. Large flour tortillas are ideal for wrapping and holding the filling. You can use regular or whole wheat tortillas, depending on your dietary preferences.
For the Garlic Butter:
- 4 tablespoons unsalted butter, melted. Unsalted butter allows you to control the saltiness of the garlic butter. If using salted butter, you may need to reduce or omit the additional salt.
- 2 cloves garlic, minced. Freshly minced garlic provides the best flavor for the garlic butter. Use a garlic press or finely chop the garlic for even distribution.
- 1 tablespoon chopped fresh parsley. Like in the filling, fresh parsley adds a bright, herbal note to the garlic butter.
Preparation:
Step 1: Prepare the Chicken
Start by ensuring your chicken is fully cooked and either shredded or diced. If you’re cooking the chicken from scratch, you can bake it at 375°F (190°C) for about 20-25 minutes, boil it until cooked through, or grill it for a smoky flavor. Let the chicken cool slightly before shredding or dicing to make it easier to handle. Proper chicken preparation is crucial for preventing dryness and ensuring even flavor distribution.
Step 2: Soften the Cream Cheese
Take the cream cheese out of the refrigerator at least 30 minutes before you start preparing the recipe. Softened cream cheese blends much more smoothly into the filling, creating a creamy texture without lumps. If you’re short on time, you can microwave it for 10-15 seconds, but be careful not to melt it.
Step 3: Chop the Parsley
Finely chop the fresh parsley. This herb adds a burst of freshness to both the filling and the garlic butter. Rinse the parsley under cold water and pat it dry before chopping to prevent it from becoming soggy.
Instructions:
Step 1: Prepare the Filling
In a large bowl, combine the shredded or diced cooked chicken, shredded mozzarella cheese, shredded cheddar cheese, softened cream cheese, chopped parsley, and garlic powder. Season with salt and black pepper to taste. Mix all the ingredients thoroughly until they are well combined and the cream cheese is evenly distributed. Tasting the filling at this stage allows you to adjust the seasonings to your liking, ensuring the flavors are balanced.
Step 2: Assemble the Wraps
Lay the flour tortillas flat on a clean surface. Spoon an even amount of the chicken filling onto each tortilla, leaving about an inch of space around the edges. This prevents the filling from spilling out when you fold the wrap. Fold in the sides of each tortilla towards the center and then tightly roll the tortilla from the bottom up, like a burrito. Ensure the wraps are snug to hold the filling in place.
Step 3: Make the Garlic Butter
In a small bowl, melt the unsalted butter. You can melt it in the microwave in 20-second intervals or in a small saucepan over low heat. Add the minced garlic and chopped parsley to the melted butter and stir well to combine. The garlic butter adds a rich, aromatic layer of flavor to the wraps as they cook.
Step 4: Cook the Wraps
Heat a non-stick skillet or griddle over medium heat. Brush each wrap generously with the garlic butter on both sides. Place the wraps seam-side down in the skillet to help seal them. Cook the wraps for about 3-4 minutes per side, or until they are golden brown and crispy and the cheese is melted and gooey inside. Use a spatula to gently press down on the wraps while they are cooking to ensure even browning.
Step 5: Serve
Once the wraps are golden brown and crispy, remove them from the skillet and let them cool slightly. Slice each wrap in half diagonally and serve hot. These cheesy garlic chicken wraps are delicious on their own or with your favorite dipping sauce, such as ranch dressing, sour cream, or salsa. They also pair well with a side of fresh salad or coleslaw.
Why you will love this recipe:
This recipe is a winner for several reasons. First, it’s incredibly versatile. You can easily swap out the chicken for other proteins like turkey or shredded pork. The cheese blend can also be adjusted to your liking – try adding some pepper jack for a bit of spice or Monterey Jack for extra creaminess. Second, it’s quick and easy to make, perfect for busy weeknights. Using pre-cooked chicken significantly cuts down on prep time. Third, these wraps are incredibly satisfying, combining the comforting flavors of cheesy garlic bread with the heartiness of a chicken filling. The combination of textures – crispy tortilla, gooey cheese, and tender chicken – makes each bite a delight. Finally, they’re a hit with both kids and adults, making them a great option for family meals or gatherings.
Serving Suggestions:
- Serve with a side of ranch dressing, sour cream, or salsa for dipping.
- Pair with a fresh salad or coleslaw for a balanced meal.
- Serve alongside a bowl of tomato soup for a comforting lunch or dinner.
- Cut into smaller pieces and serve as appetizers for a party.
- Add a side of roasted vegetables for a healthier option.
Tips:
- Use pre-cooked chicken to save time. Rotisserie chicken works perfectly.
- Ensure the cream cheese is fully softened for a smoother filling.
- Don’t overfill the wraps to prevent them from tearing.
- Brush the wraps generously with garlic butter for maximum flavor.
- Cook the wraps seam-side down first to help seal them.
- Adjust the amount of garlic and parsley to your preference.
- For a spicier kick, add a pinch of red pepper flakes to the filling.
- If you don’t have a skillet, you can bake the wraps in the oven at 375°F (190°C) for about 10-15 minutes, or until golden brown.
- To make these wraps ahead of time, assemble them and store them in the refrigerator. Cook them just before serving.
Prep Time: 15 minutes Cook Time: 10 minutes Total Time: 25 minutes
Nutritional Information:
(Note: Nutritional information is approximate and can vary based on specific ingredients and portion sizes.)
- Calories: Approximately 450-550 per wrap
- Protein: 35-45 grams
- Sodium: 500-700 mg
Conclusion:
These Cheesy Garlic Chicken Wraps are a crowd-pleasing recipe that combines convenience with deliciousness. They are perfect for busy weeknights, quick lunches, or even party appetizers. The customizable nature of the recipe allows you to tailor it to your taste preferences, making it a versatile addition to your culinary repertoire. Whether you’re a seasoned cook or a beginner, this recipe is sure to become a staple in your kitchen. Enjoy the golden, buttery, cheesy goodness of these wraps!
Questions and Answers about this recipe:
- Can I use different types of cheese?
- Absolutely! Feel free to experiment with different cheeses based on your preferences. Pepper jack, Monterey Jack, provolone, or even a sprinkle of Parmesan can add unique flavors. Just make sure the cheese melts well for the best results.
- What can I use instead of chicken?
- You can easily substitute the chicken with other proteins such as shredded turkey, pulled pork, or even vegetarian options like black beans or seasoned tofu. Adjust the seasoning to complement the protein of your choice.
- How can I make these wraps healthier?
- To make these wraps healthier, use whole wheat tortillas, reduce the amount of cheese, and opt for lean chicken breast. You can also add more vegetables to the filling, such as diced bell peppers, onions, or spinach. Additionally, consider using olive oil instead of butter for the garlic butter.
- Can I prepare these wraps in advance?
- Yes, you can assemble the wraps ahead of time and store them in the refrigerator for up to 24 hours. Cook them just before serving to ensure the tortillas don’t get soggy. Brush with garlic butter right before cooking for the best flavor.
- What dipping sauces go well with these wraps?
- These wraps pair well with a variety of dipping sauces. Ranch dressing, sour cream, salsa, guacamole, or a creamy garlic aioli are all great options. Choose your favorite or offer a selection for your guests to choose from.