Description of this recipe: This recipe elevates the classic hot cross bun with the tangy depth of flavor that only sourdough can provide. Forget overly sweet, commercially yeasted versions; these buns are rich, aromatic, and beautifully balanced, boasting a subtle sourdough tang that complements the traditional spices and dried fruit perfectly.
Why you will love this recipe: These sourdough hot cross buns are a delightful departure from the norm. The naturally leavened dough creates a wonderfully soft and slightly chewy texture, a world away from the often-dry texture of commercially produced buns. The long fermentation process not only enhances flavor but also makes the dough easier to digest. The aroma of warm spices mingling with the subtle tang of sourdough will fill your kitchen, creating a comforting and inviting atmosphere. Plus, the satisfaction of baking your own bread, particularly a bread as special as this, is truly rewarding.
Introduction:
Hot cross buns are a cherished Easter tradition, and this sourdough version brings a new level of sophistication to this classic treat. The inclusion of sourdough starter introduces a complex flavor profile that enhances the traditional spices and dried fruit. This recipe provides a step-by-step guide to creating these delectable buns, from nurturing your sourdough starter to baking them to golden perfection. While it does require a bit of patience due to the sourdough’s slower rise time, the end result is well worth the effort. Get ready to impress your family and friends with these homemade sourdough hot cross buns, a testament to your baking skills and a truly special treat for the holiday season. They’re perfect for breakfast, brunch, or an afternoon snack, especially when served warm with a generous slather of butter.
Ingredients:
- 300g active sourdough starter (see recipe, below)
- 2 large eggs, beaten
- 200ml milk
- 500g strong white bread flour, plus extra for dusting
- 60g golden caster sugar
- 1 tsp ground cinnamon
- 1 tsp mixed spice
- 1 orange, zested
- 150g raisins, or a mixture of small dried fruits (such as raisins, mixed peel and cranberries)
- 100g unsalted butter, softened
- 1 tsp salt
Preparation:
Step 1: Activating the Sourdough Starter
The success of these buns hinges on a vibrant and active sourdough starter. Before embarking on this recipe, ensure your starter is bubbling and ready to work its magic. A simple float test can confirm its readiness: drop a teaspoon of starter into a glass of warm water. If it floats, it’s ready to go! If it sinks, feed it and wait until it doubles in size and passes the float test. Ideally, feed your starter about 4-6 hours before starting this recipe, depending on the temperature of your kitchen. A warmer environment will accelerate the fermentation process. Using a scale for precise measurements is crucial for consistent results in sourdough baking.
Step 2: Combining the Initial Ingredients
In a large bowl, combine 200g of your active sourdough starter with all but 2 tablespoons of the beaten egg, the milk, strong white bread flour, golden caster sugar, ground cinnamon, mixed spice, orange zest, and your chosen dried fruits. Mix everything thoroughly using your hands or a stand mixer fitted with a dough hook until a shaggy dough forms. It’s okay if it looks a little rough at this stage; the key is to ensure all the flour is incorporated. This initial mix is called the autolyse, which allows the flour to fully hydrate, resulting in a more tender and extensible dough.
Step 3: First Proofing – The Autolyse Stage
Cover the bowl with a clean, damp tea towel or plastic wrap and let the dough rest for 30 minutes at room temperature. This resting period, known as the autolyse, is essential for gluten development. Meanwhile, cover the remaining sourdough starter and refrigerate it for later use.
Step 4: Incorporating Butter and Salt & Second Proof
After the 30-minute rest, add the softened unsalted butter and salt to the dough. Using your hands or the dough hook of a stand mixer, gradually work the butter and salt into the dough. This process can be a little messy, but be patient and continue squashing and kneading until the butter is fully incorporated and the dough becomes smoother and more elastic. Once the butter is fully combined, gently knead the dough on a lightly floured surface for about 5 minutes until it forms a smooth and springy ball. Return the dough to the bowl, cover it tightly, and place it in a slightly warm location for its bulk fermentation. This bulk fermentation can take 3-4 hours, or even longer depending on your starter’s activity and the room temperature. You’re looking for the dough to almost double in size.
Step 5: Shaping and Second Proof
Once the dough has almost doubled, gently tip it onto a lightly floured work surface. Knead it briefly to release any large air pockets, then divide it into 12 equal pieces, weighing approximately 100g each. Roll each piece into a smooth ball. Arrange the dough balls on a baking tray lined with parchment paper, leaving some space between them to allow for expansion during the final proof. Cover the tray with a clean, damp tea towel and let the buns proof at room temperature for another 2-3 hours, or chill them overnight in the refrigerator. Chilling the buns overnight can enhance their flavor and result in a neater shape.
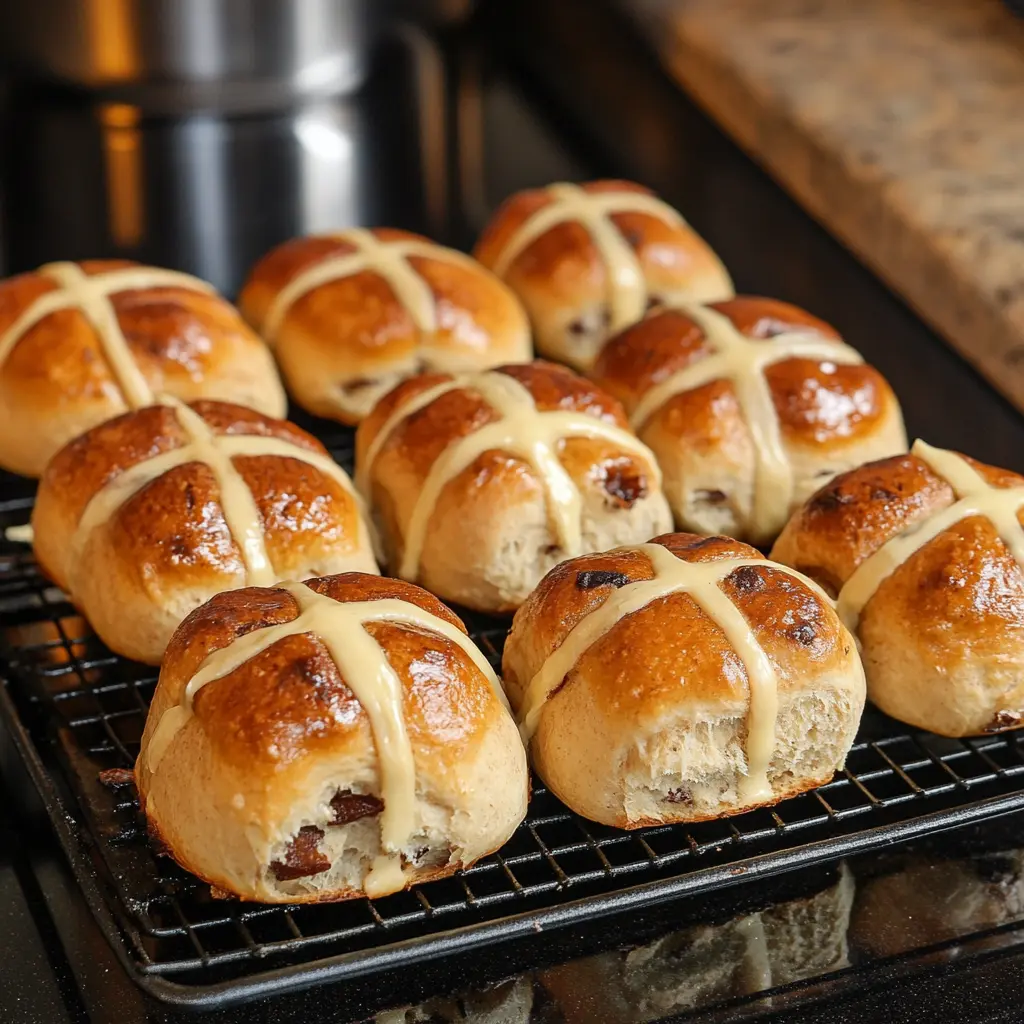
Step 6: Baking and Crosses
If you chilled the buns overnight, remove them from the refrigerator about 1 hour before baking to allow them to warm up slightly. Preheat your oven to 200°C (180°C fan/gas mark 6). Brush the buns with the reserved beaten egg to give them a beautiful golden sheen. Transfer the remaining sourdough starter into a piping bag fitted with a small nozzle. Pipe crosses on top of each bun. Bake the buns in the preheated oven for 20-25 minutes, or until they are light golden brown and sound hollow when tapped on the bottom.
Step 7: Cooling and Serving
Remove the baked buns from the oven and let them cool slightly on the baking tray before transferring them to a wire rack to cool completely. Serve the buns warm or at room temperature, ideally on the day they are baked.
COOKING Rating:
Intermediate
Serving Suggestions:
- Serve warm with butter, clotted cream, or a drizzle of honey.
- Toast and top with your favorite jam or marmalade.
- Enjoy them with a cup of tea or coffee for a delightful afternoon snack.
- Make a hot cross bun bread pudding for a decadent dessert.
Tips:
- For a richer flavor, use brown butter instead of regular softened butter.
- Add chopped candied orange peel for an extra burst of citrus flavor.
- If you don’t have mixed spice, you can use a combination of allspice, nutmeg, and cloves.
- To ensure even baking, rotate the baking tray halfway through the baking time.
- Store leftover buns in an airtight container at room temperature for up to two days.
- To freshen up the buns, wrap the buns in foil, and put in a preheated oven for a few minutes until heated
- For a shiny look, apply a glaze or honey
Prep Time:
45 minutes (plus sourdough starter preparation)
Cook Time:
20-25 minutes
Total Time:
6-8 hours (including proving time)
Nutritional Information:
(Approximate, per bun)
Calories: 350 kcal Protein: 8g Sodium: 250mg
Conclusion:
These sourdough hot cross buns are a truly special treat that combines the comforting flavors of a classic recipe with the unique tang of sourdough. The long fermentation process creates a wonderfully soft and flavorful bun that is sure to impress your family and friends. So, roll up your sleeves, fire up your sourdough starter, and embark on this rewarding baking adventure. The aroma of warm spices and the satisfaction of creating these homemade sourdough hot cross buns will make your Easter celebration even more memorable. Enjoy!
Questions and Answers:
- Can I use a different type of flour? While strong white bread flour is recommended for its high gluten content, which is essential for creating a good structure, you could experiment with a portion of whole wheat flour. However, be aware that this will result in a denser bun. Start by substituting no more than 20% of the white flour with whole wheat flour.
- What if my sourdough starter isn’t very active? If your starter isn’t particularly bubbly, give it a few extra feedings over 12-24 hours to build up its strength. Make sure to feed it regularly and keep it in a warm environment. A healthy starter is crucial for a good rise.
- Can I freeze these buns? Yes, you can freeze the baked buns. Allow them to cool completely before wrapping them individually in plastic wrap and then placing them in a freezer-safe bag or container. They can be frozen for up to 2 months. To thaw, simply remove them from the freezer and let them thaw at room temperature for a few hours. You can then warm them up in the oven for a few minutes to refresh their texture.
- What can I use instead of the piping bag for the crosses? If you don’t have a piping bag, you can use a ziplock bag with a small corner snipped off. Alternatively, you can make a simple flour paste by mixing a tablespoon of flour with a little bit of water until you have a thick, pipeable consistency.
- Can I add other fruits or nuts to these buns? Absolutely! Feel free to customize the recipe with your favorite dried fruits and nuts. Some delicious additions include chopped dried apricots, cranberries, candied ginger, pecans, or walnuts. Just be sure to adjust the total amount of dried ingredients to maintain the dough’s consistency.